
 Continue with onX Maps
 Sign in with Facebook


Bleed Between the Lines

5.9 YDS 5c French 17 Ewbanks VI UIAA 17 ZA HVS 5a British PG13
 Avg: 3 from 2
votes
Avg: 3 from 2
votes
Routes in 6. The Tower Wall
|
|
Any Which Way But Down/Ex-traction T,TR 5.8 5b 16 VI- 15 HVS 4c PG13 |

|
Arrowhead T,TR 5.10a 6a 18 VI+ 18 E1 5a |
|
|
Back to the Gym T,TR 5.7 5a 15 V+ 13 MVS 4b |
|
|
Back to the Wall T,TR 5.8 5b 16 VI- 15 HVS 4c PG13 |
|
|
Bleed Between the Lines T 5.9 5c 17 VI 17 HVS 5a PG13 |
|
|
Crefeld Crank TR 5.11a 6c 22 VII+ 22 E3 5c |
|
|
Dead Tree Dihedral T,TR 5.7 5a 15 V+ 13 MVS 4b |
|
|
Ex-traction Slab TR 5.7+ 5a 15 V+ 13 MVS 4b |
|
|
In & Out T,TR 5.4 4a 12 IV 10 VD 3c |
|
|
Johnson Route T,TR 5.7+ 5a 15 V+ 13 MVS 4b |
|
|
Manticore Dihedral T,TR 5.8- 5b 16 VI- 14 VS 4c |
|
|
Manticore Face T 5.9 5c 17 VI 17 HVS 5a |
|
|
Manticore Upper Arete T,TR 5.3 3+ 10 III 9 VD 3a |
|
|
No Rest for the Wicked T,TR 5.9+ 5c 17 VI 17 E1 5a |
|
|
Ogre Arete T,TR 5.9 5c 17 VI 17 HVS 5a |
|
|
Rachel's Crack T,TR 5.8- 5b 16 VI- 14 VS 4c |
|
|
Red Knob, The T,TR 5.7+ 5a 15 V+ 13 MVS 4b |
|
|
Rock Romancer TR 5.11b 6c 23 VIII- 23 E3 5c |
|
|
Rossinator, The TR 5.11a 6c 22 VII+ 22 E3 5c |
|
|
Tower Wall Direct T,TR 5.9+ 5c 17 VI 17 E1 5a PG13 |
|
|
Unrest of the Witches TR 5.10d 6b+ 21 VII+ 21 E3 5b |
| Type: | Trad, 140 ft (42 m), 2 pitches |
| GPS: | 41.145, -74.1653 |
| FA: | Frank Bochanski & Zach Hyer |
| Page Views: | 575 total · 11/month |
| Shared By: | Frank Black on Sep 14, 2021 |
| Admins: | Morgan Patterson, SMarsh |

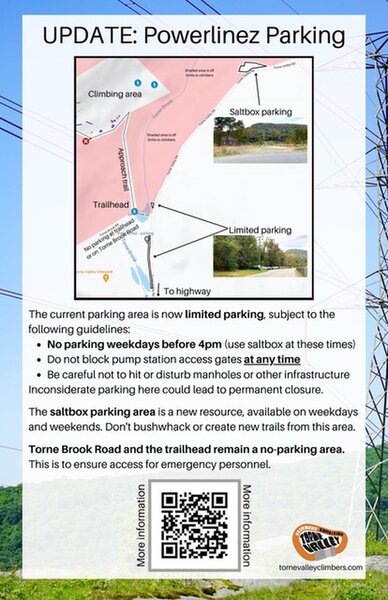
 Access Issue: As of November 2021, there are new parking arrangements. Please follow this guidance.
Details
Access Issue: As of November 2021, there are new parking arrangements. Please follow this guidance.
Details
No parking weekdays before 4pm. (Use Saltbox Parking Area at these times).
Do not block pump station access gates at any time.
Be careful not to hit or disturb manholes or other infrastructure.
The Saltbox Parking Area is a new resource, available on weekdays and weekends. Don't bushwhack or create new trails from this area.
Torne Brook Road and the trailhead remain a no-parking area. This is to ensure access for emergency personnel.
Inconsiderate or illegal parking here could lead to permanent closure.
Description
A traverse of the Tower Wall, recommended as two pitches for rope drag and protecting the follower.
P1 5.9 PG13: At an (often wet) obtuse corner below some small cracks, step up to a bread loaf pinch and move right on slabby feet and sidepulls. Step up (crux) to a small crack/pocket, make a critical placement, then go right around the corner. Up through a slightly overhung section on good holds to a ledge, then up again to belay at a large horizontal crack. 80'
P2 5.8 G: Move right, hug the torpedo, then step down and follow the crack around the corner. Use positive holds at the top of the dihedral to pull the roof, then step right and finish up past several horizontal cracks on easier ground to the top. 60'
For an easier variation, start on Back to the Gym or Back to the Wall, join P1 and belay as above, and for P2 continue to traverse into and finish on The Red Knob, keeps the difficulty at about 5.7.


0 Comments