
 Continue with onX Maps
 Sign in with Facebook


Cache-Cache

5.11d YDS 7a French 24 Ewbanks VIII UIAA 25 ZA E5 6a British
 Avg: 4 from 1
vote
Avg: 4 from 1
vote
Routes in Pointe Adolphe Rey
|
|
Bettembourg-Thivierge T 5.10c 6b 20 VII 20 E2 5b A0 |
|
|
Cache-Cache T 5.11d 7a 24 VIII 25 E5 6a |
|
|
Coup de foudre T 5.12a 7a+ 25 VIII+ 25 E5 6a |
|
|
Fil ou face T 5.12- 7a+ 25 VIII+ 25 E5 6a |
|
|
Police des Glaciers T 5.11d 7a 24 VIII 25 E5 6a |
|
|
Voie Salluard T 5.10- 6a 18 VI+ 18 E1 5a |
| Type: | Trad, Alpine, 750 ft (227 m), 7 pitches, Grade III |
| GPS: | 45.85404, 6.9045 |
| FA: | Alain Stuber and Romain Vogler (1989) |
| Page Views: | 1,001 total · 11/month |
| Shared By: | Eric Blanc on Oct 9, 2018 |
| Admins: | Bogdan Petre, David Riley, Luc-514 |

Location
Leave the glacier at the level of the Salluard route’s start, left of the obvious couloir. Get to the bolt with quick-link which is well visible from the glacier. This approach is very good in summer. It is also possible to ascend the snow cone of the couloir to reach R0.
Description
- “Cache-Cache” (“Hide and Seek”) is a beautiful route which offers varied climbing. Some pitches are very aesthetic on gorgeous granite. Albeit fairly short, “Cache-Cache” is a little gem that will please everyone.
- 750 ft of rock climbing 5.11d / obligatory 5.10c
Fixed anchors except for R0
2 bolts and chain at the anchor
Route rebolted in 2015
50 meter rappels. 60m ropes advised. - More information: chamgranit-topos.com/cham_n…
- Translation from french by Aanoud Petermann
Protection
- Glacier gear
- 2 racks of camalots C4 up to n°3 (blue)
- 1 rack of C3 or X4 .1 .2 .3
- 1 rack of nuts
- 10-12 quickdraws
Itinerary "Cache-Cache"
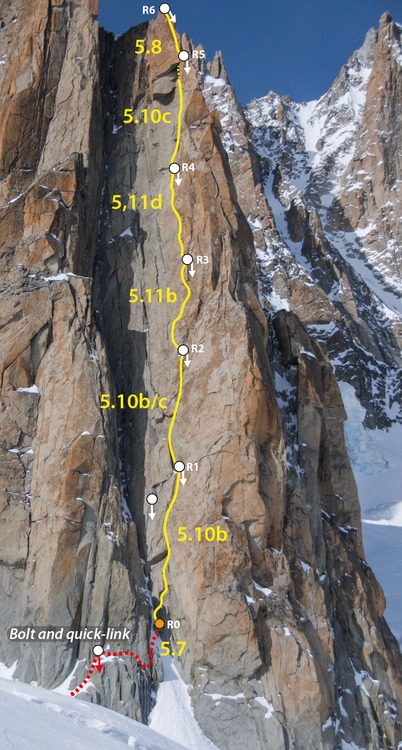
From the “bolt and quick-link” go right. Descend a few meters in the direction of the couloir ( snow cone), directly take the grooves which lead to a large couloir exposed to rock falls, R0 on a big block. The R0 of the couloir is not bolted. With a 60m rope it is possible to directly reach R1 from the “bolt and quick-link”.
Pitch1 (40m 5.10b) : From R0, climb onto a thick flake towards the right, in order to reach a bolt protecting the start. Follow the crack system to the right, parallel to the couloir, and you will bump into a small roof above you. Climb over it from the right, some athletic moves. Then follow a crack that rises right until R1.
Pitch2 (45m 5.10b/c) : Enter the wide crack formed by the impressive flake left of the anchor. Step onto this flake. A bolt at arm-height protects the next part: the wide crack to the right, delicate and a little exposed. Then follow an easier crack system, first straight, then upwards left until R2
Pitch3 (30m 5.11b) : Beautiful slab. From R2, first leave towards the left, then upwards right. Bolts.
At the end of the slab, follow the crack that goes upward left. Traverse left under the bulge and climb it left, following a good flake. R3 just above.
Pitch4 (35m 5.11d) : The crux of the route. Sustained but well-protectable pitch. Starts left of the anchor. Follow the pronounced cracked corner. Finger and then handcrack. After 15 or so meters, traverse left and join another line of cracks. Athletic. R4 above a small roof, avoided by going left.
Pitch5 (40m 5.10c) : Start slightly upwards left, but not too far left. Follow a system of parallel cracks. Continue upwards right through an easier section. Reach to the right a crack formed by the impressive corner. The first part is easily protectable, fingers, hands. The second part is wider and protected by 3 bolts. Enter right of the large roof in a narrow bottle neck gully. As you leave the gully, follow the plateau to the right. R5. A game of Hide and Seek...
Pitch6 (30m 5.8 ) : From R5 climb the beautiful wall above, staying just left of the ridge, bolts. Climbing on knobs and large crimpers, splendid. R6 and the start of the abseil line are at the top of the summit pinnacle.
Descent
The first rappel from R6 is delicate because it traverses. Moving onto the North face for the last 20m is a good option. With a 60m rope it is tempting to rappel P4-3 and P3-2 in one go. This is not advised however, as there is a high probability of the rope getting stuck, an important risk in this route. A 60m rope can be useful to reach directly the “bolt and quick-link” of the start, from R1.


0 Comments