
 Continue with onX Maps
 Sign in with Facebook


Routes in The Crestones

|
'Bag O Stones' T 5.8 5b 16 VI- 15 HVS 4c |

|
Crestone Peak / North Pillar T 5.8- 5b 16 VI- 14 VS 4c R |
|
|
Crestone Peak North Buttress T Easy 5th 1+ 3 I 5 M 1c PG13 |
|
|
Crestone Traverse T Easy 5th 1+ 3 I 5 M 1c |
|
|
Ellingwood Ledges T 5.7 5a 15 V+ 13 MVS 4b |
|
|
India T 5.8 5b 16 VI- 15 HVS 4c |
|
|
Merhar Direct T 5.6 4c 14 V 12 S 4b AI4 M5-6 Steep Snow PG13 |
|
|
North Ridge of Kit Carson T 4th 1 2 I 2 M 1b |
|
|
Northwest Couloir T |
|
|
Prow (Kit Carson), The T 5.8 5b 16 VI- 15 HVS 4c R |
|
|
Red Gully T 3rd 1- 1 I 1 M 1a |
|
|
Septem Virtutum Anima Mea T 5.7+ 5a 15 V+ 13 MVS 4b |
| Type: | Trad, Alpine, Grade III |
| GPS: | 37.96669, -105.585 |
| FA: | Albert Ellingwood and Eleanor Davis, 1925 |
| Page Views: | 88,026 total · 290/month |
| Shared By: | Ben Mottinger on Dec 31, 2000 · Updates |
| Admins: | Leo Paik, John McNamee, Frances Fierst, Monty, Monomaniac, Tyler KC |

Description

Got up at 4:30am to get a good start on the climb. We hiked up to the Upper South Colony Lake and then waited for a little light to start climbing.
The standard route ascends a 3rd class slab up to a ramp on the Needles' East face, then starts the 4th class arete. There is also a direct start, which adds two pitches of 5.6 climbing up to the 3rd class ramp. We ended up doing the direct direct start which started on the N side of the arete and added 6 pitches of 5.5/5.6 climbing up to the arete.
Once we got to the 4th class section, progress was faster, but we still stayed roped up which made it slow going. The headwall section is the crux, which we did in 4 pitches. The climbing here was really nice, and the last, crux pitch was 150 feet of 5.7 up a nice crack. There was another group in front of us already on the standard 5.7 crack, so I took one to the right, which angled up and right for a bit, then went straight up to the belay. It was about the same grade 5.7ish and offered nice hand and finger jams with cobbled conglomerate rock for extra hands and feet.
From here, it was about 200 feet of 3rd class to the summit.
Key beta for the climb: We did 10 technical pitches (although easy) that take time nonetheless. Plan on using a WHOLE day for this climb. You start at first light to make it off the mountain before thunderstorms in the afternoon. Since we did it in September, the storm factor was less, but still present. Even so, we didn't make it back to camp until about 4pm. Take plenty of water, extra food and clothing, and definitely first aid gear.
Protection
Hexes, tri-cams, cams from #0.5-#4 Friends, mid-large stoppers, many runners in the 24 inch length. Twin ropes are useful.
Getting There
Per Bill Lawry:
Access the South Colony Lakes area as indicated on The Crestones page. From the second-to-highest lake, there are at least three well-separated starts to the route. The chosen start determines how much of the lower ledges will be traversed.
See this marked up
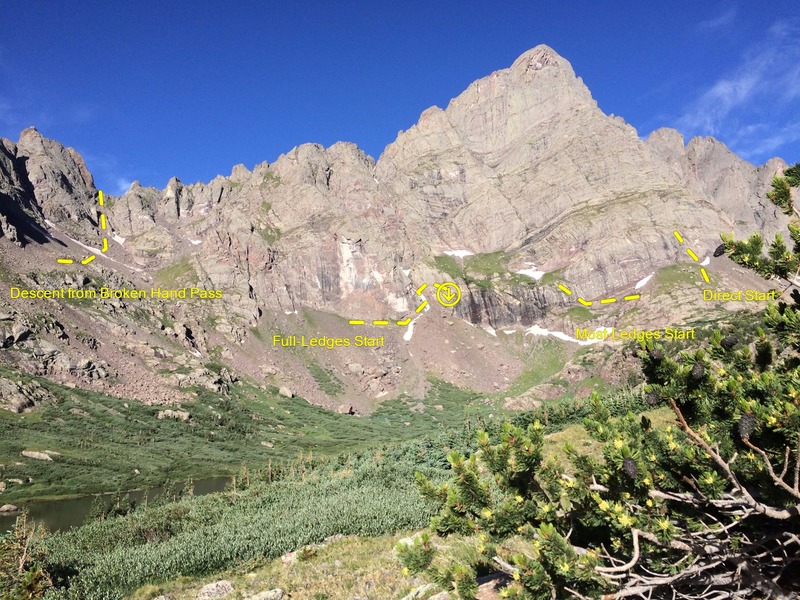
for relative locations of these starts.
Before the day of the climb, it is worth getting familiar with the approaches by finding a vantage point from which to view them in broad daylight. The starts can be approached from the second-to-highest lake as follows:
- Direct Start - continue up the main trail which ascends the valley on the ~north side of the second-to-highest lake. Cross over to the direct start of the blunt arete just before the highest lake. The Direct Start and approach to it is shown in this and in this
![]() .
.![]()
- Full-Ledges Start - from the bottom of the second-to-highest lake, take the trail up towards Broken Hand Pass. Leave that trail where needed to thread your way between rocky outcroppings and the vegetation below them. Alternately, some suggest staying on the trail until the second LARGE cairn. Either way, traverse to climber's right while gradually ascending up to the Full-Ledges Start shown in this .
![]()
- The intermediate Most-Ledges Start - approach as for the Direct Start. After crossing just below the highest lake, traverse left as needed on the way up to a left-slanting grassy crack. That crack is drawn in on Gary Clark's topo linked on the Crestone Needle page in the North American Classic Climbs site.


![Here are some ways to start [[105748714]]. I have not done the starts labeled "Direct" and "Most-Ledges".
<br>
<br>
The "Full-Ledges" start - after a little up climbing and a little down climbing - passes just above a large slung horn with old rap rope as of July 2016. The old rap rope was knotted off for a two-stranded rap, and it was a little sun-bleached with some sheath damage visible in one strand about 15 feet down from the anchor.
<br>
<br>
In July 2017, the rap station was gone.](https://mountainproject.com/assets/photos/climb/112026570_smallMed_1494316977_topo.jpg?cache=1596143633)


80 Comments