
 Continue with onX Maps
 Sign in with Facebook


Bolts installed without threading exposed above the nut


|
|
I’ve come upon bolts installed like these below at two different walls in the past two weeks. To me, these are not installed to the standards I was taught when I learned to bolt. Specifically, I was taught to several threads should be exposed above the nut after the bolt is torqued. I’m inclined to replace these bolts. I’d love to hear other opinions and thoughts on the topic. 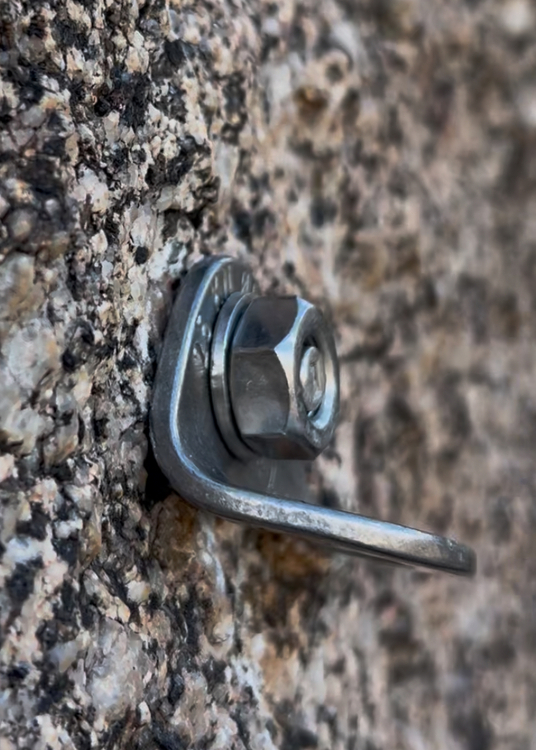 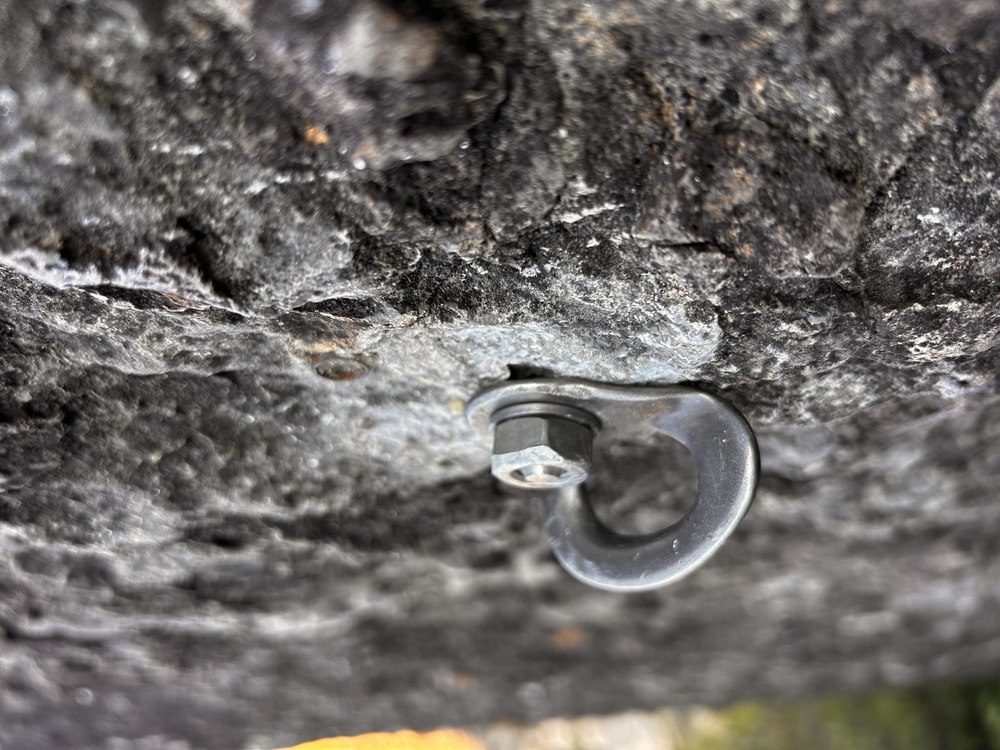 |
|
|
I've always had threads become exposed, just due to the nature of how wedge bolts work. My guess is either: A, the rock is so hard that the cone engages the wedge immediately, or B, the stud was pounded in first, then the hanger, washer, and nut were added. This would mean that the nut started with only a few threads instead of all. Maybe take a torque wrench to them first? Would be interested to see if they hit torque requirements. |

|
A minimum of two threads exposed seems standard. Adjust your whippers accordingly. ;) |
|
|
I’ll be able to torque the bolt in the first photo (granite) tomorrow. The hanger is spinning on it too. The rock in the second photo is limestone. I agree, the threads expose themselves during the tightening process with wedge bolts. This is the partner anchor bolt to the one in my first photo. I assume it wasn’t the same installer. This one makes me feel warm and fuzzy… and no spinning hanger. 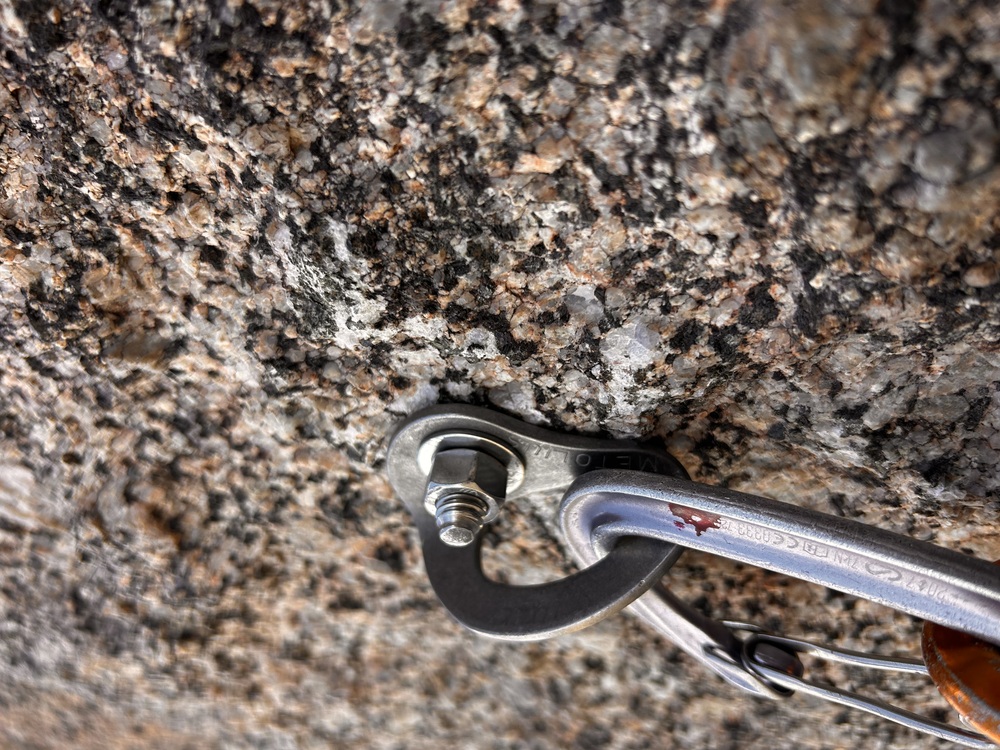 |
|
|
Yeah, see if they tighten down, exposing threads. Otherwise, suboptimal installation. Torque test a good idea. |
|
|
I know some developers who do this purposefully. They tighten the nut down a turn or two, loosen the nut, then hammer it in a little more, then tighten the nut again. This leaves an install looking just like this. They claim it is for safety as the draw can sometimes get tangled up in the threads if there is a lot of thread sticking out. It doesn't seem to me likely to occur with 2.5 threads sticking out which is the average for my bolt installs. I worked 6 years as an airplane mechanic so the idea of having no threads sticking out gives me the heebie jeebies. I don't like it at all and would recommend against the practice, but I also don't think it's a massive issue. I do think it's more likely in spring for the nut and hanger to loosen problematically and perhaps even fall off entirely as is occasionally seen. If your developers are anything like the ones I know, they do know what they're doing, but I think have made a sub optimal judgement call on how to maximize safety. I do agree that such practices are likely to cause others to question the knowledge and ability of the developers and the safety of their routes. I am skeptical that these shallow nut installs are dangerous, however. If I had concerns I would go out there with a hammer and make sure they placed bolts only in good rock and not in scabs, flakes, blocks, or hollow rock. I think that is actually the most dangerous mistake that rookie developers make, and if I had concerns about a developer that would be the largest question I would want answered to verify if they are safe and knowledgeable developers or not. |
|
|
These are the first bolts I recalled seeing installed like this in New Mexico. It’s definitely not the norm to install wedge bolts like this here, which leads me to believe it was someone newer to bolting who placed them. The rock is solid surrounding the bolts. |
|
|
Probably okay, but still suboptimal. Removing the washers and/or switching to a thinner hanger (eg. Eldrid Draco, Austri Alpin) after they've been torqued would help a lot. Another note: It looks like a B stamped on the head. Ifso, its a 2 1/4",.so perhaps they were just trying to place them as deeply as possible? |
|
|
Here’s a front photo of the bolt that I’ll torque tomorrow. I think it’s an “E” stamped. 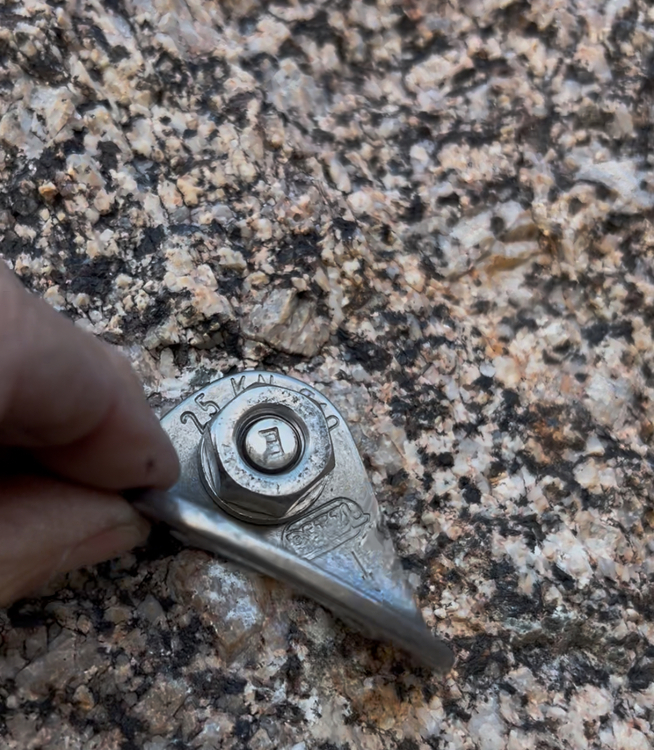
Here’s the head of the other bolt which is installed in limestone. It’s placed right next to the old bolt hole.  |
|
|
Anna, You are right to be uneasy about those bolts. There should be a minimum of two threads showing above the nut after torqueing. The wedge anchor in granitic rock with the Petzl hanger: The "E" code = 3.5" to 4.0" total length. Most likely the ubiquitous 3.75" length. The placement was crude in several ways: 1. The surface of the rock has large crystals and irregularities, enough that the hanger did not seat well against the rock. That will contribute to a "spinner". Pulverizing the surface crystals with a hammer prepares a smooth, flat surface for the hanger. I like to think of it as "cleaning" the surface underneath the hanger. 2. As you noted, the wedge anchor is flush with the nut. Wedge anchors have a "dog-point" head, an impact section for installation with a hammer. That impact section is devoid of threads for 1/8" or more. If that is a 3/8" bolt, it is a 3/8" - 16, coarse thread. The '16' denotes TPI (threads per inch). If the dog-head is 1/8", that equals two full revolutions of the nut not being engaged. If the dog-head is 3/16", then three threads not engaged. That is quite significant. 3. The nut has impact marks from hammering. The "E" depth length code does not show any sign of hammer impact. Therefore, the nut took the full force of the hammering, which causes damage to the threads. The few engaged threads are now suspect. 4. The hammer struck the nut and the Petzl "Coeur" hanger, disrupting the chromium oxide passivation layer which leads to corrosion of stainless steel. It is not a reach to suspect that the installer used a non-stainless steel hammer and swung it wildly. 5. The hanger is spinning, which certainly indicates that proper toque was not achieved. Suggestions to assess and fix it: Assuming that is a 3/8" wedge anchor, bring a 3/8" - 16 SS nut, 9/16" box end wrench, and a torque wrench w/ 9/16" socket if you have one. Tighten the existing nut snugly to 8 or 10 lb-ft. That may bring the nut down, exposing a few threads. Now remove the old nut, flat washer, and hanger. Carefully inspect the threads on the wedge anchor for damage. If the threads seem okay, use a hammer to pulverize the surface crystals, creating a flat, smooth seat for the hanger. Be careful to avoid hitting the exposed threads. Reassemble with the new nut, and torque to spec. Torque values on a 3/8" SS wedge anchor should be between 20 to 25 lb-ft. Each manufacturer sets their torque spec. Do not exceed 28 lb-ft. My guess is that you will now have 3 full threads protruding above the nut. If not, this is where I would use a rotohammer, or just use the pointy end of a climbing hammer, to dish out 1/8" to 1/4" of the rock surface, so that the hanger will sit in a slight recess. For each 1/16" you recess the hanger, it will expose 1 additional full thread. If, upon inspection, the threads of the wedge anchor are damaged, or if the nut strips upon torqueing, the wedge anchor should be removed and replaced. Good luck. I hope that you can save this one. Please get back to us with your results. |
|
|
The bolt in limestone with the MadRock hanger has similar issues. Wild hammer swings damaged the hanger and the nut. There is no reason to hammer forcefully or wildly to drive a wedge anchor in a properly drilled hole. Light tapping should be sufficient if the hole is the proper size. This installer beat the sh*t out of it. I also noticed that here is significant spalling around the hole under the hanger. I can't ascertain the cause from a photo. Generally speaking, drilling and installing a wedge anchor does not cause the rim of the hole to spall to that degree. Perhaps this limestone is particularly brittle, or the installer's heavy-handed hammering caused it. ? ? |
|
|
The nut should not be struck with a hammer. DAV-UIAA-BoltingGuide-2025: 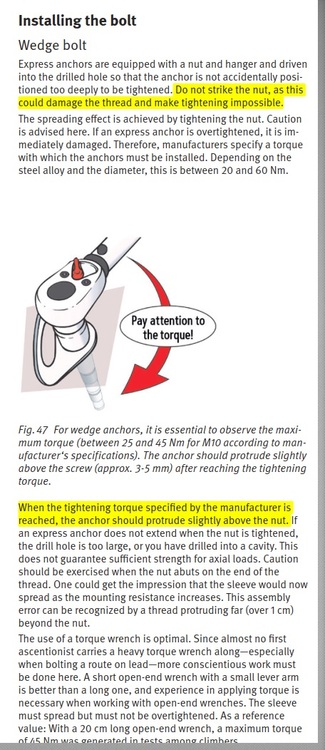 Hilti wedge bolt graphic: 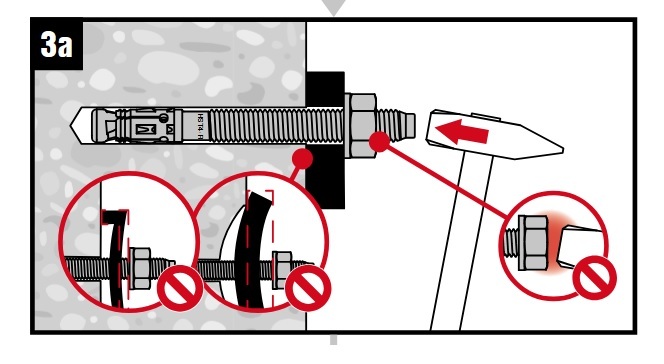 The top end of of the bolt is chamfered to protect the threads. This is good. 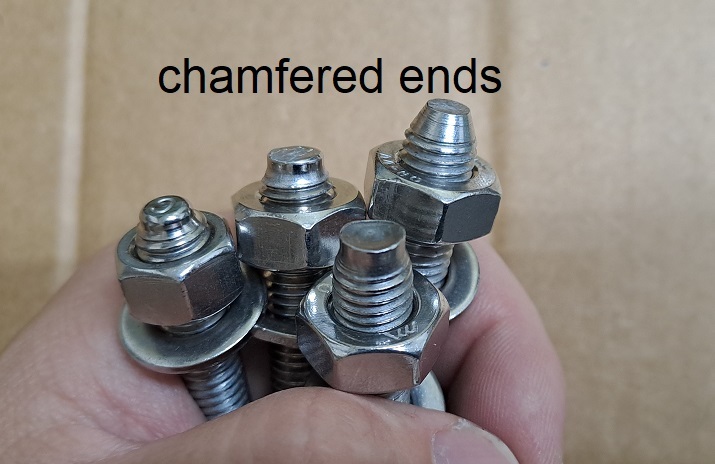 If the nut is struck instead of the bolt body, there is like around 1.5 turns of thread taking that energy. This can excessively stress (or damage) the threads, and increase the chance of galling...which can basically botch an installation cause now the nut and bolt shaft might just spin around together, and targeted torque won't be reached. This is bad. 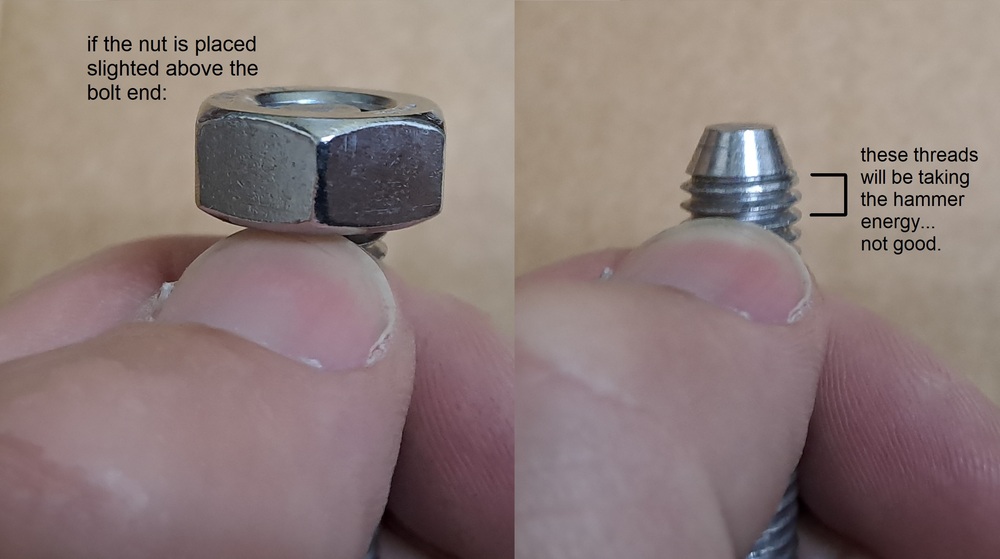 The chamfered end for sure should be rising above the nut, confirming the bolt and nut thread's are interlocked. This is good. In the various wedge bolts I've installed, the amount of visible turns of threads rising above the nut has varied from different brands and bolts, since their wedge/mandrel angle and length can vary, clip design, substrate type & quality, etc. But after I reach proper torque, there has always been at least a turn of threads showing, and often a few. Thanks Anna for the nice clear pictures and sharing discussion. I'm with ClimbBaja and others on here, these bolts were poorly installed. See if they can get torqued to spec; but if they just spin, consider replacing. |
|
|
Second vote for removing the washer and going to a thinner hanger |
|
|
Hilti Kb3 lock down inless than a full turn of the nut in hard rock. Hard rock is different than average rock or concrete. As long as any thread is exposed past the nut they are installed properly. Threads in the air dont do much... These are clearly not installed as good as they could be though. Thinner hanger remove washer and torque to full spec. If you see thread they are ok. |
|
|
Update… I put a torque wrench on the bolt that is installed in the granite and the bolt spun in the hole immediately. It appears the threads are damaged which isn’t allowing the nut to tighten down the bolt. For me, this explains why the “normal” amount of threads aren’t exposed above the nut. I’m guessing this was how it was installed on day 1 and the person walked away with the bolt not tightened down and spinning in the hole. This is an anchored bolt with a properly installed second bolt. It doesn’t appear to be the same bolter. I plan to replace the bolt tomorrow. For the limestone bolts, as a temporary fix, I removed the washers and tightened the bolts to 28ft lbs. This worked for all but one bolt which still has a spinning hanger. The nut on that bolt is damaged enough that it won’t seat well on the socket. I used my crescent and tightened it as best I could. I’ll replace this bolt tomorrow also. While at the limestone wall, I attempted to loosen an old plated sleeve bolt (photo below) to see if I could hammer it in and retighten. The bolt sheared off in the threading with 18ft lbs set on the torque wrench. I estimate the age of this bolt to be early to middle 90s. There wasn’t a lot of rush on the shaft. I assume something in the limestone corroded the metal and welded everything together in the hole. That, or I have muscles I don’t know about. I was surprised how easily it broke. I had only planned to torque the bolts so didn’t have hardware/drill kit to fix the broken bolt. I’ll head there again tomorrow after work to install new bolts. The lesson learned for me is… if a wedge bolt doesn’t have several threads exposed above the nut, it may mean it has damaged threads and can’t be tightened down. Thank you all for sharing your wisdom, ideas and knowledge! This was very informative for me. 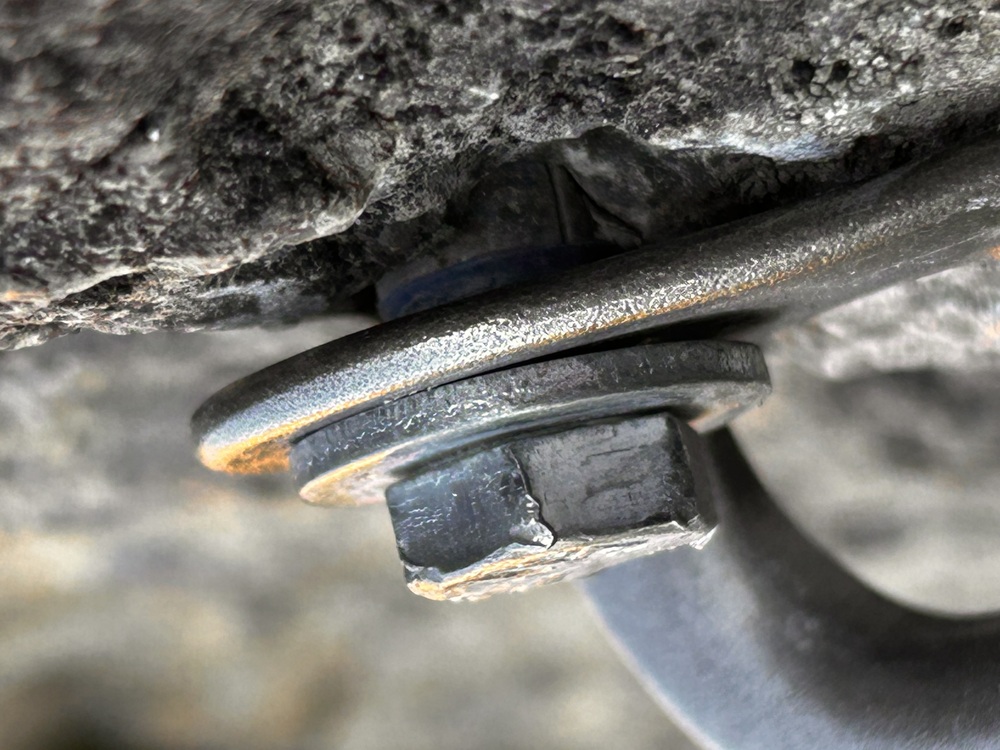 |
|
|
Anna Brown wrote: Wow. Someone really did not give a fuck. Incredible. Thank you. |
|
|
Anna, Good work on those bolts! Thanks for reporting back to us. |

|
Interesting thread (no pun intended). As a casual climber who has no business bolting routes, I feel like I should learn how to install bolts just so I can check existing ones on routes I climb and report (not replace) questionable hardware. |
|
|
Paul S wrote: Paul- taking/posting a high quality photo of the bolt in question is often the best thing you can do. I wish more climbers would do this when they see something that seems 'off'. Knowing the size, type, and condition of the bolt helps refine the tools required + the time estimate for whomever takes the hike to inspect or replace the bolt. |
|
|
Gregger Man wrote: YES! Please listen to Greg, and take a high quality close-up photo of the bolt - it can be super helpful to rebolters. The ASCA has a questionable hardware reporting site (which is also ready to upload a photo) here: https://safeclimbing.org/report-unsafe-hardware |
|
|
Amen, having as many details and photos/videos is huge for planning and executing the work. To me these are the things to capture when reporting a bolt;
If anyone has edits to this, please post a comment. Maybe I can create a thread on the topic and get Zander to make it sticky at the top of the General forum. |


