
 Continue with onX Maps
 Sign in with Facebook


Our climbing rope rug (pic-heavy instructions included)
|
|
We recently retired a climbing rope and decided to make a rug out of it. After Googling for the beta, doing our own analysis, and getting a workout pulling rope through weave, we now have an 2 1/3' x 1 3/4' quadruple-weave rug from a retired 10.2mm x 60m climbing rope:  Our procedure: We found very informative posts on SuperTopo and SummitPost on how to weave a rope rug. We really liked the detail provided by the SummitPost article, as well as the idea of using a home-made peg-board. However, we decided to diverge a bit from the SummitPost template. First Mark constructed a template on the computer to figure out what dimensions the peg-board should be (based on analysis of an existing rope rug), and where the pegs should be. This diagram also would serve in assisting us on the first weave in knowing whether to weave under or over an existing rope line. The colored blocks indicate which rope should be over in any intersection with another rope line. 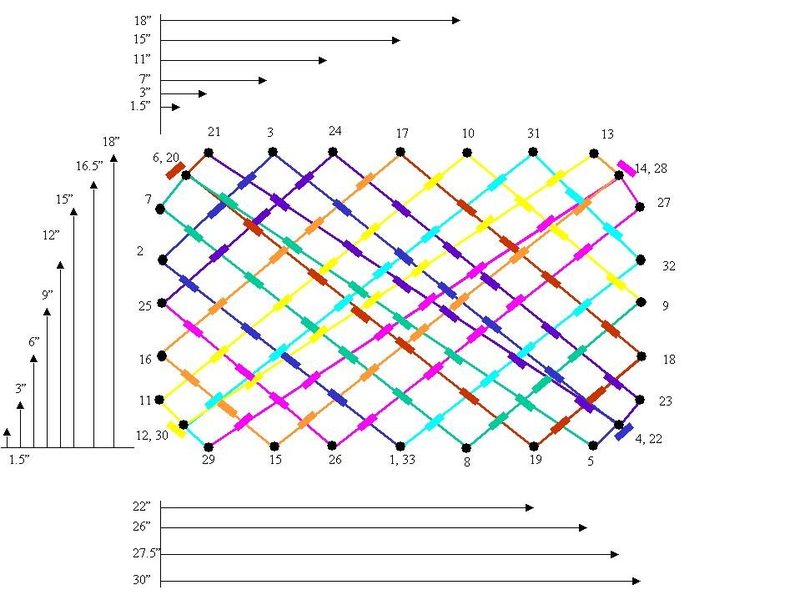 After a visit to the hardware store for wood screws (#10 x 1 1/2") and plastic tubing to put the screws through so the rope is up against something smooth (rather than the screw threads), Mark constructed the peg-board on a piece of particle board we had in the garage. He then wrote the peg numbers from the template directly onto the particle board next to each peg. 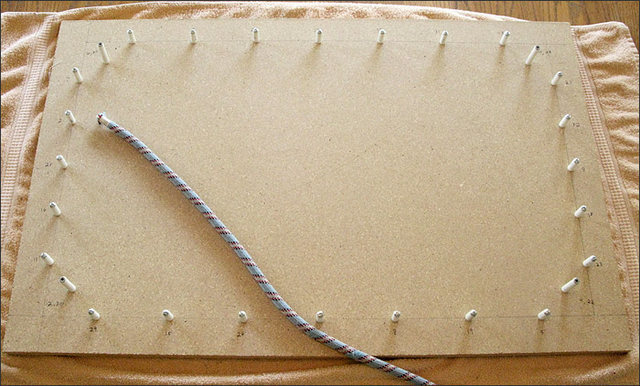 Now start weaving. We first started to weave the rope around the pegs like a train, but several pegs later we discovered that the rope drag became too much. Forget that. The easiest thing to do, we found, was to start about 1/4 the total length of the rope (in hind-sight we know this, for a quadruple-weave of a 60m rope; at the time we were just guessing and ended up luckily with just the right amount of rope to make one complete weave) and that would be positioned at peg #1. We worked our way around the pegs, referring carefully to the template to figure out whether we should go under or over an existing rope line. This took a bit of concentration to get right. A photo part-way through the first weave: 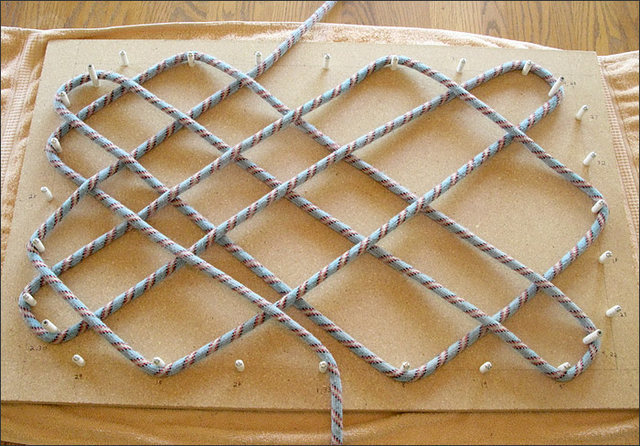 After completing the weave, we checked to make sure it was right. It looked good:  After that it was time to relax our minds and gear up our bodies for lots of rope feeding and pulling. Someone who has made a rug mentioned that it feels like belaying 20 pitches--he's got that right! We grabbed the end of the long left over rope and fed backwards through the weave along the existing rope. We pulled the rope completely through for each peg-to-peg weave line. One trick is to always set aside the end of the rope before pulling the rope through so you can find it again when you're ready to feed it through the next line of weave (and avoid creating a knot as you dig through the bottom of your stack to find the end). By the end of the third round of weaving, we were sweaty from our rope-pulling workout, but the rug was shaping up nicely:  We calculated that we had enough rope left for another round of weaving, and there was space in the rug left for a fourth weave, so we went for it. It helped to burn the rope end to make it rigid for getting through the small holes left in the weave. The rope was harder to pull--it helps to have one hold the rug down while the other pulls--but at least there was less and less rope to pull through. What worked out wonderfully was that we had no tightening of the weave to do, just some straightening out and pushing in of the edge loops which took only a few minutes. Here is a photo after the fourth weave, and shows the amount of the 60m rope left over: 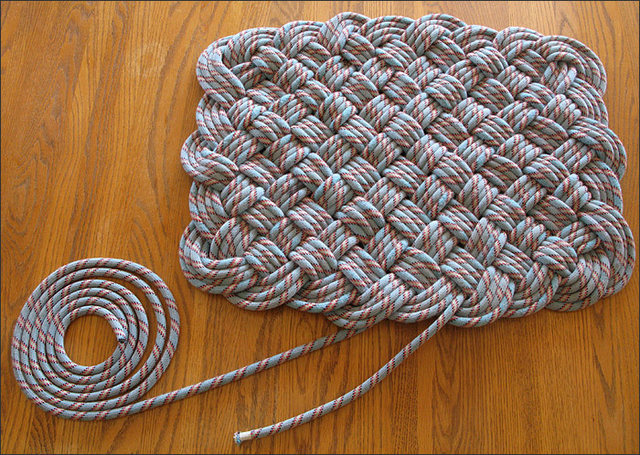 To finish it, we flipped the rug over, held the 2 loose ends together, marked where to cut the rope, cut the rope (with scissors), burned the ends (with a lighter), and sewed the two ends of rope to each other using a Speedy Stitcher Sewing Awl. Close-up photo:  So in the spirit of "Reduce Reuse Recycle" we now have converted a retired climbing rope into a rug! |

|
Nice work you guys it looks great. Thanks for the pics as I have always wondered how it was done. Next time call me as I think I can get at least another year out of your rope and then I will be happy to give it back for you to reuse. |
|
|
Eric Rhicard wrote:Nice work you guys it looks great. Thanks for the pics as I have always wondered how it was done. Next time call me as I think I can get at least another year out of your rope and then I will be happy to give it back for you to reuse. Eric, you beat me to it. =) |
|
|
I have made 11 rugs for family and friends. You can see pictures at: greg-hand.com/rugs/ . I only do 3 passes as the 4th seems too tight. Each pass takes about 40 feet of rope for the size I make. Plus, you can use multiple ropes of contrasting colors. I even made one from remnants of 5 ropes. Once you have your pegboard made, it takes about 1 hour to weave. |
|
|
Daryl Allan wrote: How close would you say that is to 10m you have left? Both my potential candidates are 50m. Daryl, we measured 11.5' (3.5m) left of rope. Sorry! I guess that means you'd be limited to a triple-weave rug. You can see the triple-weave stage photo; you can either leave it that loose (which isn't bad) or tighten it up and end up with a smaller rug. |
|
|
Thanks again Stacy. Greg, are the pegs on your board at the same intervals or shorter for a three pass? |
|
|
Eric Rhicard wrote:Next time call me as I think I can get at least another year out of your rope and then I will be happy to give it back for you to reuse. When our friends began to decline to climb on our rope, I thought it was due to the multiple soft spots they commented on while belaying or those whippers they watched me take. Now I realize it could be that my new deodorant ain’t making it. That would explain some of the facial expressions too. |
|
|
Wow! That is the most elaborate rope rug I have ever seen. Well done. In my opinion that rope did need to be retired. But, EFR you probably would have used it for another 3 years (until someone borrows it and gives it back to you with a core shot, sorry). |
|
|
SWEET! How long did it take you to do that? I had a book years ago that showed how to do it, but in my move i lost it. |
|
|
Really nice job on the rug! |
|
|
Harold Lampasso wrote:How long did it take you to do that? It seemed like it took a long time (several hours in all, over the course of 3 days). But that is mostly because this was our first one, and we had procedural things to work out. I think the weaving itself took about 2 hours; I think it could be done in less time next time. |
|
|
Thanks for posting this. I needed some guidance on constructing my rope rug and found your post. I replicated the peg board and the rug came out perfectly!! |
|
|
I'm guessing the 30" dimension in the peg board is wrong. It's probably supposed to be 29" since the peg board looks symmetrical in the photo. I'm going to try 29"... |
|
|
Actually, looking at it again it looks like the 18", 22", 26", and 27.5" measurements are wrong. They should be 19", 23", 27", and 28.5", no? |

|
I used the same instructions with the same board. It is a long process, drinking near the end is a real possibility if not a necessity. The pic.s below show a "two rope" weave using the same procedure. 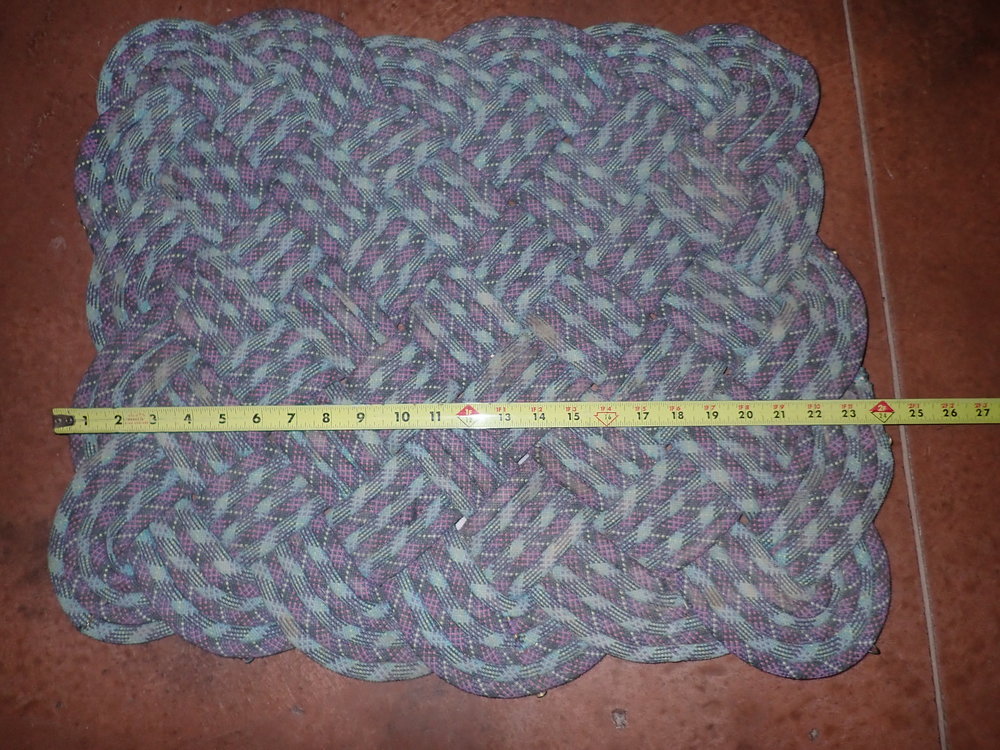 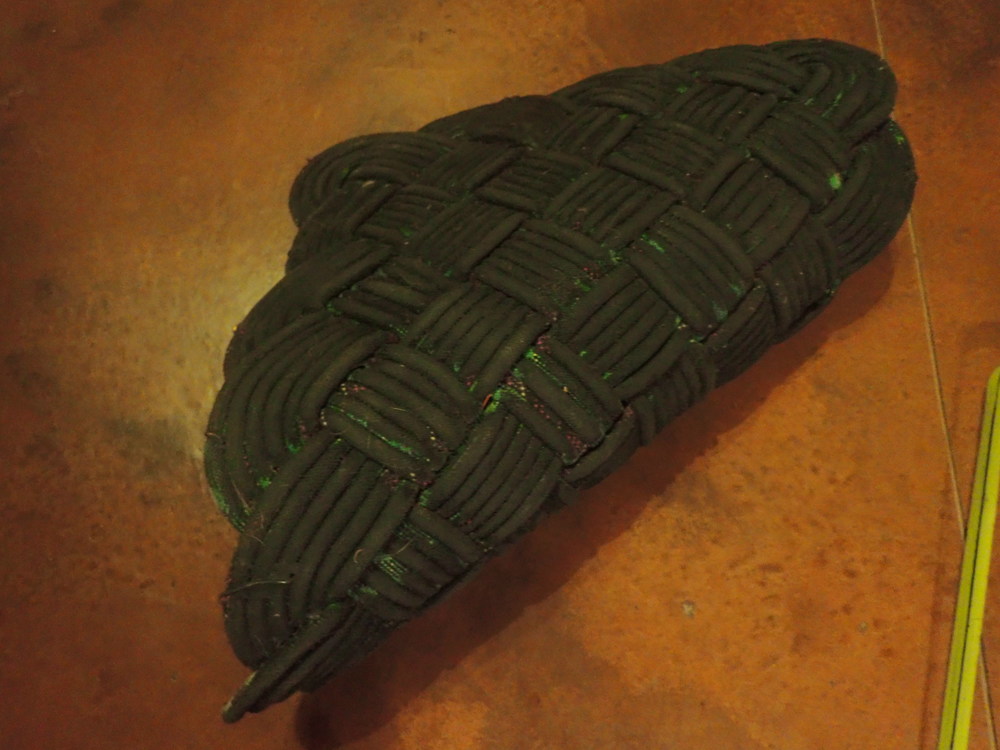  |
|
|
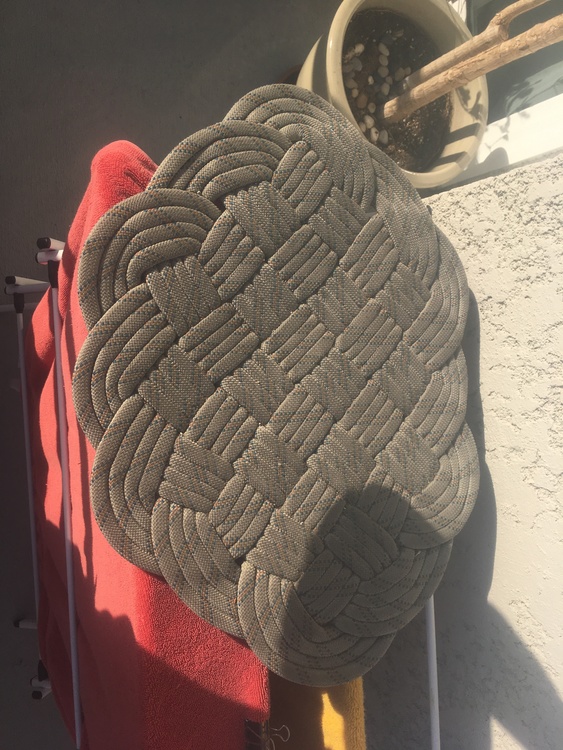
Thank you for the detailed instructions. I was disturbed by the lack of symmetry in the peg board dimensions so I changed the dimensions as I described above (from 18", 22", 26", and 27.5" to 19", 23", 27", and 28.5"). I ended up with a nice rug measuring 74cm x 55cm. I used almost all of a 60m rope -- maybe there were two meters left. Instead of cutting it I was able to weave the extra into the rug. Maybe you can see where I have five strands together in a couple places. The weave doesn't look as tight as in some of the other photos I've seen. Because I didn't pull the rope tight? Or because my rope was thinner? (I don't know the width, but it looks pretty close to the 9.8mm rope that I recently bought to replace this one.) Or because I changed the dimensions? I don't think so. Anyway, I'm quite happy with it. 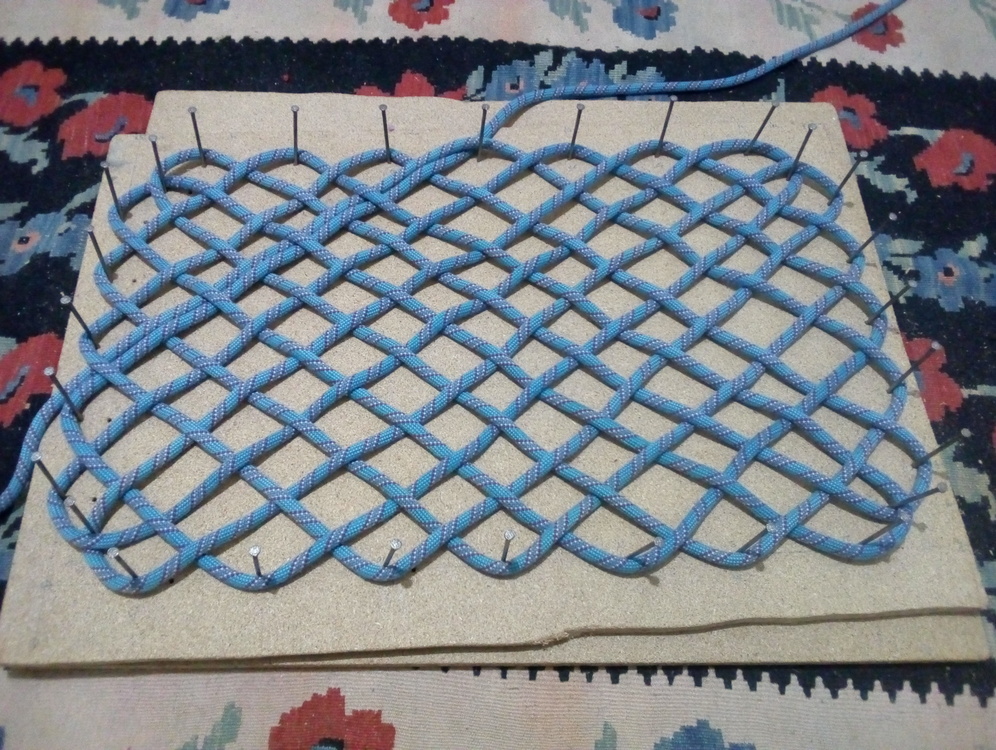 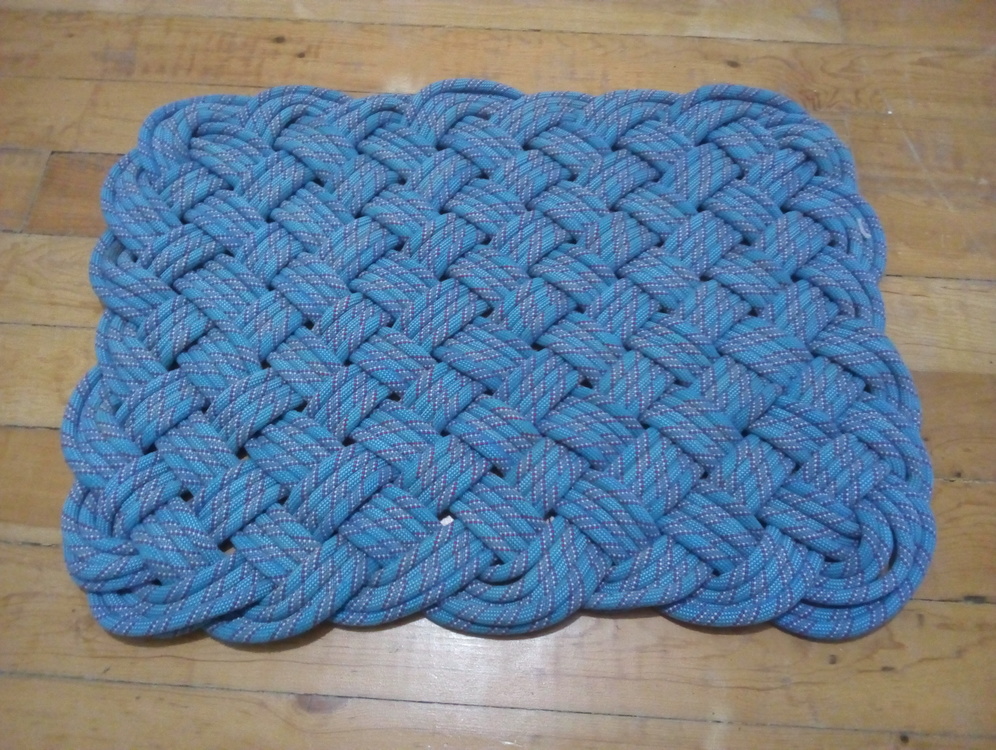 |
|
|
Thank you Mark and Stacy for the instructions. I followed them closely, only changing the peg board dimensions for symmetry (like Bryan did above). I used a 60m 9mm rope and had about 5m left after weaving it tight. It took quite a few hours to do this, but it was worth it. I can’t think of a more honorable way to retire an old climbing rope. 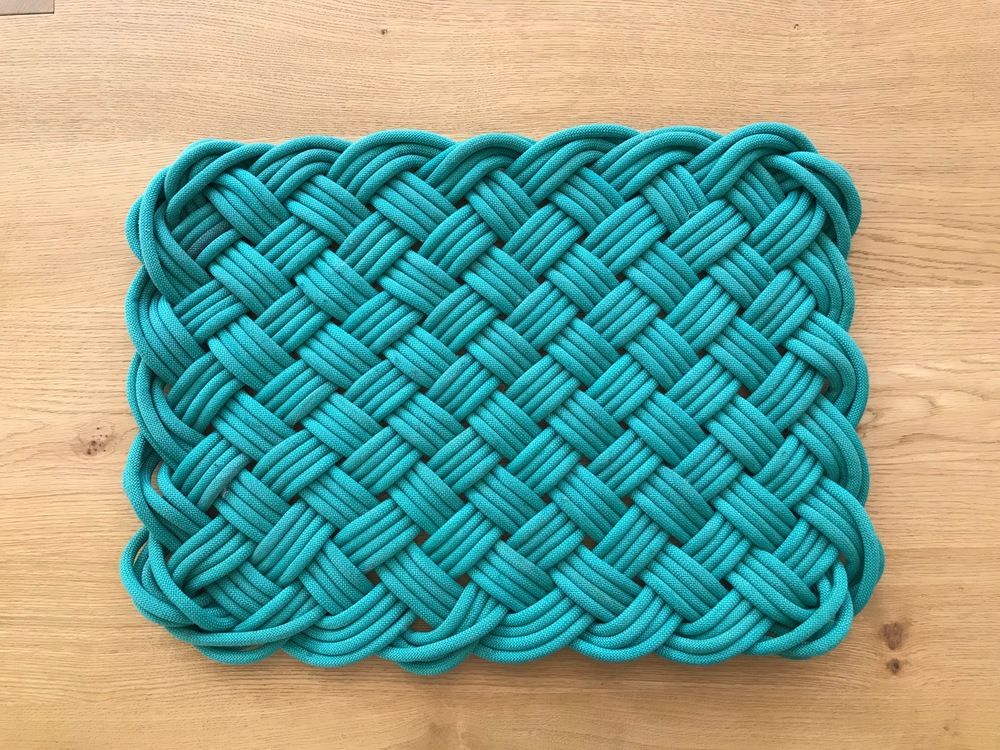 |
|
|
 A nice and flat rug done nice |
|
|
I’ve made a few of these rugs now as gifts and after the first two I decided it was much easier to draw the pattern on the board as a reference. In my opinion this is better then constantly looking back at the screen to make sure you have the correct weave pattern. This will also save you a ton of time. Also I drew a little arch around the nails that need a little more slack because the first pass of rope is on the outside of the bend. This prevents the rope from bunching up around the bends.null 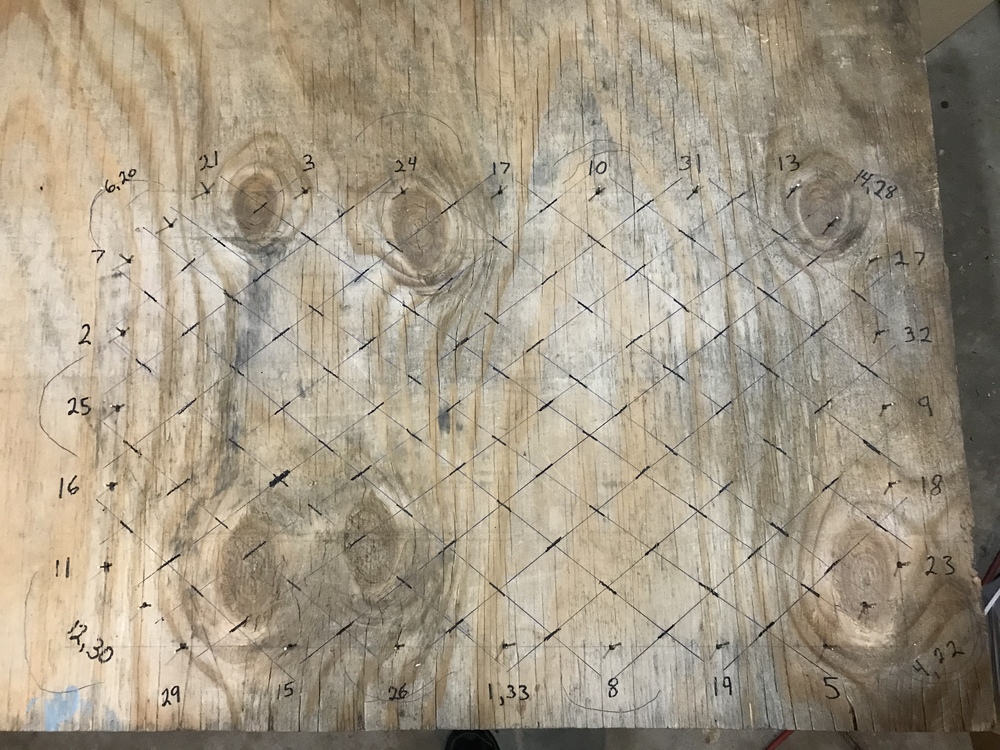 |
|
|
Very cool! A bigger rug would have more usefulness. Maybe somehow 2 ropes? Super cool project! |
|
|
This is great! Thanks for posting this you guys. Appreciate the detail (wouldn't expect anything else from you!) and easy to follow guide. |


