|
|
Jimmy Yammine
·
Aug 18, 2018
·
Ehden, LB
· Joined Apr 2015
· Points: 1,761
I've been bolting recently and was looking for tips and tricks that people can share. (I bolt in Limestone)
How you rack your gear, preferred method for top-down bolting, multipitch bolting.....
Share what you know and make my life easier.
|
|
|
kenr
·
Aug 18, 2018
·
Unknown Hometown
· Joined Oct 2010
· Points: 16,608
My non-expert suggestions:
1. Take a lesson from someone with lots of experiences with the kind of rock you're developing.
. . . (Seems to me just too complicated + tricky to learn from piecemeal text instructions).
2. Take a lesson from someone with lots of _years_ on that kind of rock to find out what practices did not pass the test of time.
. . . (Almost any not-completely-botched bolting job looks + feels just fine a week later).
3. (for non-glue-ins) . Learn two methods for dealing with a bolt which is now rotating together with its nut in that nice hole you just drilled.
. . . (Keep the equipment those methods require within close + convenient enough range so you can execute either method the same day when it happens).
4. (for non-glue-ins) . Know what your strategy is for dealing with a bolt with some mistake where it cannot be removed by means that you know.
. . . (Keep the equipment needed for completing that strategy available enough so that you can execute it next morning, if not already same day.
5. Take a lesson out there on the rock you want to develop.
. . . (Not just watch a video for some "generic" installation).
Ken
|
|
|
Ryan Hoover
·
Aug 18, 2018
·
Index, WA
· Joined Dec 2012
· Points: 2,012
|
|
|
Donovan Allen
·
Aug 18, 2018
·
Soft Lake City
· Joined May 2012
· Points: 356
Jimmy, a few tips.
1. Get really nerdy with it, learn everything you can about the specific limestone you are bolting in, if it’s chossy after an inch, is it extra porous, does it have any calcite, or chert. The knowledge will help you decide how to proceed.
2. Are you using glue ins or Rawls? If you’re using an expansion bolt, make sure it’s 1/2” x 3.5 “ minimum.
3. Some things are too steep to be rap bolted. But if you are rap bolting, suss the line, make sure the moves and holds are good or cleanable. Bosuns chair is nice. Goggles are nice. Hooks are nice. If you aren’t rap bolting, really put some thought into where your bolts are going, or know how to patch bolt holes once a line is in. Look up videos of bolting on steep terrain. It’s super physical. I always feel like I lose climbing fitness and gain bolting fitness.
4. I like having a couple mini husky work bags for my bolting stuff, brushes, tubes, etc. They are great, sturdy, not super bulky and cheap.
5. Make sure you know how to place each type of bolt properly. It always takes longer to develop a route than you think.
6. Slow is smooth, smooth is safe. Don’t rush.
|
|
|
eli poss
·
Aug 18, 2018
·
Durango, CO
· Joined May 2014
· Points: 525
First find a mentor, preferably one who has bolted in the same crag or at least the same kind of rock.
Get a small stuff sack or something similar to use as a bolt bag. It needs to be durable and with at least one clip in point, preferably with a drawstring closure system. Bolts, blow tube, and possibly wrench goes in here.
One tip for ground up bolting with a power drill, you can use a fifi hook to hang the drill on the last bolt. Then tie some cord through the hole on the top of the hook and clip your pull line to this. Now you can pull your drill up off the previous bolt to drill your next one.
Don't forget to prep the rock before you drill your hole. You want the space around the hole to be relatively flat without and big bumps or protrusions so that the hanger will lie flush with the rock when tightened. You want to prep about half an inch around the hole in all directions and then around 2.5" straight down and like 30 degrees on either side of straight down.
If you're doing it top down, TR the route first to figure out the clipping stances and then mark the spots where you want a bolt with a chalk ball.
If using a power drill, try to stop after drilling for like 4 or 5 sec for a few seconds to let the drill bit cool off then start drilling again. Even better if you bring a spray bottle with water and give the bit a little squirt to cool it off. This will help to squeeze a little bit more life out of your drill bits.
If you can, try to drill your holes an inch or 2 deeper than you need for your bolt length. I usually just drill the entire length of the bit. It really isn't that much more effort/battery life/wear on your bit if you're drilling in limestone. This makes your life much easier if you botch your placement and have to patch it. Even if you don't botch it, it can potentially make life much easier for whoever will eventually need to replace the bolt.
|
|
|
kenr
·
Aug 21, 2018
·
Unknown Hometown
· Joined Oct 2010
· Points: 16,608
Donovan Allen wrote: 3. Some things are too steep to be rap bolted. Have not bolted significant overhanging sections, but not clear to me why sometimes they cannot sometimes be bolted in the downward direction, but attaching a truluy-static rope to trad gear placed at the bottom to hold the line in toward the rock. Especially an overhang with a convex curve (steeper overhang near bottom than near top. Donovan Allen wrote:
> "I always feel like I lose climbing fitness and gain bolting fitness."
Drilling builds core strength.
I've found bolting even "merely" vertical on rappel can be strenuous, trying to apply substantial into-the-rock pressure on the drill.
Ken
|
|
|
kenr
·
Aug 21, 2018
·
Unknown Hometown
· Joined Oct 2010
· Points: 16,608
eli poss wrote: . . . TR the route first to figure out the clipping stances and then mark the spots where you want a bolt with a chalk ball. I've been taught to design placements for a wide range of other lead climbers (with less height or reach than me). I'm a bit under 5ft7in with normal ape-index, and I was taught to mark bolt placements at my wrist. I once worked with a taller guy who markes them around his elbow.
The most experienced installers I've worked with prefer school-blackboard marking chalk.
. . . (in case you're not going to finish bolting the same day you mark, note that
. . . . school chalk washes away very thoroughly under sustained rain).
eli poss wrote:
> "If using a power drill, try to stop after drilling for like 4 or 5 sec for a few seconds to let the drill bit cool".
I've been pausing my drilling after 12-15 seconds in granite, and 10 seconds in quartzite (harder rock than granite).
Often takes me 25-30 seconds to drill a 3/8-inch by 3.5-inch hole in quartzite, so that's three separate "burns" (sometimes four as the bit gets dull-ish).
. . . (so 5 seconds per burn sounds to me like "overdoing it" for limestone (soft rock), but what do I know?)
eli poss wrote:
> "try to drill your holes an inch or 2 deeper than you need for your bolt length."
Those of us who drill in hard rock (and routinely have a least one replacement drill bit hanging off our harness) tend to believe that 0.5 inch deeper is enough.
My experience pounding the bolt stud down into its hole after a mistake is that 0.5 - 0.75 inch deeper is sufficient to get th top of the bolt stud down low enough below the rock surface to leave room to cover it over with some putty.
Ken
|
|
|
MorganH
·
Aug 21, 2018
·
Unknown Hometown
· Joined Sep 2010
· Points: 197
eli poss wrote: First find a mentor, preferably one who has bolted in the same crag or at least the same kind of rock.
Get a small stuff sack or something similar to use as a bolt bag. It needs to be durable and with at least one clip in point, preferably with a drawstring closure system. Bolts, blow tube, and possibly wrench goes in here.
One tip for ground up bolting with a power drill, you can use a fifi hook to hang the drill on the last bolt. Then tie some cord through the hole on the top of the hook and clip your pull line to this. Now you can pull your drill up off the previous bolt to drill your next one.
Don't forget to prep the rock before you drill your hole. You want the space around the hole to be relatively flat without and big bumps or protrusions so that the hanger will lie flush with the rock when tightened. You want to prep about half an inch around the hole in all directions and then around 2.5" straight down and like 30 degrees on either side of straight down.
If you're doing it top down, TR the route first to figure out the clipping stances and then mark the spots where you want a bolt with a chalk ball.
If using a power drill, try to stop after drilling for like 4 or 5 sec for a few seconds to let the drill bit cool off then start drilling again. Even better if you bring a spray bottle with water and give the bit a little squirt to cool it off. This will help to squeeze a little bit more life out of your drill bits.
If you can, try to drill your holes an inch or 2 deeper than you need for your bolt length. I usually just drill the entire length of the bit. It really isn't that much more effort/battery life/wear on your bit if you're drilling in limestone. This makes your life much easier if you botch your placement and have to patch it. Even if you don't botch it, it can potentially make life much easier for whoever will eventually need to replace the bolt. Fanny pack for the win.
|
|
|
eli poss
·
Aug 21, 2018
·
Durango, CO
· Joined May 2014
· Points: 525
kenr wrote:
eli poss wrote:
> "try to drill your holes an inch or 2 deeper than you need for your bolt length."
Those of us who drill in hard rock (and routinely have a least one replacement drill bit hanging off our harness) tend to believe that 0.5 inch deeper is enough.
My experience pounding the bolt stud down into its hole after a mistake is that 0.5 - 0.75 inch deeper is sufficient to get th top of the bolt stud down low enough below the rock surface to leave room to cover it over with some putty.
Ken
Shorter might be adequate if you're just patching, but a longer length could potentially make the difference between having to patch and being able to reuse the same hole. IMO the goal should always be to reuse the hole when rebolting, and an inch or two might be enough if you're able to get some of the old bolt out but not all of it. For example, if a wedge bolt snaps while you're trying to get it out (which I've heard isn't all that uncommon), you might be able to push whatever's left to the back of the hole and fit another bolt in.
|
|
|
Roy Suggett
·
Aug 21, 2018
·
Unknown Hometown
· Joined Jul 2009
· Points: 9,325
Eli, what if you are in an alpine area where a space behind your bolt fills with H20 and then freezes?
|
|
|
eli poss
·
Aug 21, 2018
·
Durango, CO
· Joined May 2014
· Points: 525
Roy Suggett wrote: Eli, what if you are in an alpine area where a space behind your bolt fills with H20 and then freezes? That's a good question and another worthwhile thing to be thinking about. I dunno much about the alpine because I usually stick to warm weather suffering instead of cold weather suffering.
|
|
|
Boissal .
·
Aug 21, 2018
·
Small Lake, UT
· Joined Aug 2006
· Points: 1,541
Donovan Allen wrote:
2. Are you using glue ins or Rawls? If you’re using an expansion bolt, make sure it’s 1/2” x 3.5 “ minimum.
??
1/2" diameter sure (although in hard rock with enough embedment a 3/8 stud will exceed UIAA requirements) but where's this minimum length idea coming from? You don't think a 2-3/4 stud embedded 2" is sufficient in bullet rock?
|
|
|
Donovan Allen
·
Aug 21, 2018
·
Soft Lake City
· Joined May 2012
· Points: 356
Bossial- Alexi, you savage. You got me there. I was under the assumption this was taking place on not so bullet limestone. You think 2” is enough even there?
|
|
|
Dan 60D5H411
·
Aug 21, 2018
·
Colorado Springs, CO
· Joined Mar 2006
· Points: 3,472
Ryan Swanson wrote: You're supposed to let the drill do the work. It will drill faster and be easier on the tooling.
This is one of the most crucial parts of drilling. Enough pressure to engage the hammer, but no more. Your bits will last way longer and the holes will actually drill faster. The other crucial aspect is to clean, clean, and clean your hole. A wire brush fitted for your hole diameter will prevent lots of the problems that can arise when bolting. When you see how much rock dust you can get out of a hole compared to just using a blow tube, you will be astounded.
|
|
|
Boissal .
·
Aug 22, 2018
·
Small Lake, UT
· Joined Aug 2006
· Points: 1,541
Donovan Allen wrote: Bossial- Alexi, you savage. You got me there. I was under the assumption this was taking place on not so bullet limestone. You think 2” is enough even there? I don't think I'd be too happy with a short bolt in limestone... In that case 1/2" x 3.5" is probably a must and not an issue considering how easy it will be to drill.
|
|
|
eli poss
·
Aug 22, 2018
·
Durango, CO
· Joined May 2014
· Points: 525
Boissal - wrote: I don't think I'd be too happy with a short bolt in limestone... In that case 1/2" x 3.5" is probably a must and not an issue considering how easy it will be to drill. I'ved used 3/8" bolts in limestone with no problems, and this isn't even bullet limestone like dolomite. In bullet limestone, I think 3/8" x 2.5" or 3" wouldn't be an issue. However, I'd probably be more likely to use a sleeve bolt instead of a wedge bolt in limestone .
|
|
|
Boissal .
·
Aug 22, 2018
·
Small Lake, UT
· Joined Aug 2006
· Points: 1,541
eli poss wrote: I'ved used 3/8" bolts in limestone with no problems, and this isn't even bullet limestone like dolomite. In bullet limestone, I think 3/8" x 2.5" or 3" wouldn't be an issue. However, I'd probably be more likely to use a sleeve bolt instead of a wedge bolt in limestone . Agreed, I was talking about studs which I don't think work well in soft rock. A 3/8 sleeve should be fine as longs as the rock isn't too soft. I guess it really depends on the limestone, I'd feel very differently about Utah Hills limestone which appears to be really hard vs something like the limestone around Alta (Hellgate) which looks more like consolidated sugar.
|
|
|
Jason Halladay
 ·
Aug 22, 2018
·
Los Alamos, NM
· Joined Oct 2005
· Points: 15,686
·
Aug 22, 2018
·
Los Alamos, NM
· Joined Oct 2005
· Points: 15,686
Some great tips in here, good stuff. For me, an indispensable item for rap bolting is a rope bucket. Clip to harness and easily keep your rope on your person and out of harms way from falling rocks you clean off. It's also a convenient location to keep extra bolts, bits, etc. inside.
|
|
|
bus driver
·
Aug 27, 2018
·
Unknown Hometown
· Joined Aug 2009
· Points: 1,531
Tape a carabiner to the handle of your drill so it stays firmly in one spot. (Tie your leash to the handle. Clip a binder to it, then tape that biner right so it is stiff and doesn’t restate) This allows for putting the drill on and off your harness or gear sling with one hand.
If bolting on lead with stud bolts put them right on your quick draws and spin the nut down so they don’t fall off. This allows for one handed placement in the hole and if it’s tenuous, you can get your rope in to the draw quickly.
+1 for toproping the route before rap drilling. I’ve found that going down from the top I sometimes misjudge a climbers reach and have put a couple just a bit too high to reach comfortably when climbing up to them. holding a clipping jug while drilling on rappel doesn’t mean that you’ll approach that clipping hold and the same as you climb up.
|
|
|
Highlander
·
Aug 27, 2018
·
Ouray, CO
· Joined Apr 2008
· Points: 256
Climb the route, and clean the route before placing bolts. The character of the route can change some depending on how clean it is, which can effect where you might want to place bolts. Nothing worse than climbing a route that has no flow because the bolts are in the wrong place because the equipper did not climb the route, and a route that the equipper did not spend the time to thoroughly clean.
A hook and adjustable daisy is nice for pulling into the rock while cleaning or drilling. A couple removable bolts are nice for directionals on steep lines for bolting and working the route.
I prefer the squeezable blow bulbs over blow tubes, cleans the hole better, no moisture, and can be used for blowing dirt out of pockets.
A small socket wrench is nice, gives a little space over protrusions compared to a normal box wrench.
|
|
|
John Byrnes
·
Aug 27, 2018
·
Fort Collins, CO
· Joined Dec 2007
· Points: 392
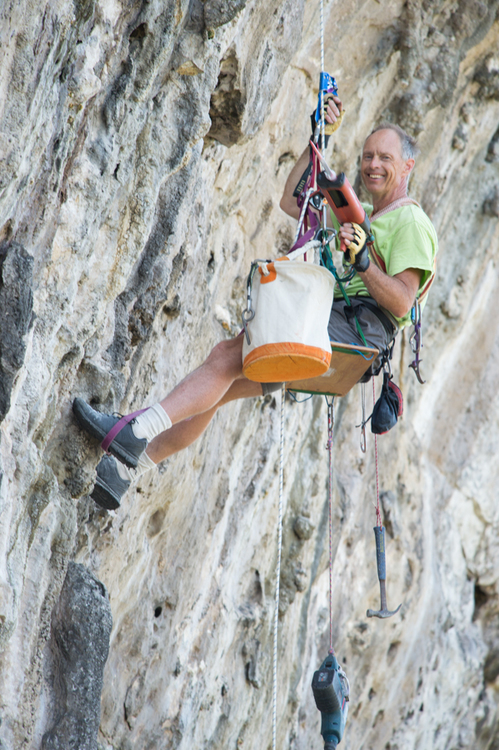
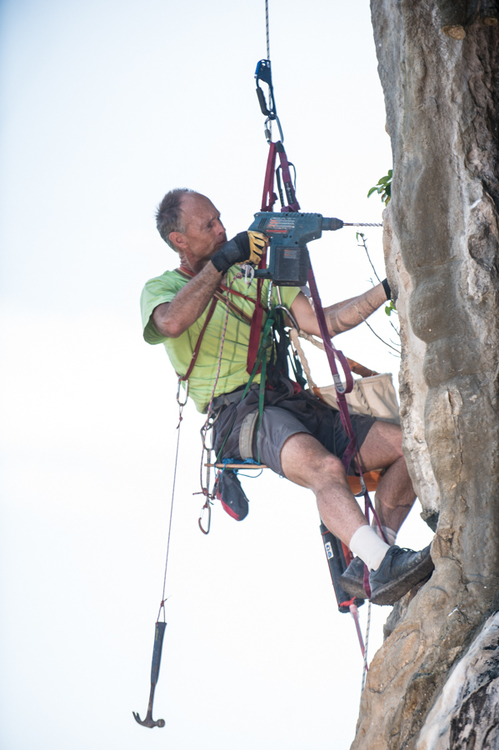
Jason Halladay wrote: Some great tips in here, good stuff. For me, an indispensable item for rap bolting is a rope bucket. Clip to harness and easily keep your rope on your person and out of harms way from falling rocks you clean off. It's also a convenient location to keep extra bolts, bits, etc. inside. Hmm... I agree... sort of. Here's my rig.
I have a canvass electrician's bucket ($15) that I put all my bolts/tools/brushes, etc. in. It has a stiffener to hold it open, a leather bottom to keep it from wearing out and several internal pockets to keep your stuff sorted. Also collapses when empty to save space. I would never hang this from my harness; too heavy. I use a wooden bosun's chair, and heavy things get hung from that: drill, glue-gun, bucket, etc.
Putting the extra rope in a bucket is a good idea but when I need to keep it out of the way, I just clip the end to the back of the seat, or flake it through a long sling. I would never put tools/bolts/etc. in with the rope, pulling out rope could make small things fall out, or certainly things would get lost in the tangle.
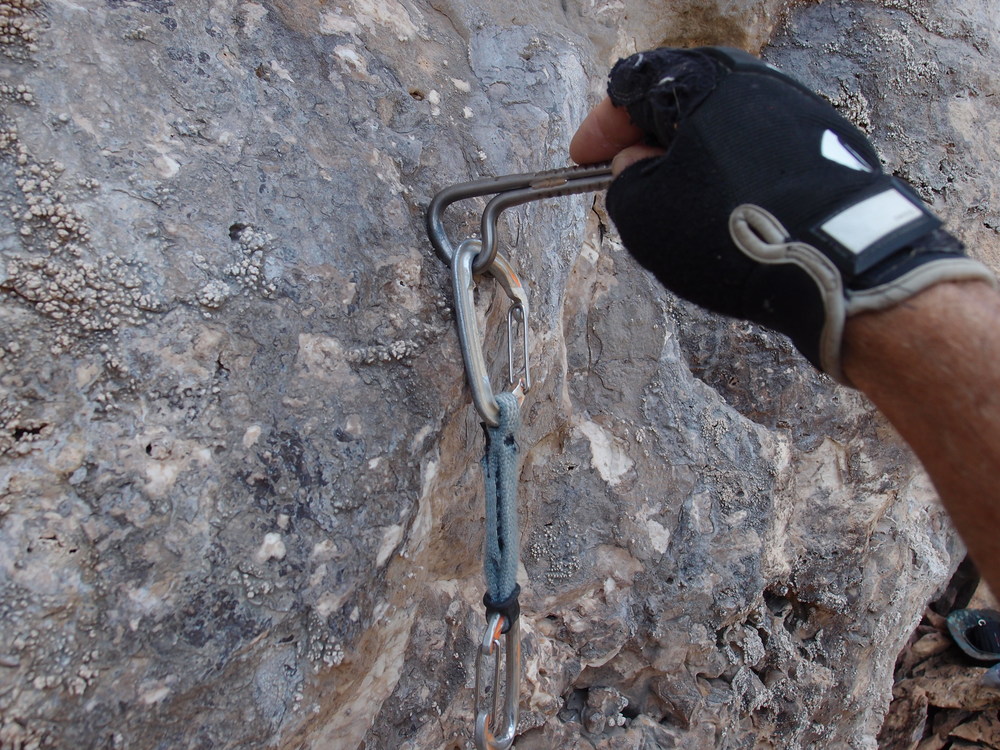
Oh, since we're talking about tips: in the first photo you can seem my "sample" hanging from the bag. Hold the sample up to the place you're considering drilling to see how the draw hangs and the hanger/eye rests on the rock. If the draw hangs free, it'll be easy to clip. If it rests against the rock, it will be a pain to clip and might abrade the rope in a fall. Make sure some nearby feature isn't going to interfere with it if it's pulled up or to the side, especially near small overhangs. Make sure it can be reached by smaller climbers from the "clipping hold." Watch out for cross-loading: In the first photo, the sample reveals the top biner is cross-loaded. In the second, the bottom biner is.
|

 Continue with onX Maps
 Sign in with Facebook