
 Continue with onX Maps
 Sign in with Facebook


Fast process for buttonhead removal


|
Thanks for doing this! my only amateur comment is don't forget the glasses and ear plugs. |
|
|
@AndyShoemaker, I was serious about the "pro tip thank you". This is a great nugget of information! I appreciate knowing how to make steel soft again. |
|
|
The description and specs on that sledge hammer include the words, "hardened, heat-treated, and tempered steel". It is not a "soft steel" hammer. Andy Shoemaker wrote: Anna, hold off on that attempt to anneal. I don't see how the sledge hammer can be annealed with the handle still attached. I had considered the annealing process as well, and I don't believe that you could heat it sufficiently long without burning up the synthetic handle and the bond between handle and head. I considered a couple other options for safety, while still retaining Anna's claw hammer/framing hammer. I have a MIG welder, so my immediate thought was to weld 1/4" plate mild steel on the claw hammer's head to create a softer striking surface. When one has a wire feed welder on hand, those proposed solutions come easily. A simple 5 minute task. A down and dirty way to mitigate hardened steel from striking hardened steel would be to use a galvanized pipe cap. They are malleable iron. Found in plumbing supplies, inexpensive, and in a variety of sizes. Find the size that best fits over the claw-hammer head. Pipe caps are sized by the ID of the actual pipe that it fits, so a cap for 1" pipe has a substantially larger hole. Weld it on (w/o breathing the galvanized smoke), or duct tape the cap thoroughly to the hammer so it doesn't fall off. 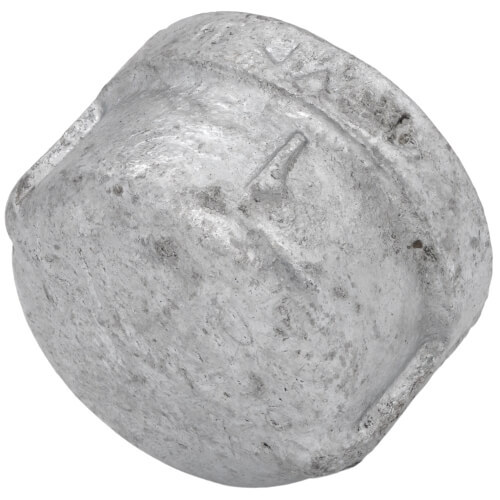 |

|
ClimbBaja wrote: That's a good call- I was picturing an Estwing style all metal hammer in my head. You would definitely have to remove and re-set the handle- which isn't easily accomplished with a composite handle. Don't follow my suggestion. |
|
|
@Andy Shoemaker Well, it was a good idea while it lasted. I'll check out the galvanized pipe cap sizes at my local hardware store. That could easily be epoxied on to the hammer head. Thanks for the idea @ClimbBaja! |
|
|
The link for the mini sledge in my initial post was incorrect (just fixed it). I have this 40oz Estwing Blacksmith's Hammer. It was recommended by someone I trust for advise regarding replacements. This 2lb Estwing "drilling hammer" may be a good alternative.
|
|
|
Anna Brown wrote: Deadblow hammers have a few uses for causing impact force, but without damaging the components. Such as, with automotive brakes, where you need to remove a brake drum or rotor, without damage. It functions more like a mallet, but with less rebound. The wrong hammer for this job. I wonder about epoxy glue holding up to repeated impact? I've seen some epoxy that remains somewhat pliable, and others that cure to a brittle condition. Maybe epoxy, then duct tape to hold in place should the epoxy fail? Or, do you know anyone with a welder? *************************************************************************** I hope that folks aren't thinking that we are dismissive of others' efforts and their contributions in this, or in other threads. Ours is a quest for best methods and practices. We may borrow from construction and other industries, but climbing hardware is a unique niche. We are improvising as we go along. Sharing information, comparing notes on our experimentation, and discussing what works best (or what fails to work) is vital to progress and to climbers' safety. Practical methods for the removal of old carbon steel anchors, incl. 5/16" buttonheads, have been a challenge as these bolts age. ***************************************************************************** Roger B. I recall many years ago that you tried out a few of my modified chisels ("Juan Maderita" on the SuperTaco). You had good success with the tile chisel; I think you liked the modified Bosch best? We are interested to see your other tools if you can post some photos and/or descriptions. I'm especially curious about your slide hammer. I made an unwieldly slide hammer with a Vaughan "Superbar", notched to 5/16", cut off and welded to the end of a pipe. It did work, but the difficult part was getting the prybar started under the hanger. At that point, it was just as easy to use the 1" modified cold chisel. Maybe you had better success? I didn't have much luck with a prototype puller attached to the hanger. Ripped some hangers over the head, and snapped the head off of a 5/16" buttonhead before the bolt would move. |
|
|
What about this option… It’s a rubber cover for a hammer head. They have it for the 16oz Estwing framing hammer. And a basic DYI option to make your own: |
|
|
Anna Brown wrote: Cool gadget that I haven't seen before, thanks for asking. My mechanical sense says that it absorbs energy. That is a bit like making a hard hammer it into a mallet. The goal is to transmit close to 100% of the energy from one striking surface to the other. Absorbing energy is counterproductive in this situation. I think of climbing helmets absorbing impact between hard surfaces - skull and rock. This gadget is like a helmet for the hammer. I hit my post limit today. Edited to add: If there is anyone wanting Rawl "Drive" 5/16" x 1.5" buttonheads for experimenting or practice in removing, I still have a box of these unicorns. Production stopped in the last century, though the 1/4" size is still available. I will happily send a few to anyone who is serious about replacing old bolts. |
|
|
Here's another hammer head cover that fits larger hammers. I ordered one to see how it works on my hammer with the next replacements. I'll report back. A video showing the fit on different hammers: |
|
|
Ask your mechanic if he has a welder and wants a small project. Mechanics generally know someone with a welder. |
|
|
Maybe one of the hammers could be hard faced with a mild steel welding rod to put a softer finish? |
|
|
Yours would be an extreme application, but I have been amazed by how JB Weld products have worked. If you go the pipe cap and epoxy route, might give their steel weld product a try. |
|
|
ClimbBaja wrote: Pictures coming. Slide hammers did not work for pulling bolts but does work for rusted out pins, sleeves, cones, etc. 1/4" split shaft threaded bolts with no hangers is what they were made for. (South face route on Half-Dome) Yea, that was a fun one! One try with the tile chisel and I was sold. That is now about all I use to get things started. |
|
|
Yeah, the tile chisel is a game changer to get the removal process started. And once I learned to set the hammer with the teeth DOWN so I could use gravity to help with the hammering, I was able to get the buttonheads very quickly. I created this post to share what has worked for me for future teams taking on this removal work. I initially bought and modified numerous tools and tried several techniques in the field with disappointing results. For the first removal, we spent all day getting a single buttonhead out (1of 5 we needed to remove) and a single anchor hand drilled (1 of 2 we needed to install). My pack was so heavy on that hike out that I cried thinking about coming back to finish the job and having to hike out of that canyon again. I made changes to my tools after that and connected with numerous people in the replacement community. On my next trip to that route I returned with 4 guys to help carry gear/tools and was able to more efficiently get out the remaining 4 buttonheads and handdrilled the remaining 3 bolts (2 for an anchor, 1 protection). From there, I kept adjusting tools/process and now I feel I have buttonhead removals down with just 3 tools (plus eye protection!). This reduction to the bare minimum cuts down on weight and on the cost of tools that need to be purchased. Being able to successfully complete a replacement project helps keep the momentum going so you're motivated to do the next one. If I had struggled again on my second trip to that first project, I would have stopped there. Thank you to the folks who helped me get through my initial learning curve!! Our replacement projects in the Sandia Mountains have been able to bring two old routes back to life and we've been able to upgrade several of our area classic with modern hardware. |
|
|
Thank you Anna for you and the other volunteers work! Climbed for the first time in the sandia last year and the boy it’s a pretty taxing environment! The UV is intense as is the extremely dry air. |
|
|
Anna Brown wrote: The sledge is softer but it can still chip the framing hammer. Consider adding leather gloves to your PPE. I've worn a hammer chip implant at the base of my thumb for 35 years from doing this exact thing. Even with aggressive probing I was unable to remove it when it happened. But the important thing is with adrenaline fueled focus I can't feel it when jamming :) And thank you for all of your contributions at the crag and here on MP Anna! You're awesome! |
|
|
@Jabroni McChufferson Isn't that hike up and out at the end of the day the hardest! We're lucky to have the mountain so close to Albuquerque but it's very committing when you climb up there. What route(s) did you climb? Did you get lost trying to find the route? @SenorDB Thank you for sharing this story. The world and all pain disappears when jamming. I think adding the 3-rd party rubber cap to the framing hammer might mitigate the risk. I'll report back after on my findings after I use it. |
|
|
Anna Brown wrote: The Needle! No we sussed part the approach the evening before and dropped some water/beer at the saddle. the tangled mess near the base we didn’t nail. Next day did some sport clipping at Paloma?
|
|
|
Roger Brown wrote: |


