
 Continue with onX Maps
 Sign in with Facebook


Fast process for buttonhead removal


|
|
This process has consistently worked to remove buttonheads out of granite FAST with just 3 tools (links to Amazon). Thank you to the folks who pioneered these tools/techniques and to those who helped me dial-in the techniques. —
— Here’s a video showing the whole process: Here’s a video showing how to make space with the tile chisel: Once there is a little space behind the buttonhead, get the framing hammer behind either the buttonhead or the hanger with the teeth facing down so you can hit the hammer down from the top. Then use the sledgehammer to hit hard. It usually takes 10 hard hits. This is the best position for the framing hammer on vertical rock so gravity can help when the hammering starts. 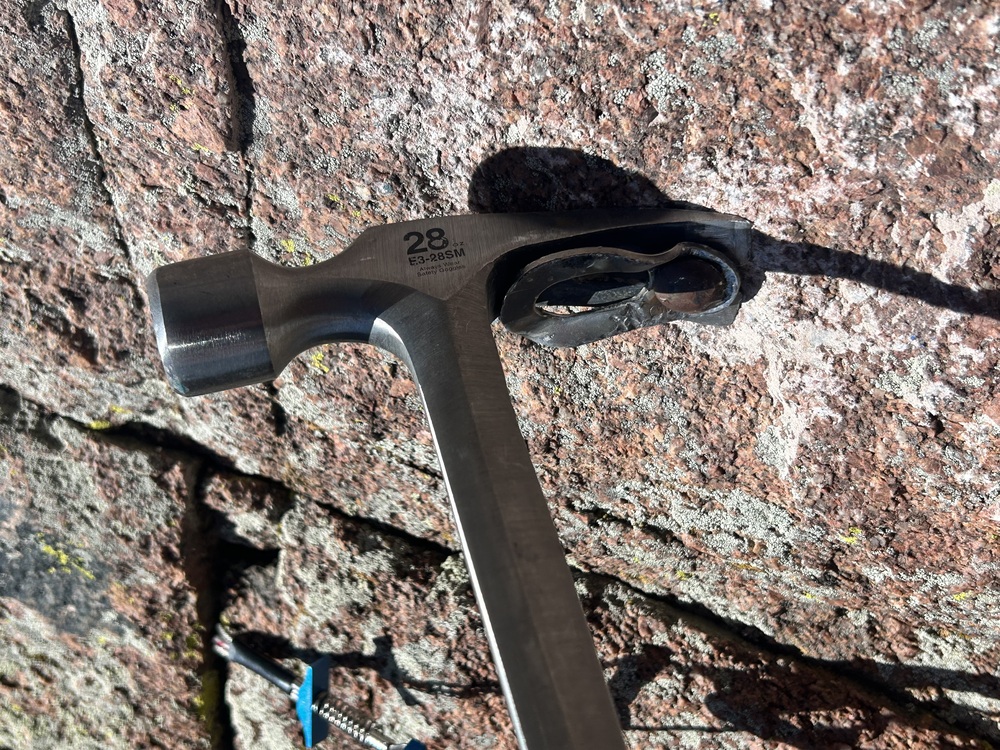 Protip… bring an old piece of cord/sling to girth hitch to the hanger so you don’t drop it when it pops out. Yes, I have tuning forks but the modified tile chisel works better because it’s easier to get out. — The modifications (use grinder or Dremel with cutting disc or attachment for grinding out metal) For the tile chisel (left in photo below), cut a wide groove down the middle and grind down the teeth to have a sharp approach angle. For the framing hammer (right in photo below), cut a deep groove and grind down the teeth to have a sharp approach angle. Cut out all this that is circled in red in the photo below. 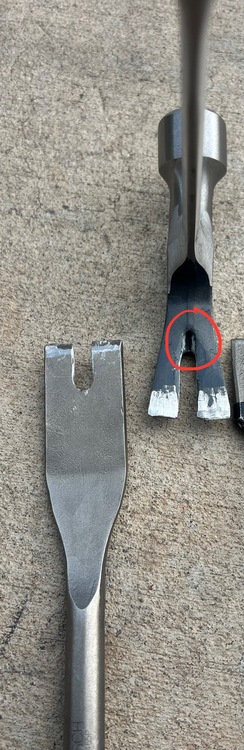
 |
|
|
This was our haul from a project yesterday in the Sandia Mountains. The 1/4” were most likely from the 1974 FA and the 5/16” from early/middle 90s? 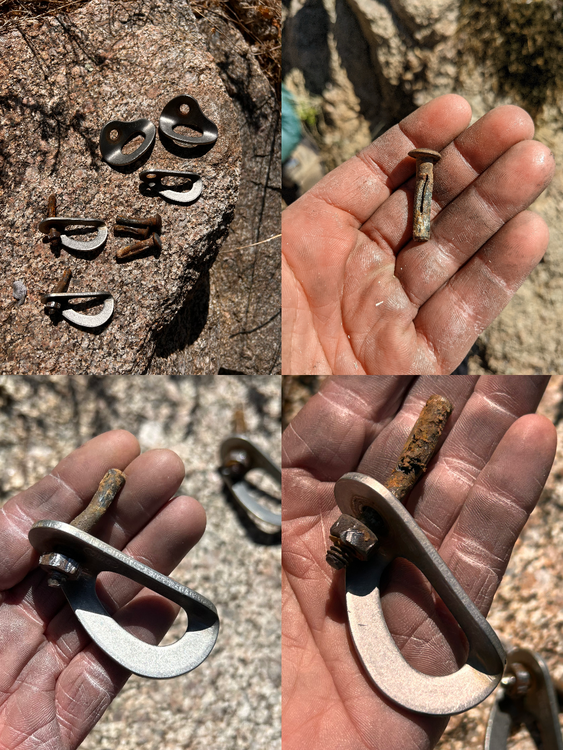 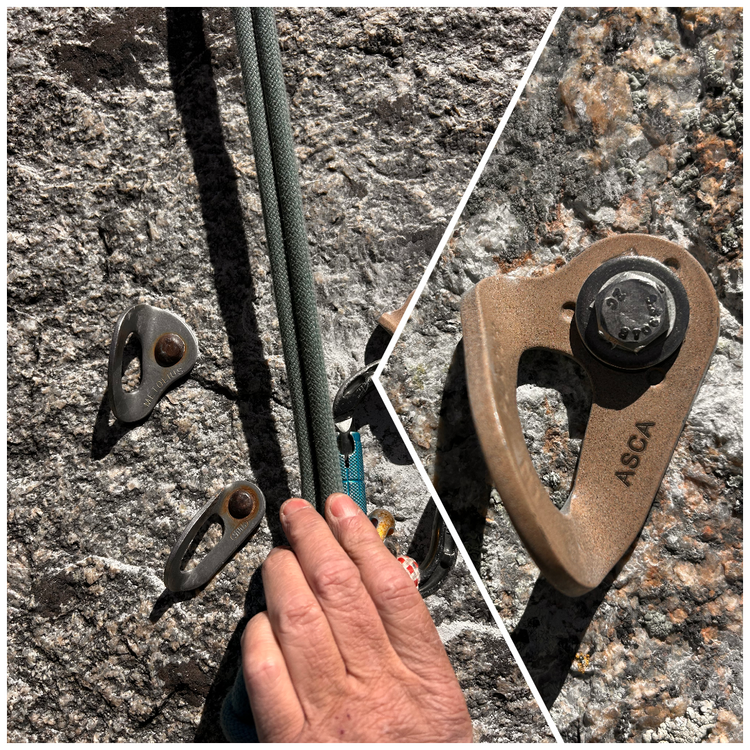 |
|
|
Nice work, I've been scared shitless on old buttonheads many times |

|
Thanks for sharing Anna, excellent guidance for those who have never extracted these types of bolts. |
|
|
No secret sauce, but we’ve been able to reduce to just the 3 tools. To me, the steps are: 1. Make space to get hammer behind head or hanger 2. Insert framing hammer with teeth pointed down 3. Get above framing hammer and use sledge to hit |
|
|
Anna, it's good to know that a few folks take an interest and are willing to make the effort to replace these time-bomb bolts. "Thank you to the folks who pioneered these tools/techniques and to those who helped me dial-in the techniques." De nada. I first recognized the need for bigger & better tools in the 1990s. 5/16" x 1.5" Rawl "Drive" buttonheads became popular in the mid to late 1980s, coinciding with the introduction of the Bosch "Bulldog" cordless rotohammer. The Lost Arrow piton "tuning fork", first used with a 1/4" slot, was not up to the task of removing the 5/16" and had a 1/4" slot. The following link shows tools and methods: https://www.mountainproject.com/forum/topic/118667371/replacing-split-shaft-climbing-bolts-with-powers-bolts-at-sugar-loaf#ForumMessage-118668203 Another informative thread. I'm "Juan Maderita" on ST. Unfortunately, Supertopo deleted all photos form the forum archives: http://www.supertopo.com/climbing/thread.php?topic_id=597882&msg=597974#msg597974 After much experimentation and various prototypes, I have some suggestions: Start with the modified/slotted tile chisel under the hanger to lift the hanger and bolt the initial 1/4" above the rock. Next, use the modified/slotted 1" cold chisel to complete the extraction. The tile chisel is not necessary, but provides some finesse when beginning the removal. When multiple bolts are being removed, and when weight is not a concern, the 2.5 lb. engineer hammer (aka: sledge) does make the job much easier than using a climbing hammer. I suggest ditching the claw hammer for two reasons: 1. Prying is less controllable than lifting with wedging action. I snapped 2 Vaughan "Superbar" prybars trying to pry out bolts. It requires some thousands of pounds of pullout force to pry the 5/16" out of hard rock. 2. Hammer faces should never be struck against each other. The hardened steel can shatter, with shards flying like shrapnel. "The 1/4” were most likely from the 1974 FA and the 5/16” from early/middle 90s? " The photo shows SS hangers with those rusty 1/4" Rawl "Drives". In 1974, the commercial hanger choices were either chromoly Leeper and SMC. Stainless steel hangers were not made until much later, including SMC's newer SS version. I'm wondering about the hole patches after buttonhead removal and replacement from the other thread? You are overdrilling the original hole to a larger diameter, I hope? Thanks for your service, and thanks to all who volunteer their time, expense, and energy. It's a difficult and often thankless job. |
|
|
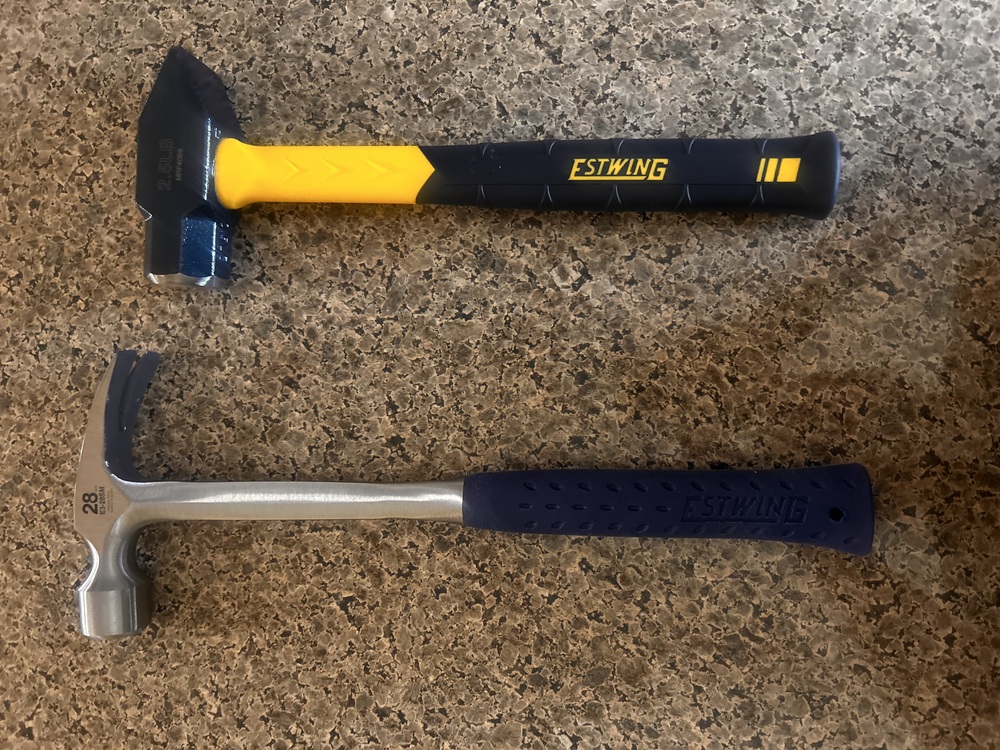
These bolts are within wilderness boundaries so we're patching existing holes and hand drilling new 3/8" holes. It's proven frustrating to hand drill existing holes larger to 1/2". For me the framing hammer is a must have. We don't pry with it... instead we use the sledge hammer to hit the head of the framing hammer to leverage the buttonhead out of the hole. The curve of the framing hammer’s head is perfect for this job. We can get bolts out this way in probably 30 seconds once space is made for the hammer's teeth to fit behind the hanger. Photo of the two hammers working together:  |
|
|
While I appreciate seeing people doing the good work of bolt replacement, your method leaves a lot to be desired. I’m sorry but why would you need to drill up to 1/2” to replace 5/16” bolts? A 3/8”x2 1/4” bolt is a more than adequate replacement. I know hand drilling those up to 3/8” really sucks but it’s very doable. Also hitting hammers together is never a good idea. I’m going to go out there and say I would rather you replace 1/2 of the bolts well, than get twice as many heavily handed. Your patches are going to be suspect given the large area you need to cover to hide the rock scaring. They will change color over time and become very noticeable
|

|
Hey Kevin, how many 5/16" buttonheads holes have you tried to hand drill to 3/8"? It's super hard since the old holes are nearly 3/8" or so in the "wide" direction (where the split shaft went in), and the bits get SUPER stuck really easily. You can even tear the grip off of hand drills trying to rotate since most of your time is trying to rotate to break out rock. I think with modern 4-cutter bits (the ones that are symmetrical + shaped), it might be possible, but it was nearly impossible with older bits (including the Bosch Bulldog Xtreme bits that the ASCA has been supplying for years - those are solid carbide head but not symmetrical + shaped). In Tuolumne a few times I would size up to 12mm and place Long-Lifes, since they were really short. Hand drilling up to 12mm was doable, while the 3/8" bits would always get stuck. This can be strongly affected by exactly how hard the rock is and how much it spalled when the 5/16" was driven in. And also whether people had drilled true 5/16" holes, or oversized holes (it was common for folks to use slightly oversized bits in granite since you often couldn't get a 5/16" buttonhead to go into a 5/16" hole in hard granite). |
|
|
We hand drilled several holes from 5/16” to 1/2” last summer and the bit got stuck on every hammer hit with both 2-cutter and 4-cutter bits. Breaking the bit out of the stuck position then bore out the hole opening as the granite crystals broke off. It was not the quality of work I was willing to leave my name on so we pivoted. Be began patching the exiting holes using J-B Weld SteelStik (with granite bits pushed into the putty and then crushed with a hammer) and hand drilled 3/8” holes from scratch. Our patches are generally no larger than a quarter and I believe are invisible to anyone besides me in this granite. We’re working in a rugged wilderness area with hour or longer approaches and limited access to volunteers to carry gear/tools. I’m personally focused on making sure we are fast and efficient so we can get replacement project completed in a single trip. I’m learning, adjusting and improving as I go based on the conditions I’m working with here on the ground. The removal method I detailed above has been consistently working on our projects with our granite. Once we start, we can get a 5/16” buttonhead out in a couple of minutes with 3 tools. |
|
|
Greg Barneswrote: 0 |
|
|
The dont hit hammers together thing is what got me. |
|
|
Most of the 5/16 buttonheads that I have upgraded to 3/8 5-peice in Yosemite were placed in 1989-1990. There were so many I had to make what I called "The Grinder". It was made from a Snap-On scaffold wrench with the socket removed and a SDS adapter installed in its place. This scaffold wrench has a rubber hammer head for banging things around. Using the asca supplied bits I would softly tap the bit until it sticks then turn, tap, turn, tap until the bit bottoms out. Really goes fast. Now I can finish up with the hand drill. I am headed east either on 40 or 70 to visit the Grandkids soon and I always carry my bolt replacement stuff. I have some pretty cool pullers, slide hammers, and other stuff. If any of you want to see any of these toys let me know. |
|
|
Regarding hammer hitting hammer... my understanding is the steel in the mini sledge hammer is a little softer than the framing hammer and this is why the two are paired together for this job. All I have is my real world experience to share... We've removed roughly 20 buttonheads so far using this technique without any issues with steel chipping. I always have two pairs of safety glasses in my bolting kit. I did break one of the "teeth" off a modified cold chisel fairly quickly last summer but the Bosch tile chisel has held up to the job of opening up space between the rock and the buttonhead so we can get the framing hammer teeth behind things. |
|
|
@RogerBrown... Are you driving through Albuquerque? I'd like to see your bolt replacement kit. |
|
|
I’ve only hand drilled about 50 bolts in the 20 years I have been doing bolt replacement. I have not hand drilled 5/16 buttonheads out, but I have replaced close to 30. I have a modified tuning fork that works pretty well, although I know that’s relative. I’ve replaced over 500 1/4” buttonheads so do have some experience with this work Here is the thing, when you scar rock it takes a really long time to oxidize. If the outside of your patch is surrounded by the scarring, once you have some weathering the contrast between the rock scarred by your removal tools and the patch becomes very obvious. If your patch is larger to cover some of the scaring, the outside edges will start to flake and break away as it is very thin. If you use heavy handed techniques you end up with a lot more scaring to the rock than if you carefully dislodge the bolt by using wedges(pitons) etc. I spent over 2 hours once getting a single 3/8” split shaft bolt out. Sometimes this work really sucks. I get it that this is a remote area, and again thank you for your hard work!!! I’m just letting you know I feel your techniques you are posting on a public forum are not the best. Yes they might be faster, but is that the most important consideration? Your bolt, placed in desert granite, is going to be around for another 100 years. Wouldn’t it be better if you could find a way to do this work in the best way possible? Have you tried a Hurley SR on any of the 5/16 bolts? Have you tried modifying a tuning fork so you can leverage more evenly? Have you considered leaving the 5/16" bolts ( which I am guessing are still bomber based on personal experience) for the next generation? Thank you again for your service |
|
|
ANNA, Yes, I think we will be coming thru there. My tile chisels keep getting modified every season. Kevin is correct concerning the scaring. Over the years I have got to the point where it is hard to tell the bolt/hanger was replaced. I probably have over a dozen tile chisels that I use now, and a bunch of lost arrow tuning forks that I don't use anymore because the angle is too extreme, and I was breaking bolts and scaring the rock. That is when the tile chisel slot went to at least 2 inches deep and went from nothing to 1/8 of an inch in those 2 inches. Those buttonheads come out so smooth and easy when the force is straight up. I have aluminum spacers that can be stacked between the rock and the hanger to reduce the scaring. This is not work, it is fun stuff. Now, as for patching holes: A small bag of round rocks and dirt does the trick. I fill the hole with patch material then tap the best fitting rock in and any patch material outside I smear dirt on. One season a few holes got patched using hippy beads and cat-eye marbles. I think it was on an aid route for a bored belayer. |
|
|
@KevinStricker, I actually started out using tuning forks, but now I use the tile chisel exclusively. I prefer it because it’s easier to dislodge after using it to make space, and I can hold my hand farther away from the rock. Functionally, it works just like a tuning fork, and the leverage feels just as balanced and even to me. I'll add this... neither the chisel nor the framing hammer needs to touch the rock. They can both be placed behind the head of the buttonhead instead of the hanger to alleviate your concerns. I personally place the chisel behind the head to create space. Then I place the framing hammer behind the hanger because to me the hammer teeth lay more solid in the position for the leveraging. For me, speed is the primary consideration. We're driving 1+ hour to the parking lot, we're mostly working above 10,000ft, we have longer approaches, we have afternoon thunderstorms to contend with, we are mostly hiking up/out at the end of the day, we generally have 4+ pitches to climb plus we must handdrill the new bolts and get the old buttonhead bolts out. Speed is firmly at the very top of my list. |
|
|
Anna Brownwrote: If you were concerned you could anneal the sledge hammer. Heat it up as hot as you can, for as long as is reasonable (10-20 min will suffice), with whatever means you have and let it cool down slowly (in a bucket of sand works well). I wouldn't do this with the framing hammer since you want the "claw" (ackchually the toe) to remain hardened. If it were me, I would anneal the sledge rather than using them both in hardened form- I have impact shattered hardened steel before and it's scary energetic. Like enough to embed itself in your skin by a mm or two. ETA: as pointed out- this only works if you separate the handle from the head, or are using an all metal hammer. |
|
|
@AndyShoemaker, I'm building a fire now. Thank you for this pro tip! |
|
|
Anna Brownwrote: I can't tell if this is a joke- haha. A propane blow torch would be the bare minimum to anneal low grade tool steel- like 1200-1600F for 15 minutes. Sorry for being the Safety Sam on the chat! |


