
 Continue with onX Maps
 Sign in with Facebook






The Mini Moonboard


|
|
Braxton Francom wrote: Nice! You got a killer deal; just the four holdsets new from Moon cost $1400 shipped. Thanks for the review! |

|
I would say LEDs on the moon board except the 2024 new set are not needed. The color variety and spacing makes it relatively easy to remember what holds are on/off. Wonder why they went all blue and wood on 2024 |
|
|
 |
|
|
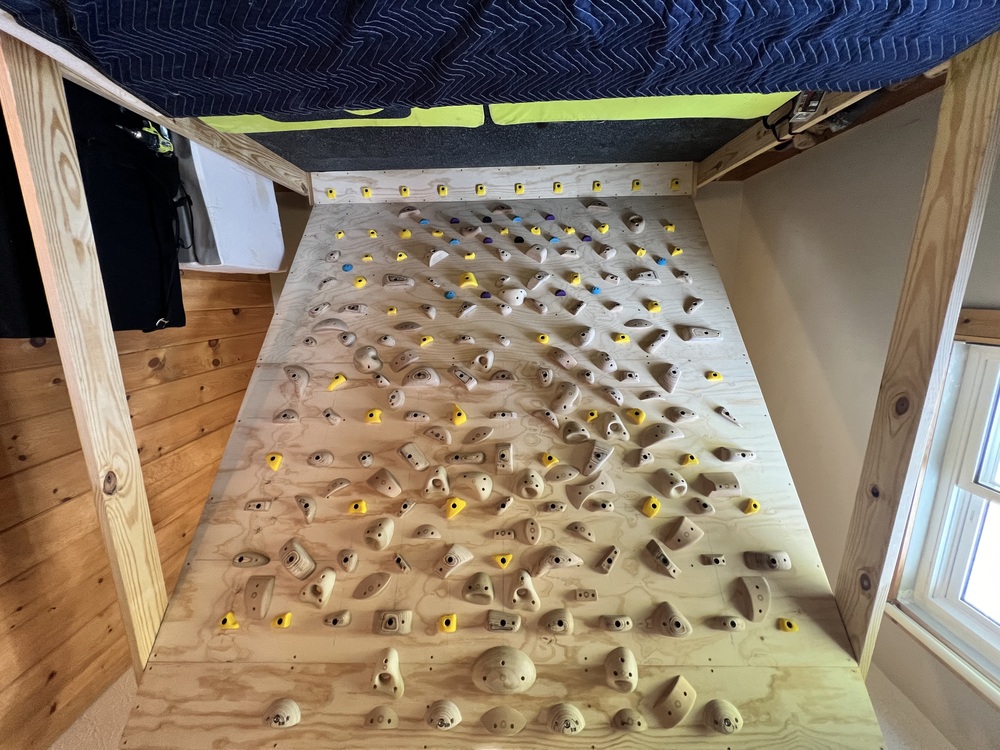
Damn dude, that’s a nasty training set-up. Really well done. Are those the beastmaker holds in between? |
|
|
Thanks Eric! Appreciate the psych and positivity. It felt like an art project. lol Yeah, they are almost all beast maker. There’s a couple tension and escape grips. This week I’ll put up 30 more grips arriving from Woodcrag (small shaper from Canada) and a few custom holds other small shapers. Very psyched put those up this week. The beast maker holds are definitely cool shapes. Nice on skin, difficult, but fun). Their training series are a great value if you’re considering but their deluxe holds are pricey! Quicker shipping than some US companies shockingly. |
|
|
Michael Azevedo wrote:  |

|
How’s the meatloaf? |
|
|
John Clark wrote: Honestly pretty nails at 40 degrees but that’s the point. I’m considering moving it down to lower right on the board to practice moving off of it. |
|
|
Michael Azevedo wrote: Which holds from beastmaker would be hard at say…29.5°? Sorry for drifting Fritz |
|
|
John Clark wrote:
Hard: - small leafy crimp (one of my favorites) - nano hoist (prob the most difficult of the bunch) - dog bone pinch (this hold is sick and versatile) - classic crimp set at certain orientations (sidepull and undercut could be difficult). Horizontally it won’t be super difficult. - thin lip (I have the big lip on my board and love them) - 2 finger pocket (if you want to train that sort of thing) I don’t have them, but I suspect the farret, Tonfa, and sledge could be challenging at 30. Hardish: Button pinch, symmetrical pinch pair (vertical), incut pinch (vertical or near) |
|
|
A little late to the party but: I bought mine in 2020 so I don't think there were any other short boards available, at least in Europe. It was so long ago that I can't remember the total cost, but at the time plywood and planks were still relatively inexpensive, so the main cost were the holds. I like the dimensions but it would be nice if they had either added a couple more rows or if they had increased the kick board height. At 5'9, with a standard kick, I can't get off the ground on many of the problems. I think most ceilings could accommodate either. I am not a fan of spray walls, mostly because I don't have time to set many problems myself. Training utility: I think that the mini transfers really well outside. It has been particularly helpful in improving the kind of core that is useful on the steep stuff. At 50yo, I warm up carefully on a hardboard and rings and try not to overdo it, but knock on wood have not gotten injured on it yet. I'm looking forward to the new layout! It has been kind of a game changer for me
|
|
|
I've been using a Moonboard Mini for a bit over a year at this point.
You may find this post by Jason Halladay to be helpful as you look to build your board: https://jasonhalladay.blogspot.com/2017/01/swole-hole-moonboard-shed.html 3. Now that the board is at the as-designed angle (40 deg off vertical) it is fantastic. It is not however a good board for beginners unless you place additional holds in to give large jugs. I do that on my board regardless to give a warmup circuit that protects my fingers. 4. I find it more useful for training than a spray wall, partly because I'm forced to try routes that I would likely not envision or care to set in a spray wall. 5. The app has been meh. Just got the new one and contact list is broken, but it works well enough. If you do build one and can do an extra tall kicker I'd recommend that. I'm on a concrete garage floor and had to push the pads back to give a couple feet starting space to my kicker. A few problems with the start set really low become difficult to pull off due to the pad height. |
|
|
Mark White wrote: hey Mark- Thanks for the detailed post! I just ordered my holds, bolts and LED’s last night. Looks like I’ve got about a month to get my board framed out.. Will be in a concrete garage like yours so I’m taking the advice to double the kicker to 12” to accommodate 6” of padding.. what spacing did you do for your vertical supports? I’ve seen everything from 16” to 24” and even 32” spacing
|
|
|
Quinn Hatfield wrote: Nice! I'll be right behind you; Oliunid said their Moon inventory will be restocked by the end of the month. I'm going to go with yellow + WoodB + WoodC, which yields 2800 problems at V6 and under. Then I'll slap some friendly low-profile holds in the remaining zones to facilitate therapeutic ego massage. We'll be traveling for the summer, so I'll hopefully have the board usable by the time the school year resumes. |
|
|
Why skip a set fritzy? Seems like if you can spring for 3 of 4 you can just spend the couple hundred on the 4th. |
|
|
Eric Marx wrote: My rationale is twofold. The $350 I'm not spending on Wood Set A will help pay for the lumber and hardware. And spraying that zone with luridly obese holds will give me more options for warming up and doing endurance work. (Although I would imagine that trying to work endurance on a Mini could be comically hamster-wheel-esque). |
|
|
F r i t z wrote: I see, I checked out the set on my app and it’s still full value with many of the better benchmarks. There is somebody who has set a number of circuits on the mini, highlighting all the holds and providing the move by move beta in the comments. I think they’re just called “circuit 1, 2, etc etc” Sounds cheesy but some of them are nails. Imagine a very fast hamster on a very tiny wheel haha |
|
|
Quinn Hatfield wrote: I used four 2x6" boards. Two on the edges and two in the middle dividing it into roughly thirds. The outside "thirds" are 34" spacing and inside is 27" center to center. Note that I initially started building a design that would fold and store to the side in my garage but then bailed on it and went to a stationary board. So I have reinforcement and some other odd decisions you probably won't face. Can provide pictures of it would help you out. |
|
|
Mark White wrote: Thanks Mark! I’m going with 6 boards Looks like my spacing will be 12” from outside edge to the next upright- and then 24” for the remainder. thx |
|
|
Here's a snapshot. As noted before, my design changed from a folding board to a static one half way through which is why this design is so atrocious.   |


