|
|
jt newgard
·
Feb 7, 2022
·
San Diego, CA
· Joined Jul 2016
· Points: 461
Peter Zabrokwrote:I reposted the photo from above. Have a look. It appears as though buddy has tied backup knots while jugging a fixed rope. DON'T DO THIS! You are making life SO much harder because you are lifting the weight of rope. When you are jugging a fixed rope, you aren't lifting ANY weight. Let it hang, man. Thanks guy. By posting my jingus setup I've learnt something new! That makes sense... since you don't need to clean any gear on a fixed rope, you're always attached by two points (until passing a knot as you mentioned). Looks like it's back to the swamp, I will be ribbit-ribbiting up the rope in no time!
|
|
|
Peter Zabrok
·
Feb 7, 2022
·
Hamilton, ON
· Joined Dec 2007
· Points: 645
Yay! Glad I could be of help.
When you start out as a caver, not a climber, the first thing you learn in the vertical world is how to ascend a fixed rope. When ropes are fixed on each end, like you necessarily do when caving, then it's impossible to tie a backup knot. That being said, if you really feel the need for a backup, it's cheap insurance to run a Micro-Trax or the like underneath you. Still, if the fixed ropes are plumb, it's one more thing to get in your way. As you like, the Better Way is whatever works best for you.
There must be a million different systems to ascend a fixed rope, with big wall climbers using the most obvious yet pretty much most inefficient system possible. It's great if you're jugging to Dolt Tower on low angle rock, but if you're out in space someplace [which is usually the case on harder aid since the routes always overhang] you really need to figure out the Better Way. The cavers jugging the entire Dawn Wall are using a complex ropewalking system which just isn't practicable on much else, save maybe something like Fantastic Pit in Ellison's Cave, Georgia, USA [not the other Georgia, where the world's deepest cave is, over 2200m deep]. Fantastic Pit is over six hundred feet of free hanging jug, so a ropewalker would work well. That being said, back in the day I did it in about 25 minutes on my Frog system, and this was before I used an ankle cam. As mentioned above, I did 200m in under 23 minutes recently. When I wasn't even fit.
Take some pics of your system when you set it up, and we'll have a look. In the meantime, you can study these photos, but more importantly, study what's WRONG with the photos!
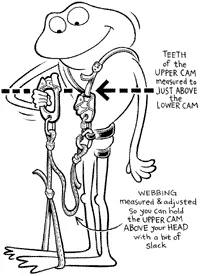
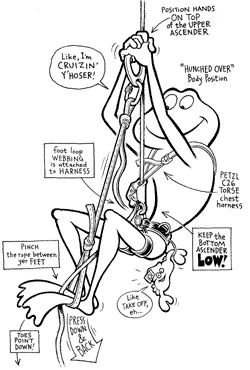
![]() Frog 1 corrected. Correct measurements for the Froggy system – this diagram by Mike Clelland! features a dedicated footloop plus safety cord you tie from webbing, but you can use your aider[s] and adjustable daisy if you prefer. The attachment of the Croll to the harness is too high and is incorrect – use a short-spined locker in parallel with your belay donut to mount the ascender as low as possible. Thanks to Mike! and Climbing Magazine. Frog 2 corrected. How to climb using the Frog system – study, learn, and kick ass on free-hanging jugs! Diagram by Mike Clelland! with thanks to Climbing Magazine. Note the inclusion of Wee-Wee the Big Wall Crab, eh?
Things to Note Using the Frog System: - Since you want to be able to squeeze the trailing end of the rope between your toes, it is best to use a single wide aid ladder that has room for both feet in a single step. Otherwise, you should tie your own dedicated foot loop because it’s harder to squeeze the rope between two feet each in one aider
- When starting out, get your partner if handy to pull down on the fixed line to put tension in it so it autofeeds through your lower Croll ascender – quicker and easier than squeezing the rope between your toes. Or if you are climbing a fixed rope for the last time and pulling it up to continue once you reach its top, drop the free end of the rope beneath you and let it hang in space – no knot! – its weight will help it better autofeed
- Make sure that the rope is declustered beneath your Croll – it has to autofeed by its weight hanging freely, so you don’t want it twisted around a daisy or your leg nor any other crap that might be dangling off of you
- Once you are a ways up and have the weight of the rope dangling beneath you, the Croll will autofeed easily. And when you are higher still, if you squeeze the heavy rope between your toes, it will help you stand more upright by pushing your feet back into plumb – get it?
- When you begin a free-hanging jug, cinch your Torse chest harness down tightly. If you are standing on the ground or your portaledge, then you want to actually feel “hunched over”. This will keep you upright when you are jugging in free space
- Experiment with step length. Instead of making short movements, try making the longest “steps” you can, maximizing the distance you get each time you stand up. Don’t forget that final “udge” just before you sit to gain those few precious inches by arching your back and thrusting upwards with your hips
- When the angle lessens and you find yourself touching the wall, you can take one foot out of the step and use it on the rock. Do a bit of a scissors step – think Pete Townshend, the guitar player from The Who – with your back foot pressed backwards in the step out behind you in space, and your free front foot stepping against the rock. Look for bumps, rugosities and ledges that you can push down on as a foothold
- When you’re touching the rock, loosen off the tension a ways on your chest harness so you are less hunched and more upright, just tight enough to lift your Croll ascender the full distance with each step. When jugging one-footed against the wall, you can make much bigger steps, too
- This is the reason you should invest in the Torse harness – so that it is readily adjustable based on how steep the ground is that you’re jugging
- When you get to the anchor, immediately release the tension in your chest harness to relax – whew!
- As with any jugging system, it never hurts to run a backup autoblock device below you
Above is only a short selection of tips from HOOKING UP - The Ultimate Big Wall and Aid Climbing Manual by Fabio Elli and Dr. Piton. Learning how to jug properly will completely underwrite the cost of your book in terms of time, effort and heartache saved! In my 800-plus nights on El Cap, I have only seen a very small handful of climbers efficiently ascending a free-hanging fixed rope, and for the most part they were Euros or cavers.
This is like ONE page from our book. And there are 670 pages of stuff like this you can learn!!
Email me if you're interested: passthepitonspete@hotmail.com
|
|
|
Fail Falling
·
Feb 7, 2022
·
@failfalling - Oakland, Ca
· Joined Jan 2007
· Points: 1,021
To actually answer the question: For two tied together overhanging dynamic ropes, taking about 10 minutes for the first rope and 15 minutes for the second rope is an acceptable time. For me, any faster comes by skipping a lot of the energy saving aspects of the method I talk about below. This makes it faster but the amount of exhaustion that is created by the end of the jug goes up exponentially. If you're doing this a lot and the extra weight and cluster of additional specialized gear isn't an issue (such as working with fixed ropes on a project you're coming back to over and caching gear) then a dedicated ascending system utilizing a chest ascender and foot ascender or the dedicated froggy system is faster and less exhausting. If you're doing a wall where you're committed and weight is important to manage, then a few modifications to the yosemite jugging style is going to be best overall (overall meaning taking into account not just speed of jugging but the overall weight of the haul bag, approach and descent, and faffing about with different systems depending upon what you're doing etc) When jugging those two dynamic ropes. (echoing much of what Quinn said earlier) - First, (obviously) making sure that your daisy lengths are perfect (a reason why adjustable daisies are better than normal daisies as even a half inch difference between the two can add up to quite a bit of lost efficiency and energy over the course of a long jug) Additionally, if you have elastic strips on your ladders to lock in your feet, these are very helpful to employ while
- While sitting on the daisy attached to the top jug, spread your knees out (similar to frog legs) and lean your upper body into the line. The goal is to put your center of gravity in line with the rope that you're moving up. The greater the angle between the rope and your center of gravity is, the more efficiency you'll lose.
- With your body in line with the rope stand up on both legs and simultaneously throw your upper ascender to the extent of the daisy and immediately sit on the daisy, keeping your center of gravity as inline with the rope as possible.
- Move up your lower ascender and reset your legs in that initial sideway spread and repeat.
Tips: - Resting while overhung can be exhausting in its own right. To rest, cross your arms over your chest trapping the rope and position your feet against the ladders to keep yourself balanced and upright. The goal here is to have as little leaving back of your upper body as possible and to use your folded arms instead of your muscles to maintain this position.
- Going up dynamic rope sucks because of how much bounce there is in the line as it stretches back and forth as you move up the rope. To mitigate this:
- If possible, fix the rope to the wall whenever possible (as passing an anchor, just like passing a knot) takes no time at all and the less rope is hanging, the less bounce you'll get as it stretches
- Focus on learning the bouncing cycle of the rope and time your step up/throw ascender motion to happen right at the apex of the bounce cycle when the rope begins to contract. This will feel slower than just going as fast as you can, but overall you'll move faster for longer overhanging jugs. DO NOT do this if your dynamic rope is rubbing over an edge. Actually, just completely avoid ascending full length dynamic ropes if they mgo over an edge that has not been padded. If this can't be avoided then the first person should move slower to ascend as smoothly as possible and pad the edge when they get to it so others can jug faster.
- If you can, anchor the end of the rope to the ground and pull out as much slack as possible (have a partner weight the rope with their jugs while doing this) and tie it off with a munter/mule/overhand. The last person up the rope will need to undo this anchoring if you intend to rap that same line. Even with two people., this can save the first person time and energy when they jug up and they will have more energy to be able to setup whatever needs to be done at the high point while the second is dealing with the dynamic bounce aspect of the line.
|
|
|
Peter Zabrok
·
Feb 7, 2022
·
Hamilton, ON
· Joined Dec 2007
· Points: 645
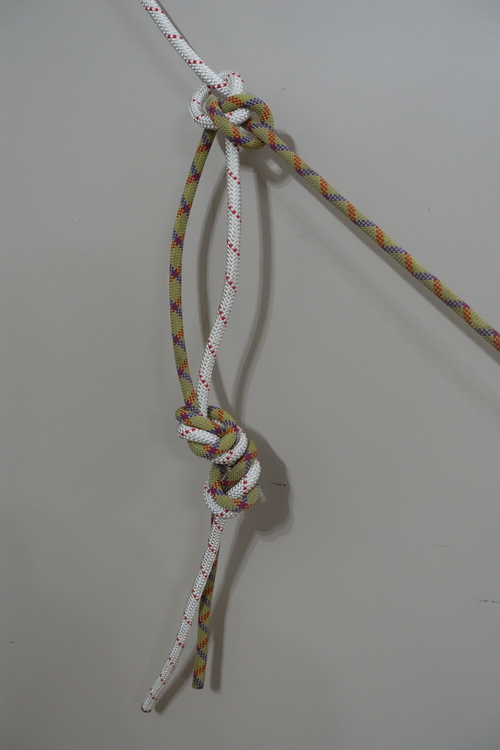
A good knot to join your two ropes together:
You join the ropes with a properly dressed Euro Death Knot, backed up with one tied in the opposite direction. Then you isolate the whole thing within a butterfly. Not only do you have a loop that you can clip into while you are lifting your ascenders over the knot, but the butterfly is easy to untie after being weighted.
I probably should have left the tails a bit longer on the EDK... but you get the idea.
|
|
|
Keith Boone
·
Feb 7, 2022
·
Henderson, NV
· Joined Jul 2013
· Points: 497
|
|
|
Russ Walling
·
Feb 7, 2022
·
Flaky Foont, WI. Redacted…
· Joined Oct 2004
· Points: 1,216
Peter Zabrokwrote:
I'd love to have seen that! That is caver speed on a Yosemite system. That was down in Mexico at the Golondrinos cave. I’m not saying I didn’t almost have a stroke. Just saying that other dude is way slow.
|
|
|
Peter Zabrok
·
Feb 8, 2022
·
Hamilton, ON
· Joined Dec 2007
· Points: 645
Hahaha! My trip report to Golondrinas is linked above. We didn't get in that day because the birds didn't fly out, so we had to "settle" for "only" a 200m pit. Golondrinas is 376m which is something like 1233 feet. So your ascent is PROUD on a Yosemite system. Possibly unequalled - in both speed and stupidity.
|
|
|
Keith Boone
·
Feb 8, 2022
·
Henderson, NV
· Joined Jul 2013
· Points: 497
The frog technique shown above has only one leg loop, but videos I referenced they prefer a loop for both feet. Any preferences here? Two seems more advantageous.
|
|
|
Peter Zabrok
·
Feb 8, 2022
·
Hamilton, ON
· Joined Dec 2007
· Points: 645
Definitely one. It is easier to pinch the rope between your feet as you stand up to help it feed through the Croll. Add Ankle cam as desired.
|
|
|
Keith Boone
·
Feb 13, 2022
·
Henderson, NV
· Joined Jul 2013
· Points: 497
Is there a chest harness you love for the frog technique?
|
|
|
Peter Zabrok
·
Feb 13, 2022
·
Hamilton, ON
· Joined Dec 2007
· Points: 645
Keith Boonewrote:Is there a chest harness you love for the frog technique? Yes, the Petzl Torse. Used to be C26, not sure number now. The best 20-or-so bucks you'll ever spend! Super simple, works perfectly with any climbing harness. Buy one! You will have to go to a caving retailer or special order through a climbing supplier.
CMI ankle cam from Liberty Mountain.
The main problem with frogging on a climbing harness is two things:
1. Not having a proper ascender like a Croll, Basic, or something similar
2. Inability to mount the ascender low enough on your harness, cuz the cross-bar seems to always come up too high.
And my challenge above appears unheard.... ;)
|
|
|
Christopher Chu
·
Feb 16, 2022
·
CA and NV
· Joined Apr 2011
· Points: 40
Short footage of me jugging up on modified frog, but footage none-the-less https://www.youtube.com/watch?v=V7xdiR6LKkk.... This is a good example of pace, but it takes very little energy since my body stays upright. Gear from top to bottom:
Singing Rock Ascender L
Kong Futura R + Ocun H Step
CT RollnLock (at belay loop, Microtrax might be better here)
Petzl Pantin L
Only extra item on top of the normal aid gear is the Pantin. This setup allows me to clean, too, even traversing pitches. A chest ascender might cause issue with that.
|
|
|
Peter Zabrok
·
Feb 16, 2022
·
Hamilton, ON
· Joined Dec 2007
· Points: 645
^^ Nice video, but is it relevant to the discussion? The systems you can use when your toes are against the wall are completely different than the system you want to use while jugging a free-hanging rope. Edit: unless of course I completely misunderstood the OP?! But how could anyone jug that slowly if their toes are against the wall? I just assumed it was 350 feet of free-hanging jugging.
|
|
|
Christopher Chu
·
Feb 16, 2022
·
CA and NV
· Joined Apr 2011
· Points: 40
Peter Zabrokwrote:^^ Nice video, but is it relevant to the discussion? The systems you can use when your toes are against the wall are completely different than the system you want to use while jugging a free-hanging rope. Edit: unless of course I completely misunderstood the OP?! But how could anyone jug that slowly if their toes are against the wall? I just assumed it was 350 feet of free-hanging jugging. The system I used works on free hanging ropes, too. I only posted the video to show the efficiency gain, albeit brief. A foot ascender makes all the difference in keeping your weight above your feet and in line with the rope. The frogging technique employs the same concept except it uses a chest ascender to help keep you in. Either way, your legs do most of the work instead of having to do squats and pulls from a sit/stand technique.
|
|
|
Keith Boone
·
Feb 20, 2022
·
Henderson, NV
· Joined Jul 2013
· Points: 497
Christopher Chuwrote:Short footage of me jugging up on modified frog, but footage none-the-less https://www.youtube.com/watch?v=V7xdiR6LKkk.... This is a good example of pace, but it takes very little energy since my body stays upright. Gear from top to bottom:
Singing Rock Ascender L
Kong Futura R + Ocun H Step
CT RollnLock (at belay loop, Microtrax might be better here)
Petzl Pantin L
Only extra item on top of the normal aid gear is the Pantin. This setup allows me to clean, too, even traversing pitches. A chest ascender might cause issue with that. Sometimes I think the Yosemite method > Frog Method. All depends on terrain.
|
|
|
Sam Skovgaard
·
Mar 28, 2022
·
Port Angeles, WA
· Joined Oct 2017
· Points: 208
For all of you who mention that you don't want to buy a Croll, a microtraxion set up with a keeper cord attached to a chest harness works just fine for the foggy system, and all of you probably already own microtraxions.
|
|
|
Alan L
·
Nov 16, 2022
·
Boulder, CO
· Joined Jan 2019
· Points: 20
Sam Skovgaardwrote:For all of you who mention that you don't want to buy a Croll, a microtraxion set up with a keeper cord attached to a chest harness works just fine for the foggy system, and all of you probably already own microtraxions. Was going to ask about this ^^ is there any reason to avoid a micro in this situation?
|
|
|
Embarrassed to say
·
Nov 17, 2022
·
Unknown Hometown
· Joined Jan 2015
· Points: 5
Torse, croll and micro also make a great combo for top rope solo (in my opinion)…so there’s multiple uses for that gear…
|

 Continue with onX Maps
 Sign in with Facebook