Continue with onX Maps
 Sign in with Facebook


Anchor building with the rope


|
The Rgold method on the first page uses same number of biners and much less rope. By all means, I encourage you to continue to experiment and try to find a better method if you so choose, but the one pictured doesn't seem to have any advantage. |
|
|
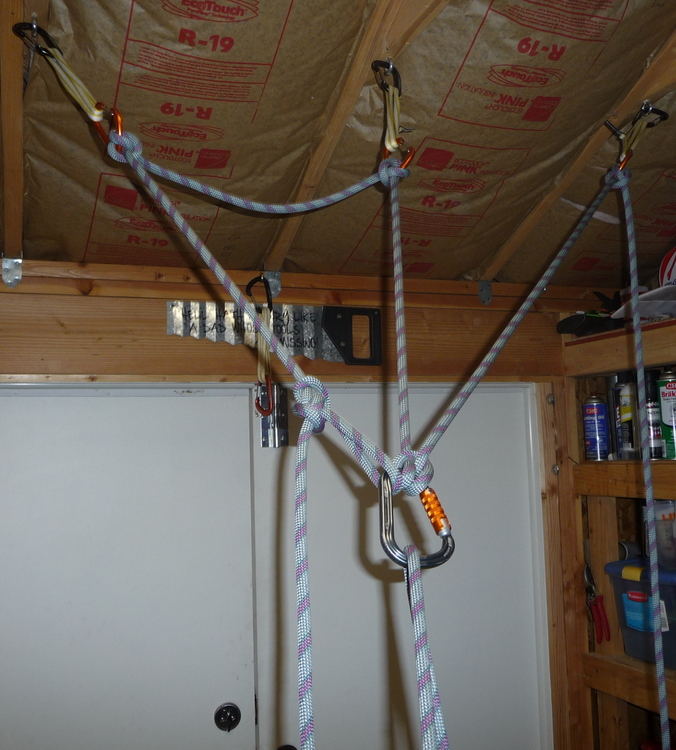
An updated video for anyone who is interested... My original rope anchor video gets a lot of views, but I think there are some advantages to the method shown above. This is basically Rgold's rope anchor method, shown earlier in the thread. I don't bother with the butterfly power point, but it's rare that I belay directly off my harness and I'm not concerned about the extra complexity this adds to a belay escape. Keep that in mind. I usually just hang my Gri Gri off 2 bomber pieces, as shown in this video. 1. Assuming I have reached a decent stance and find unquestionably bomber pro, my first action is to clove into a piece at the desired height that I want to belay from, and then call off belay. This is fast and gives my follower time to get organized and ready to climb, while I finish building the anchor. 2. This anchor uses one spare locker and about 7-10 feet of rope, in most circumstances. The weight of the locker is a wash (or better) since you don't have to carry any cord, and the rope is only an issue if you are stretching out pitches. |

|
For rgold's anchor or the DIL, don't the cloves on the power point biner stand the chance of producing a tri-directional load on the biner? |
|
|
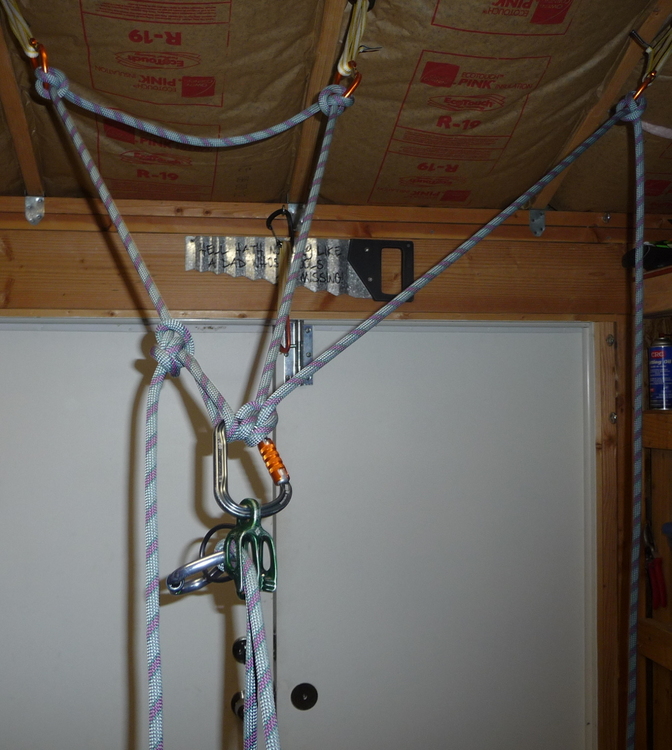
David Kerkeslager wrote: It is loaded in three directions but it should still be loaded on the main axis only, which shouldn't affect the strength. Typically with triaxial loading you have two points loading the main axis (spine of the biner) and then one loading the nose or the gate. |
|
|
Jason Kim wrote: Am I missing something here? Rgold's setup belays off of the master point (the butterfly knot), and thus tends to distribute the load to all 3 pro placements. The setup in this video uses a master point that only ties into 2 of the 3 pieces, which I would think makes it inferior to the Rgold setup. |
|
|
After this image was taken, I clipped back into the master point with my personal tether, and then brought up my two followers (need to replace my reverso). |
|
|
The butterfly power point in my method does three things. (1) It provides a power point for guide belays that loads all three anchor points rather than two. (2) For those (like me) who believe in harness-level belays, it makes it easy to face out and belay. Using the belay loop as illustrated in JKim's video makes the belayer face in. (3) It enables the belayer to undo their tie-in and so completely detach from the anchor while leaving the rigging intact. |
|
|
rgold wrote: |
|
|
Jeff N wrote: You have tri-axial loading on that biner close to the gate. Bad idea. Use two biners: 1 to connect the butterfly and clove hitch and a second biner for your belay device or redirect. Like this, but with another biner clipped to the butterfly for the belay device/redirect:  |
|
|
Thanks Eli, I see your point. |
|
|
rgold wrote: Rgold, can you tell me why you like to belay off of the harness facing out? I like to belay off the anchor when possible/convenient since I can rarely get perfect alignment of a fall load from my belay loop to the anchor. Then if my second falls, I might get rotated or pinned as the loaded rope aligns with the anchor, possibly making maintaining control of the belay more difficult. It seems to me that this risk is not worth the added convenience/comfort of trying to face out and belay off of the harness, so I am curious to know why you think it is better. |
|
|
Jeff N wrote: Well, for one thing the view is likely to be better. Also, it means one can sit down, which means you get a better rest. |
|
|
Conor Mark wrote: |
|
|
I think it's a bad idea. If the leader backs down because the pitch was too hard or got hurt or fell or whatever your fucked. Swapping the pitch out or rappelling is going to be really complicated. The way I see it, you not going multi pitch climbing without some cord, you need it for rats nest, emergency anchors, etc. Using your cord for a regular 3 or 2 point anchor is so fast and simple I see no reason not to. If it isn't broke, don't fix it. |
|
|
Jeff N wrote: Honestly, I never have any problem with load alignment. Sometimes a directional piece is called for if the load is significantly off the line of the tie-in. I've posted rants about how much I hate guide belays. Always being pulled on, sometimes to the extent of being pulled off, alternating with way too much slack because the belayer is busy multitasking, and an inability to keep up when moving fast on easy ground. So partially in the spirit of "do unto others," I prefer to give a much more sensitive and attentive belay. (Folks always say you can do that with the guide plates too, but my experience with a wide range of people, including guides, is that the possibility never translates to a reality.) Then there is the fact that the guide plates are most comfortable when they can be located at eye level, and anchors that do not allow for that, especially low anchors, force the belayer to be continually bent over, which is hard on my aging back. On top of that, the number of climbers, especially guides, suffering from epicondylitis induced by pulling the belay rope through a device with relatively high resistance is legion and a cautionary tale, especially considering the ability of climbing to produce elbow problems anyway. And finally, there is the hilarious range of complicated partial fixes for the fact that lowering with the plates is potentially catastrophic, and the fact that guide plates sometimes collide with rock features around them and then either refulse to lock or refuse to unlock. That said, I use guide belays when the anchor is well-situated and when facing in is most appropriate anyway, say for full or partially hanging belays. The rest of the time, I'm looking for a well-braced position, seated if at all possible and standing (but still braced) if necessary. My belay device is clipped to the tie-in loop, not the harness belay loop, and the rope from that loop to the anchor is always adjusted so as to be very snug, with the result that loads to the belay device are passed directly to the anchor via the tie-in and do not pass through the harness at all. This allows for comfortable holding of fallen seconds, even if they have to prusik up the rope, without having to strain and without being pulled into uncomfortable positions. The significantly lower level of rope friction means I can much more easily sense the movements of my seconds and adjust their rope accordingly, and I can take in rope faster than is possible with a guide plate without destroying my elbows in the process and/or exceeding an aerobic threshold, and I'm not pumped when the second finally arrives at the belay. Some people argue that the guide plates are better at belaying two seconds simultaneously, but I don't agree at all. The failings are mentioned above are actually magnified when two people have to be belayed, and the tendency of the belayer to haul one person while giving too much slack to the other person is actually magnified. Those of us who are used to managing two ropes for a leader have no problem doing the same for a pair of seconds, and the result is a better belay for both, not a worse one. That said, there is a situation in which the guide plates are better, and that is if one of the seconds is hanging on the rope. With a guide plate, the other rope can usually be taken in (perhaps with some effort), allowing the other follower to continue moving, where as with the harness-level belay, it is very hard, probably impossible, to take in one strand while the other strand is fully weighted. As David says, "to each his own." But I do wish guide-plate belayers would learn how to give a decent belay. |
|
|
Jake Gounaris wrote: Please read some of the numerous threads on the topic. Your worries and concerns are not nearly as complex as you think.
Exactly. That's why so many of us advocate for rope anchors. |
|
|
Don't think anyone has mentioned it yet, so I will: For 2 point anchors, Bunny Ears is by far my favorite rope anchor: https://www.backcountry.com/explore/bunny-ears-the-best-multi-pitch-climbing-knot-youve-never-heard-of Doesn't work for 3-point anchor, but when you've a couple of nice bolts, or 2 bomber pieces, this is my go-to. If you have a 3-point, and 2 of them are very close together, you can still make it work. |
|
|
Jake Gounaris wrote: This is not even remotely true.
Neither is this. For more information as opposed to these simple denials, follow Marc's advice. |
|
|
This method works good for building anchors where the pieces are relatively close together. For a two point anchor, use a yosemite bowline with a bight, the Yosemite finish becomes your master point. Adjust the two loops for equalization. For three points tie an asymmetrical yosemite bowline with a bight, leave a tag about 16". Small loop goes to one piece. Clip other two pieces with the big loop and use the tag to tie a double becket bend between the two pieces to equilize. |
|
|
Daniel Hamilton wrote: "the Yosemite finish becomes your maser point"? Care to elaborate? Pictures? The Yosemite finish that I know of (it is an ambiguous term) is tied with the tail of the knot, and therefore it is impossible to put a Yosemite finish on a "bowline on a bight" since there is no tail. Maybe you are talking about the same knot as "bowline on a bight" but without tying it on a bight. Are you just talking about tying a master point on the standing end? Also, you completely lost me with the 3 point version. |