FISH SMART AIDERS
Fish Smart Aiders in Action
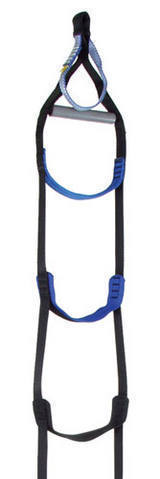
1 pr Fish Smart Aiders
Aiders, ets, wall ladders, or whatever you call them come in all shapes and sizes. Everyone has their favorite pair and usually not two people will agree. Some people want 5 steps, others 6 steps! One pair or two pair...
So why try to do a gear review on something as personalized as a set of aiders. Well, this review is really an introduction about aiders, their pros and cons and a look at some aiders I purchased recently. At first look, aiders appear to be pretty simple, but once you dive into the depths of aid climbing, you're find that there is more to a simple aider than meets the eye...
So, let's get started. There are basically four types of aiders, standard aiders, ladders, speed or adjustable aiders and the hard to find Russian Aider system. Have I missed any?
First, I'll briefly explain the different types of aiders out there:
Ladders
These are U shaped aiders with a stiffened plastic or nylon spacers to keep them open at the top. Yates Wall Ladders are probably the most popular. Other brands include Metolius, Black Diamond, Misty Mountain and recently Fish came up with their own design. Many aid climbers like ladders as they are very easy to get your foot in and out and can be very supportive with steps up to 2 inches wide. They also can be bulky and heavy. Speed ladders are also available that mitigate some of these concerns with lighter materials.
Pros
- Very comfortable (2 inch webbing) with a pair of approach shoes.
- Easy to get your feet in and out of the steps
- They don't fly around in the wind as much as other aiders due to their weight.
Cons- The spreader bars at the top of the ladder can get stuck in corners or cracks.
- They are bulky.
- Can be heavy depending on the type and brand.
- Expensive. Although you may be able to save money by purchasing fewer aiders.
Standard Aiders These are the most common aider with loops on either side of the aider. These tend to be less expensive than ladders and lighter and available in widths from half an inch to one inch. However, they are generally more difficult to get your foot in and out, especially in windy conditions. Examples include, Yates, Black Diamond and Metolius to name a few.
Pros
- Lighter than ladders.
- Available in many step configurations (4, 5, 6, 8 steps).
- Less expensive.
- Compact.
Cons- Not as easy to get your feet into them as Ladders, especially if they twist.
- Requires more attention to ensure they don't get tangled.
- Less supportive than ladders as they are generally 3/4 or 1 inch in width
- In windy conditions they can flap around
Speed or Adjustable aiders These are relatively new (been around several years) to the scene and people that I've talked to them about it either love or hate them. Rather than having fixed foot loops, the foot loop is adjustable and can be raised or lowered to the exact height required.
Personally I like them for jumaring and currently use the Yates Speed slings. I have played with adjustables but still prefer the old way of doing it for this reason: If the placement is at your waist I find they work fine, but if you are trying to "top step" or stretch out your placements I find it awkward reaching down and using the strap to get the position right. (You are pulling the strap up rather than down.) Hopefully someone who has more experience than I can chime in here....
Pros
- Only require 1 pair.
- Light.
- About the same price of normal aiders.
- Feet locked in so no messing about with getting your feet in and out.
- Fast on easy aid.
- Great for jumar setups.
Cons- Lack of options and flexibility of standard aiders.
- Top stepping is awkward since you are pulling up on the strap rather than down.
- The strap which the buckle goes through can wear out super fast.
- Sometimes the buckle doesn't work as designed.
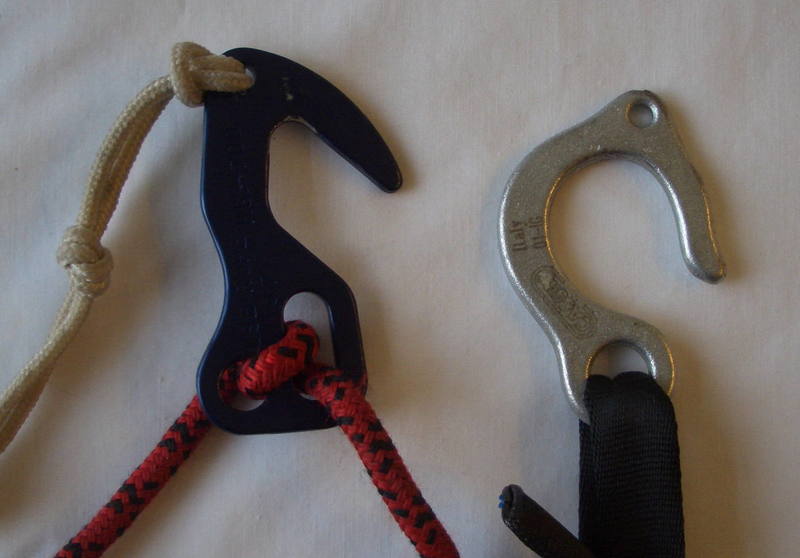
Link to Metolius Easy Aider DemonstrationRussian Aider system If you go over to rc.com you will find many references to the super duper Russian Aider system. I've never used it or seem them in real life, but people who have, swear by them. Basically, as the illustration and picture show, you attach a strap system to your lower legs with hooks and then you use an aider with rings and you simply walk up placing the leg hook into the aider loops...
Since I've never used them I won't list the pros and cons.
How many aiders do you need Once you have decided upon what type of aiders you are going to use, the next question is: How many aiders do I need? There isn't one answer and I've seen people use one, two, three or four. Tomaz Humar, credited known by some as the "worlds greatest climber" climbed one of the hardest aid routes in Yosemite, the Reticent Wall with one aider so it can be done, but most people will find either 2, 3 or 4 (2 pair) the way to go.
Rather than suggesting one method is better than the other, I'm just going to recommend that you go out and practice with a bunch of aiders and figure out what works best for you. Beg, borrow or steal so you can compare the different types and qualities before buying. Try bounce testing, walking the steps, top stepping, resting, etc to come up with the right combination.
I personally prefer two pair of aiders, since I like the "tripodal" support of having both feet at the same level and spread out about shoulder width apart. I find this very stable and relaxing. However, being too comfortable has its disadvantages as well and may slow you down as well. I also find this for stable for hooking or doing weird stuff.
If you haven't seen it already, check out Jeff Lowe's and Ron Olevsky's Clean Wall DVD for clean climbing and aider tricks like top stepping. Sometimes watching a DVD can teach you a lot more about a topic than reading about it...
Attaching Aiders?
Whether you attach the aiders to yourself or not is another point to ponder. Attaching them with daisy chains can lead to a real clusterf**k if you are not careful, whereas, on the other hand if you don't have them attached and you drop one, you're literally up the creek without a paddle. My own preference is that for straightforward aid, in the C1, C2 range, I have them generally unattached. Once you get something a little harder and start using more hooks, cam hooks, etc, then I will attach daisies to them.
One way to accomplish this is to larks foot two daisies (different colors or even better the same color as your aiders) to your harness, taking in both the leg loops and waist band. Attach the end of the daisies to your aider setup with a locker. Now if you drop an aider or bust out a free move, you won't drop them. Use a fifi, adjustable fifi or short sling to shorten up the length of the daisy. Email me if you would like more detailed information.
Adjustable Fifi and Standard Fifi
Detail of rigging an Adjustable Fifi. (The left side loop is larks foot into harness.)
If you are not attaching them to your harness you might like to carry a backup aider. I carry one Metolius alpine aiders for this reason. So far I haven't ... touch wood. If I'm crack jumaring with them I'll attach them to myself as well, since I don't want to drop them with cams attached. Crack jumaring is a technique that is perfect for cracks of the same dimension such as Moonlight Buttress, and Spaceshot in Zion. Add a small tie-off sling to the top of the aider with a couple of cam and crack jumar away.
Metolius Alpine Aiders
Crack Jumaring
Rather than placing a piece, attaching the aider and moving onto it, with crack jumaring you slide the bottom aider up to the top piece and then move the top piece up another foot and repeat. This way you can keep your feet in your aiders and simply crack jumar up the crack. Some people have half a dozen pieces attached to the aider top sling, but I find that any more than a couple cams things start to get in the way and get can get caught up on things.
Back to the review...
Anyhow, last year my old aiders were looking thread bare so I went down to my local climbing shop with the intention of purchasing a set of ladders. Prior that that I had done some web research and had it down to a couple of different models. What the web site didn't convey was the size, bulk and weight of them. So I ended up walking out of the shop empty handed.
I had plans for a trip in a couple of weeks so I needed to get some aiders pronto. So I posted up on supertopo and several people recommended Fish Smart aiders.
From the Fish Products Corporate Web Site:
SMART AIDERS
FISH Smart Aiders come with two 5-step aiders per pair. Each aider has a sub step sewn into the second step, where most of the action will take place. Unless you are on a slab, that kookie step in the top of other aiders will be virtually impossible to use. When you find yourself on the steep stuff, the second step will be home 90% of the time. If you need a little more height to reach an out of reach placement, step into the sub-second step on your FISH Aiders. Voila! The extra height---and that A7pitch---are in the bag. Nice job! Smart Aiders come in assorted colors and have step stiffeners sewn in to keep 'em open when you need 'em, and sport more bartacks than most third graders can count. For 2001 we are now putting all the steps on the same side. try it, you 'll like it! $47.00 per pair or $50.00 per pair with grab-loops sewn into the top.
Steps on the same side ... I wasn't sure I was going to like that. My backup plan was to sell them on Ebay. So I contacted Russ and he offered to make them up pronto and I had them the next week.
First Impressions
The aiders are made out of 1 inch flat webbing, with 5 steps and a sub step in the second step. The sub step makes top stepping much easier since it allows an immediate step. Each pair of aiders is made from the same webbing color, so they match and help keep aider management straightforward. They are well made with tons of stitching and reinforcements throughout. The bartacks are tight and tidy with no hanging chads, oops, I mean threads.
The first thing I did after inspecting them was to cover the main seams and wear areas with seam grip. This stuff works wonders in prolonging the life of wall gear.
Conclusion
There isn't a lot you can say about aiders since there isn't many things that can go wrong with them other then stitching coming apart or tearing at seams and really it comes down to personal preference on the type of aider and the number of steps.
After a fair bit of use over the last year or so, they are showing some wear and tear that you would expect from using them, but other than that they are still in tip top shape. Five steps seem about right. I've also got to like having steps on the same side and I don't foresee going back to the old school way of doing it right now, unless I change from 2 pair of aiders to just 2.
The only change I would make with my next pair is to go with 3/4 inch rather than 1 inch wide tape to save on the weight and bulk. I tend to wear supportive shoes (mad rock fanatic) so I doubt I would notice the difference in width.
Fish Aiders are made for big walls and not for your living room.
I hope this review has helped shed some light on aiders and aiding systems. As I said at the start, they look simple but there is more to them than at first glance. It takes time to learn how to aid and expect to be really slow the first few times out. Speed and efficiency will come with time and practice.
Learn to climb clean aid routes first and wait until you really need that hammer before you buy it. Pin scars don't grow back.

 Continue with onX Maps
 Sign in with Facebook