
 Continue with onX Maps
 Sign in with Facebook


Crevasse rescue


|
|
OK this is my take, having watched and read everything I could and read the comments here and on UKC, and then using ideas from my rock climbing book. Comments welcomed. 2 people, high risk deep snow situation, big packs but much applicable elsewhere. He and she 20m apart, 6 monster knots. Kiwi coils, but with a fig8 clipped to belay loop to make clipping into the anchor easier. Assumption being that the rope with the brake knots cannot be hauled due to one knot being over the lip, and an assisted is normally better anyhow. The aim is to reduce the amount of rope needed, and the force on the belay, and the friction. There is no one size fits all, so this is just 1 possible approach, but I hope a working approach that takes onboard the experience of those that have been in this situation for real. |

|
In addition to getting closer to the site of the haul, extending the masterpoint also reduces the amount of efficiency lost to stretch when using a dynamic rope. Another way to achieve this extension that doesn't rely on a friction hitch is to use the backside of the rope coming off the anchor and simply tie a hard knot such as an overhand on a bight. (This would be the same strand the rescuer typically uses for self belay.) |
|
|
David Coley wrote: If you can show my how that method (AS DRAWN) could ever be used (note they are not using a spare rope, it is clearly the main rope) with a 60m rope and a 15m tie in distance (let alone a 50m rope and brake knots), I will put 100 quid in the local SAR pot. In this scenario, you can't do a drop loop haul. You still have lots of other haul options, because you can haul on the original rope, or you can haul on the extra rope that you have, you'll just be doing a 3:1, 5:1, or 6:1 single strand haul (which is still a totally legitimate rescue option). I don't understand why you're so fixated on the fact that you can't do a drop loop haul with this particular rope configuration. If you want to do a drop loop, you need to either have extra rope on the rescuer's end (i.e. a guide carrying all the extra rope), or a longer rope (i.e. tying 2 ropes together per the Petzl instructions), or travel closer together (traveling ~10m apart may be a totally reasonable option on lots of popular Cascades/Alps climbs). If you don't want to do any of these options, a drop loop haul isn't going to be an option, but you still have all kinds of other equally-viable ways to manage the situation. |
|
|
David Coley wrote: 3. Assuming she can't climb out, she awaits communication from him. Best not to prussic before anchor built, unless it is a very short distance until she can reach ice The fallen climber should definitely start ascending the rope right away. Ascending a rope doesn't cause any additional force on the anchor if done smoothly. There are a variety of reasons to do this, including the need to stay warm, reducing overall rescue time, and the fact that you don't know what options are available to your partner (for example, if they can arrest the fall but can't build an anchor, you'll just sit there forever waiting for them, and slowly die of hypothermia). Even if you end up hauling for some reason, every foot the fallen climbers gets up the rope is 1 foot less that will need to haul. often best to await an assisted haul which is faster than prussiking. It's extremely unlikely that an assisted haul is faster than prusiking the rope. The time required to set up a haul system, plus the fact that mechanical advantage inherently reduces the distance hauled, makes hauling slow. 7. Now this is the new bit. She puts HER trax on the loop and clips to HER belay loop. This does two things compared to the Petzl method. It means you don't need an 80m rope; it reduces the force on the anchor. She will need to know which rope is the pull side of the loop. He could preplace his trax so she don't need to understand the orientation bit, and can't drop the trax, but this would leave him without a trax should plans need to change. If the fallen climber is capable of clipping stuff to the rope, assisting with the haul, and all these other functions, they should just climb the rope. There's no reason to set up a complex haul system, when they could just climb up the rope. Climbing the rope will be much faster, simpler, and they can start doing it like 10+ minutes sooner. 10. if she drops the trax, use a locker if the distance is small and she only needs a bit of help. If not, and this is another new bit compared to many videos. Use a prussik on the main rope between the anchor and edge to form a new master point or one of the brake knots. The prussik will need a very large number of turns. By moving the master point, the amount of rope needed it once more much reduced. You don't need to use the loaded, buried rope for the new lower masterpoint. You can tie a lower masterpoint on the unloaded strand that you drop to the climber. This eliminates faffing around trying to attach to the loaded strand, and the sketch factor of doing a force-multiplying haul off a friction hitch like you suggest. This is shown in the AMGA/OR video: https://youtu.be/XXRf4fCyass?t=57 |
|
|
Kyle Tarry wrote: Because that is the scenario shown in the Petzl image!!!!!!!!!!! |
|
|
Kyle Tarry wrote: The fallen climber should definitely start ascending the rope right away. Ascending a rope doesn't cause any additional force on the anchor if done smoothly. There are a variety of reasons to do this, including the need to stay warm, reducing overall rescue time, and the fact that you don't know what options are available to your partner (for example, if they can arrest the fall but can't build an anchor, you'll just sit there forever waiting for them, and slowly die of hypothermia). Even if you end up hauling for some reason, every foot the fallen climbers gets up the rope is 1 foot less that will need to haul. I wondered about this. But the advice I was given was that the victim should do everything they could to not weight the rope whilst the anchor was going in. But I guess it might depend on various things.
I very much doubt this. For my book I timed people prusiking. An assisted hoist won by a factor of 10.
Agreed. Either rope can be used. I've done a lot of hauling off a prussik and it worked well (BIG prussik), but the ropes were dry.
100% true. That is planned for next month in Chamonix. I started this whole thing, when trying to refresh my alpine skills and wondering if things had moved on (like they have in big wall hauling) since I last fell down a crevasse. . |

|
Gerrit Verbeek wrote: That's a great video. Wow. Seems like most of the fellers weighted the safety line prior to arresting their partner's fall. Realistic. For me, when crossing big, sketchy snowbridges, I'd highly recommend building an anchor and belaying across. That way, if the partner pops in, you've got most of the work already done to assist. |
|
|
David Coley wrote: Because that is the scenario shown in the Petzl image!!!!!!!!!!! Petzl doesn't show one single scenario. They show multiple options for roping up, and they also show a variety of ways of hauling. Some of the hauling techniques work with some of the rope techniques. You need to use your brain a tiny bit to figure out which one goes with which, and which one is appropriate for each unique scenario. There is nothing inconsistent on their website. There is no such thing as "the scenario." You seem hell-bent on figuring out "the sequence" for crevasse rescue but it doesn't exist. They are many possibilities at each step and as a result there are probably hundreds of different possible sequences. There's no way to show all of them, but what you can do is demonstrate some tools, and then let users decide, through experience, practice, and possibly in-person instruction, which one makes sense for a particular scenario. |
|
|
Kyle, maybe we should agree to disagree, but.... |
|
|
Brian in SLC wrote: Thanks for that. Great to have some first hand input. |
|
|
> Gerrit Verbeek wrote: |
|
|
David Coley wrote: Kyle, maybe we should agree to disagree, but.... Huh? They explicitly show one (of many) way to do this exact technique: Tie-in method: 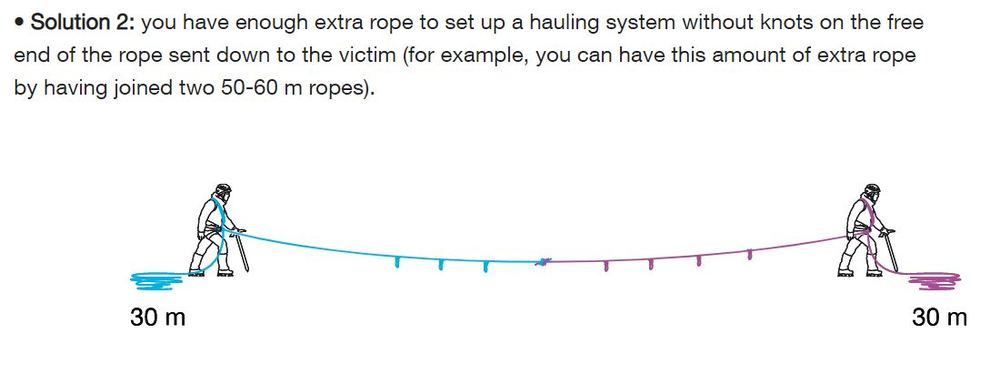 Hauling Method:  (Note that in the "suitable situation" bullet of that haul system, they clearly and explicitly state when this works. Here's the exact quote: Rope team of two, tied-in mid-rope with the ends free and reserve rope stored in the packs. And this system is clearly shown on the "Approaching a Glacier as a Roped Team of Two" page, see my top image. |
|
|
David Coley wrote: I wondered about this. But the advice I was given was that the victim should do everything they could to not weight the rope whilst the anchor was going in. But I guess it might depend on various things. Ice screws are great for this problem. In addition to the standard long screw most folks are carrying on the harness while on a glacier, I'll grab one more off the rack. If you're the one in the hole, you can leapfrog ice screws while ascending the rope or just directly aid on them. Not ideal as you'll just be on one screw plenty of times, but adds security to the situation if you're partner hasn't completely secured things up top just yet while you're prussiking. Also, could you link directly to the specific diagram you're referencing? Feel like I'm missing a big piece of this question as I did go through the Petzl materials earlier today. |
|
|
Kyle, in the "solution 2" above it says join two 50-60m ropes. Then shows, each climber with 30m of rope on the ground. So the distance between the climbers is 60m! This seems an unlikely recommendation. But is what is shown. Unless of course you realise each climber is carrying coils with (60 - 30 - 7)m of tope in them. But this could easily be missed and the reader not connect this diagram with the one 3 above. This might seem unlikely to you, but given my students regularly only get 65% in tests, it is easy to misinterpret things. Hence all I was asking for was in this diagram, the 15-20m line is repeated, or 6 words "rest of rope carried in coils". |
|
|
OK. I have now watched 30+ crevasse rescue videos. Most have felt slightly unimpressive (big apology to the makers, some of whom must of got cold making them, and I'm sure others gave up their time for free at a guess), with various bits I spotted that seemed unlikely to work (like untying the brake knots with the climbers weight on the rope). Others seemed to have what looks like to me not the most modern advice, or might only work on a dry glacier, particularly for a team of 2 (which is what I'm trying to practice). For example, not discussing use of the free rope, prepping the edge (and the dangers for both climbers of doing so), asking the victim to use their legs to make the final edge easier to navigate. Many of the possibly slightly unrealistic things came I felt from not completing a complete scenario and not using a real weight. For a relative novice like me, the following set covered things really well, using modern tools (a trax and a reverso). I know that there are many ways to skin a cat, and every case will be different, but I belive for me at least it really helps to run through the whole thing once in a realistic as possible way, then add tools to the tool box, rather than the other way around. Others will no doubt prefer the opposite.The gender reassignment John goes through makes it even more modern. So a BIG thank you to Jeff Ward, John (now Emily) and friends, and I'll buy the team a beer if I ever meet you in Chamonix. I'm sure to many of you reading this you is all old hat, and you have a full tool box, but others reading might, like me, be less experienced and really welcome extremely high quality, really well thought through material like these videos. However even here, it is not made clear that the method needs two ropes tied together to work (as shown). Note Emily is strangely not carrying coils.. |
|
|
David Coley wrote: Kyle, in the "solution 2" above it says join two 50-60m ropes. Then shows, each climber with 30m of rope on the ground. So the distance between the climbers is 60m! This seems an unlikely recommendation. But is what is shown. Unless of course you realise each climber is carrying coils with (60 - 30 - 7)m of tope in them. But this could easily be missed and the reader not connect this diagram with the one 3 above. This might seem unlikely to you, but given my students regularly only get 65% in tests, it is easy to misinterpret things. Hence all I was asking for was in this diagram, the 15-20m line is repeated, or 6 words "rest of rope carried in coils". You're taking a simple image and creating bizarre interpretations that aren't shown or intended. They're saying to tie two ropes together, travel approximately 15m apart, and carry the extra rope (which will likely be 30m or more) in your pack or in coils. All of this other business (60m spacing, 30m in coils + 30m in the pack, etc) these are all creations of your own imagination. Note that Petzl also specifically recommends "Consult a professional before attempting to perform these techniques on your own." Given the content of this thread, that's probably the most useful advice on their entire website. |
|
|
I am as confused as David was earlier in the thread. Someone set me straight. I like the AMGA videos he linked to but still am confused about if there is enough rope. In there video series they say 10 minus the number of people equals the arm lengths spacing so for a party of 2 that's 8 arm lengths or about 16 meters. I like the idea of the drop c method, but if you wanna drop a loop you need almost twice as much rope on each persons coil or pack not in use. So that would be about a 90 meter rope. Is a party of 2 abnormal, or does that just not allow the drop c method? If spacing was 12 meters, a 70 would do it for two people. is that too close?. Do you both not need to carry enough for a drop c? 2 half ropes would probably do it. is the drop C not all that its cracked up to be? |
|
|
Taylor, you have it exactly right. As I just said I think those videos great. However even there we have similar issues. if you listen then right at the start of one of set (and I use the term set lightly as within youtube I bumped in them separately as they are not grouped and labelled Part 1...4), Jeff does say the drop loop method is great for a party with an extra rope, but then goes on to use his main rope! |
|
|
Kyle, I don't think I'm creating bazaar interpretations. If that was a maths test and said the two ropes were 60m long, how far apart are the climbers, I'd bet on 60m being the MOST common answer. Note it does not say >30m of spare rope, or at least 30m, but 30m full stop. I see no logical reason for not holding the hand of the reader a tiny tiny bit more. I really think we will have to agree to disagree on the best way to present such material. |
|
|
gotta with Brian in SLC experience. The base premise is flawed. Just putting out there that just like regular old trad, if your partner is unconscious from a fall and doesn't quickly regain consciousness, you're in a shit tier situation. aka all the hauling without any assist from your partner scenarios. You're going to need to go down and check on them and you have a decent chance you won't be able to rescue them by yourself because of obstruction if the fall was bad enough to knock and keep them unconscious. You need to call a rescue asap. This is part of the increased risk that comes with 2 man glacier teams. Like Brian said earlier, you need to reduce the risk of this kind of catastrophic event as much as possible through belays as needed. Also there is no crevasse rescue on dry glaciers in the traditional sense since you can't self arrest on ice. |


