

 Avg: 3.5 from 224
votes
Avg: 3.5 from 224
votes
 Access Issue: Latest updates on closures, permits, and regulations.
Details
Access Issue: Latest updates on closures, permits, and regulations.
Details
Pitch 1. 5.11 or C2 Hooks. 130'
Cams - 1ea to #3 Camalot
Hooks - Regular no Camhooks
5.11 or reachy, thin hooks between bolts - extender or stiff draw super useful unless you are the tallest human - leads to 5.10 or more hooks to a small roof section, then more bolts and hooks to the belay. Def have the tallest climber lead this one ;)
Pitch 2. 5.13c or C1+. 130'
Cams - 1ea offsets
1ea .75 Green Totem or Camalot
Hooks - Regular no Camhooks
A couple big reaches or hooks lead to a comfy bolt ladder to a few placements before the belay stance. Another very reachy pitch.
Pitch 3. 5.12d or 5.7 A0 free variation or C2+ Window Pane Flake. 150'
Cams - 1ea Offsets
2ea Cams to #3 Camalot
1ea #4 Camalot (last move to the anchor ledge, 5.7 move)
Camhook - just in case - no Regular Hooks
A few thin moves gains you the iconic Window Pane Flake and its slightly awkward C1 goodness. After the Flake a few bolts lead to a decent-sized penji left to easy free climbing or C1 to the belay ledge.
The free climbing variation left is super fast tension-to-bolts-to-easy-french-free or 5.12d.
The Window Pane Flake is the feature that will help you find the Lurking Fear line when looking from the Bridalveil Falls straightway, either before or after your climb.
Pitch 4. 12a or C2. 130'
Cams - 2ea Offset Cams
2ea Cams to #4 Camalot
Hooks
Camhooks
Secure hooking or 5.10 past bolts leads to really fun thin cracks which take you right and then up, gradually widening to #4 right before the belay.
This really cool pitch brings you into the Milky Wave Headwall and a continuous crack system you'll follow until pitch 7. If the first 3 pitches were challenging and you feel beaten down don't worry - it's splitter from here on out!
Pitch 5. 12b or C1. 100'
Cams - 2ea Offsets
2 ea to #3 Camalot, 1ea #4 Camalot
Hooks - optional some folks use a hook near the belay but it's not necessary
Camhooks or Nuts could be helpful if you have fewer small cams, or just need to do one move that you are missing a crucial size in.
Wavy twin 5.11 finger cracks take you up a steep wall - very straightforward pitch. Save 1ea Offsets or small cams for right before the belay.
Pitch 6. 12c or C2. 110'
Cams - 2 ea Offsets
3 ea to #1 Camalot, 1ea #2 and #3
Camhooks and / or thin Nuts useful if you are shorter or don't have lots of small cams
All time Milky Wave splitter crack leads up to a thinner section to an interesting bulge to the belay. Save 1ea Offsets for the last section. I like to link this pitch into the hook traverse at the beginning of pitch 7 and then just belay at the rapppel anchor midway through that pitch. If you do this linking you just clip the pitch 6 anchor and tension over and right - feels super secure and easy moving between the bolts and hooks as opposed to leading right off the belay with your partner staring at you. It's hard to explain why - but this linking makes it easier for the cleaner too - since they're already on the jugs when they get to pitch 6 anchor they just use the rings on the anchor to lower out and follow the bolt/hook traverse.
Pitch 7. 13c or C1. 105'
Cams - 2ea .4 or Yellow Totem to #4 Camalot
1ea #5 Camalot
Hooks - Regular no Camhooks
Fun hook traverse interspersed with many bolts leads to another splitter though wide and slightly awkward crack system.
Pitch 8. 10d or C1.130'
Cams - 2ea .5 Purple Totem or Camalot to #5 Camalot - Can be done with only #4s but if you have the #5s it will make it easier.
The most incredible 10c splitter for folks with Goliath-sized hands. Epically challenging fist to wider crack for the rest of us, or cruiser C1 with your comfy shoes on ;) Save a #3 Camalot for right before the belay
Pitch 9. 5.10 or C1. 110'
Cams - 1ea Offset Cams
2ea to #3 Camalot, 1ea #4 and #5 for right before the belay
Super fun lower-angled splitter crack / flake that makes you feel free like Tommy or Babsi, and the nice belay ledge / stance at the end is welcome after mostly hanging belays since the ledge atop pitch 3. The Pillar of No Despair!
Pitch 10. 5.12 or C2. 110'
Cams - 2ea Offset Cams
2-3 ea to #.75 Green Totem or Camalot
1ea #1 to #3 Camalot
Camhooks and thin Nuts useful
A really beautiful if at times flared or thin shallow corner leads up to a couple reachy moves to the belay. Save 1ea Offset Cams and small Cams for the end of the pitch.
Pitch 11. 13a or C2+. 100'
Cams - 2ea Offset Cams
2-3ea to .75 Green Totem or Camalot
1ea #1 to #3 Camalot
Camhooks
Grappling Hook - can be nice for going over the bulge but is not necessary
A couple Camhooks or 5.12 off the belay lead to a bulge with a bolt. Wild but relatively secure cams and fixed pitons lead to three bolts and to a mostly finger-sized crack that leads to the belay.
Pitch 12. 12c/d or C2 Wild. 95'
Cams - 2ea Offset Cams
2ea to #1 Red Totem or Camalot
Hooks
Wild and fun traversing 5.12 or C2 pitch over and around, with fun easy hooks to bolts that lead to 5.10 free or easy hooks to another traverse to the belay stance - save the two smallest offset cams for right before the belay if you don't like doing easy free moves with rope drag.
Pitch 13. 12b or C1. 140'
Cams - 1ea Offset Cams
2-3 ea to #1 Red Totem or Camalot
1ea #2 and #3 Camalot
The beginning of the lower-angled crack climbing that leads to the summit. A short thin crack that takes bomber offset cams leads to fun cruiser 5.8 with maybe a fragile flake or two to a bulge move to the most glorious 5.3 hand and finger crack to the belay stance. So fun!
Pitch 14. 10d or C2. 130'
Cams - 2-3ea to #1 Red Totem or Camalot
1ea #2 to #5 Camalot
A super fun but slightly tricky pitch. Deal with a few challenges low on the pitch and you'll be rewarded with super fun 5.5 to 5.7 scrambling to the belay; if you're not mindful of rope-drag early the second half of this pitch could be a miserable struggle.
Aid or mantel onto a shelf and walk left for twenty feet to a wide gully. It's best if you can just put a piece in the bottom of the gully and walk back and remove the piece you put at the beginning of the traverse - this will help with rope drag and will allow your cleaner to just walk across a lower ledge to start following the pitch. Back at the gully a couple 5.10 or awkward C2 moves on .5 Totems / Camalot gets you to better cracks and easy cruising. Look for a good spot to put your #5 Camalot above a ledge after the fun cracks that will keep your rope straight for the follower (not necessary if the follower is free climbing only if they are jugging) and will give you the confidence to quest left and around and back up to the spacious belay ledge and its 2 bolts. I like to fix the rope to a piece in a crack on the far right of the ledge because there are a lot of edges on the route - there is a bomber finger-sized crack there - i back the rope up to the two bolts of course.
Pitch 15. 10c or C2. 140'
Cams - All of your cams.
Camhook might be useful in case you don't have the right size thin piece or if you cannot reach a higher, bigger placement - it's never harder than 10a/b at the thin spots.
Awesome but challenging 5.10 or C2 pitch. Some slick rock for the free climbers and few random thin placements for the aid climbers keep things interesting. Def use all your long runners on this pitch, in the zigzag section. Save some fingers to #1 Camalot sizes for the last bit to the belay.
Pitch 16. 10b or C1. 140'
Cams - 2-3ea Black Totem or .2 Camalot to #3 Camalot
Finally the difficult eases to downright pleasant mostly 5.7 with a touch of 5.10 or easy aid - well I did it once too early in the spring running with water and that sucked but usually it's great. A ton of easy 5.5+ free climbing even for the folks wearing approach shoes on this one.
Pitch 17. 11a or C1. 90'
Cams - 2ea .4 or Yellow Totem to #1 Red Totem or Camalot.
2ea #4 and #5 Camalots - can be done with one #5 if you are taller or if you like 11a ow ;)
Short, splitter hands to five inch crack leads to a mantel and easy cruising with a short 5.6 face section before the palatial Thanksgiving Ledge. Fun, quick pitch. Don't miss the anchor on the face to the left of the ledge that allows you to fix your rope straight above the previous belay - don't belay off the bolts in front of the cave.
Pitch 18. 10b or C1. 95'
Cams - 2-3 ea to #3 Camalot
2ea #4 Camalot
Super fun jug / crack/ boulder mantel start leads to splitter twin cracks which you eventually commit to the left one and head into a short strenuous gully. The gully protects well with cams to #4 and after just fifteen to twenty feet you exit left into an epic hand and finger crack to the belay. Def save 1ea cams .5 to #2 Camalot for this last section. Ends on a cool pillar directly above the belayer.
Pitch 19. 5.3 Glory! 135'
Cams - 1ea to #3 Camalot
Fun, juggy featured face leads to a corner with more jugs and cracks, past a cute Limber Pine and eventually right to the chains. You Did It Woohooo!
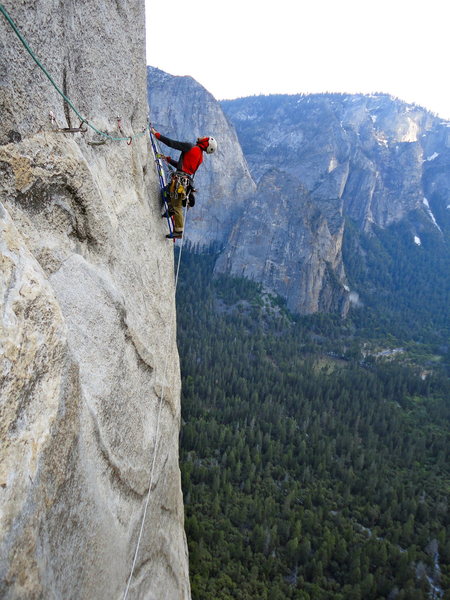
Lurking Fear is on the far left side of El Capitan. Hike to the base of the wall, as you would for the Nose, and then skirt the base of the wall, hiking up the long slope beneath the face. The approach feels long, particularly when carrying a haul bag and comparing it to the Nose. It makes you realize how big El Cap is, as you traverse underneath a lot of rock on your way to Lurking Fear. There is a few hundred feet of 3rd and 4th class ledges to negotiate, shortly before the start of the route. It is probably advisable to haul bags or fix lines on some of these sections. The start of the route is about 100 feet from the corner of the buttress and starts in a left-facing corner.
Double set of nuts, including small nuts. Triple set of cams up to red Camalot and double set of cams to old #4.5 Camalot. A selection of basic hooks, cam hooks and rivet hangers. Can also bring few heads in case any are missing.

 Continue with onX Maps
 Sign in with Facebook


Chattanooga, TN
You will still have to swing a ways to the left but you can use all of the bolts on the P7 traverse to get you there. A touch of sideways aiding on rappel.
This also avoids the semi crappy rappel anchor at P7 (The free climbing anchor below this is good). Jul 15, 2011
...
Castle Rock, CO
Western Washington
Really nice medium volume spring just past the route base was running as of early May 2015. May 19, 2015
Overall was amazing route, good introduction to El Cap. Oct 17, 2015
cincinnati, ohio
Boulder, CO
colorado
California
Yosemite, CA
This route is definitely not popular to rappel, don't know where that info came from. (It is possible for light, in-a-day teams to rap, but most are so cooked at the end they find the 1.5 hr walk down way easier and faster). We should just say that this route is set up with rappel anchors (a dedicated rap route takes you from Thanksgiving Ledge, straight back down to the route, avoiding the upper, wandry climbing).
The release of the world's first inflatable portaledge / inflatable sleeping pad combo, will change the logistical challenges of Lurking Fear greatly. Basically, most teams need a portaledge only for their first night on the wall, and the extra work required to get the portaledge all the way up to the route, and haul it up the route, really wears folks out.
Folks email me with questions about the bivy ledge mid route a fair bit, so thought I would answer here. The ledge at 9.5 is only good for one, but with an inflatable ledge would be palatial. Also, it is not possible to climb to the bivy ledge and then 'lower out' back on to the route, and climb pitch 10; the best you can do with this scenario is leave your haulbag at the anchor at the ledge, both climbers rappel down to the Pillar of Despair, belay 9, then you climb pitch 10 like normal........except that the leader has to wait to haul. After the cleaner has cleaned pitch 10 they will just rappel down to the ledge anchor, attach the haul line to the haul bag, and release the haul bag. I've included a pic to show you all this (look in the photo gallery for the pic titled 'overlay of mid route ledge').
Here are some more thoughts on 'getting to the ledge,' etc.
A couple factors are in play - one major one being that pitch 10 is one of the harder pitches on the route, so that slows things down considerable (then pitch 11 is the crux so def not good to plan on doing that before bivying, as you would be likely to run out of time).
When I climbed the route the first time I used this strategy:
1. I led pitch 10, hauled the bag up a little ways, but it was still a few meters below the elevation of the ledge.
2. My partner cleaned the pitch, like normal, but instead of clipping into the anchor they just handed me the gear sling they had just cleaned, pulled their grigri tight, and then rapped down to the bag.
3. They 'walked' the bag over to the ledge, and anchored it there.
4. They also anchored the lead line
5. I rapped down the lead line to the ledge, leaving the hauler all set up
6. In the morning, I jugged up first and started to haul (shows why it is important to pull up 4 - 5 meters of slack before fixing the lead line, so you have this as a tie in while you're hauling. When you jug back up in the morning, you just tie back into the rope, and you're all ready to start hauling safely).
7. My partner released the haul bag
8. My partner jugged the lead line also, lowering out off the anchor on the ledge (careful to not get twisted up with the bag / haul line).
Now with the new inflatable portaledge it will not be so important to reach the ledge; Pillar of Despair might be fine if you get there in the dark and don't want to deal with all this stuff (likely ;). The coolest thing about the inflatable portaledges is they are also a 4" sleeping pad. That's right baby, 4 inch base camp pad on the Big Stone!
Here is the amazing xRex pic of the Southwest / West face.....see the climbers on pitch 6?
gigapan.com/gigapans/14756
Erik Sloan, owner, RockclimbYosemite.com Yosemitebigwall.com - email me at erik@yosemitebigwall.com Feb 14, 2019
Denver, CO
Salt Lake City, UT
Golden, CO
Trip report from a spring 2021 ascent May 23, 2022
San Carlos
We only needed one set of micro nuts (offsets).
One or more 000 (purple alien or red BD) would have been great - we forgot it in the car somehow.
A beak might have made the C2 on p10 go faster.
Two hooks of grappling/cliffhanger are critical. I'd maybe bring a 3rd in case you drop one (I did, but on P1, we found it).
We went all the way up to Ned's at 9.5. That is a very long, difficult pitch to free - quite harder than 10a up high - probably 11-. Quite doable, but plan to yo-yo for #4s. The nice thing is that you can leave the bags at Ned's and go all the way up to top of 11, haul from there (skip the haul at 10 that's a hanging belay).
A stiffy quickdraw makes a lot of the ladders go faster/easier. (Long QD with coat hanger wire taped to make it stiff.)
The haul to P14 is annoying. The leader needs to make sure the haul line doesn't get wrapped up in the chimney or something. The pitch goes quite a bit to the left.
The last two pitches link with a 70, but the haul requires force. We put both of us on the haul to get the bags up. And then of course the bags got stuck anyway and we had to send Grant down to unstick them. Jun 21, 2022
Front Range
docs.google.com/document/d/… May 23, 2023
Merced
Napanoch, NY
- We stashed our food at the top of P3 in a heavy canvas bag after fixing lines. By the next morning, crows had unzipped it and stolen most of our food. Some was scattered at the base, but most was just gone.
- The penji-rap from mid-way on P7 was incredibly hard to stick - especially if it's windy (since you run into the wind). If it was also wet... I'm not sure it would have gone, and we'd of had to back-aid the P7 hook traverse as part of our bail.
- Many of the early stations are two bolts, closely spaced, which contributed to absolute anchor fusterclucks. A smarter party could surely manage, but we consistently hosed ourselves. Sep 11, 2023
San Francisco, CA
In English: medium.com/p/6d0a797bdf03
In Russian: medium.com/p/3f63fee3e68c Oct 26, 2023
docs.google.com/document/d/… May 16, 2024
Yosemite, CA
Yosemite, CA
Cams - 1ea to #3 Camalot
Hooks - Regular no Camhooks
5.11 or reachy, thin hooks between bolts - extender or stiff draw super useful unless you are the tallest human - leads to 5.10 or more hooks to a small roof section, then more bolts and hooks to the belay. Def have the tallest climber lead this one ;)
Pitch 2. 5.13c or C1+. 130'
Cams - 1ea offsets
1ea .75 Green Totem or Camalot
Hooks - Regular no Camhooks
A couple big reaches or hooks lead to a comfy bolt ladder to a few placements before the belay stance. Another very reachy pitch.
Pitch 3. 5.12d or 5.7 A0 free variation or C2+ Window Pane Flake. 150'
Cams - 1ea Offsets
2ea Cams to #3 Camalot
1ea #4 Camalot (last move to the anchor ledge, 5.7 move)
Camhook - just in case - no Regular Hooks
A few thin moves gains you the iconic Window Pane Flake and its slightly awkward C1 goodness. After the Flake a few bolts lead to a decent-sized penji left to easy free climbing or C1 to the belay ledge.
The free climbing variation left is super fast tension-to-bolts-to-easy-french-free or 5.12d.
The Window Pane Flake is the feature that will help you find the Lurking Fear line when looking from the Bridalveil Falls straightway, either before or after your climb.
Pitch 4. 12a or C2. 130'
Cams - 2ea Offset Cams
2ea Cams to #4 Camalot
Hooks
Camhooks
Secure hooking or 5.10 past bolts leads to really fun thin cracks which take you right and then up, gradually widening to #4 right before the belay.
This really cool pitch brings you into the Milky Wave Headwall and a continuous crack system you will follow until pitch 7. If the first 3 pitches were challenging and you feel beaten down don't worry - it's splitter from here on out!
Pitch 5. 12b or C1. 100'
Cams - 2ea Offsets
2 ea to #3 Camalot, 1ea #4 Camalot
Hooks - optional some folks use a hook near the belay but it's not necessary
Camhooks or Nuts could be helpful if you have fewer small cams, or just need to do one move that you are missing a crucial size in.
Wavy twin 5.11 finger cracks take you up a steep wall - very straightforward pitch. Save 1ea Offsets or small cams for right before the belay.
Pitch 6. 12c or C2. 110'
Cams - 2 ea Offsets
3 ea to #1 Camalot, 1ea #2 and #3
Camhooks and / or thin Nuts useful if you are shorter or don't have lots of small cams
All time Milky Wave splitter crack leads up to a thinner section to an interesting bulge to the belay. Save 1ea Offsets for the last section. I like to link this pitch into the hook traverse at the beginning of pitch 7 and then just belay at the rapppel anchor midway through that pitch. If you do this linking you just clip the pitch 6 anchor and tension over and right - feels super secure and easy moving between the bolts and hooks as opposed to leading right off the belay with your partner staring at you. It's hard to explain why - but this linking makes it easier for the cleaner too - since they're already on the jugs when they get to pitch 6 anchor they just use the rings on the anchor to lower out and follow the bolt/hook traverse.
Pitch 7. 13c or C1. 105'
Cams - 2ea .4 or Yellow Totem to #4 Camalot
1ea #5 Camalot
Hooks - Regular no Camhooks
Fun hook traverse interspersed with many bolts leads to another splitter though wide and slightly awkward crack system.
Pitch 8. 10d or C1.130'
Cams - 2ea .5 Purple Totem or Camalot to #5 Camalot - Can be done with only #4s but if you have the #5s it will make it easier.
The most incredible 10c splitter for folks with Goliath-sized hands. Epically challenging fist to wider crack for the rest of us, or cruiser C1 with your comfy shoes on ;) Save a #3 Camalot for right before the belay
Pitch 9. 5.10 or C1. 110'
Cams - 1ea Offset Cams
2ea to #3 Camalot, 1ea #4 and #5 for right before the belay
Super fun lower-angled splitter crack / flake that makes you feel free like Tommy or Babsi, and the nice belay ledge / stance at the end is welcome after mostly hanging belays since the ledge atop pitch 3. The Pillar of No Despair!
Pitch 10. 5.12 or C2. 110'
Cams - 2ea Offset Cams
2-3 ea to #.75 Green Totem or Camalot
1ea #1 to #3 Camalot
Camhooks and thin Nuts useful
A really beautiful if at times flared or thin shallow corner leads up to a couple reachy moves to the belay. Save 1ea Offset Cams and small Cams for the end of the pitch.
Pitch 11. 13a or C2+. 100'
Cams - 2ea Offset Cams
2-3ea to .75 Green Totem or Camalot
1ea #1 to #3 Camalot
Camhooks
Grappling Hook - can be nice for going over the bulge but is not necessary
A couple Camhooks or 5.12 off the belay lead to a bulge with a bolt. Wild but relatively secure cams and fixed pitons lead to three bolts and to a mostly finger-sized crack that leads to the belay. Jun 7, 2024
Yosemite, CA
Cams - 2ea Offset Cams
2ea to #1 Red Totem or Camalot
Hooks
Wild and fun traversing 5.12 or C2 pitch over and around, with fun easy hooks to bolts that lead to 5.10 free or easy hooks to another traverse to the belay stance - save the two smallest offset cams for right before the belay if you don't like doing easy free moves with rope drag.
Pitch 13. 12b or C1. 140'
Cams - 1ea Offset Cams
2-3 ea to #1 Red Totem or Camalot
1ea #2 and #3 Camalot
The beginning of the lower-angled crack climbing that leads to the summit. A short thin crack that takes bomber offset cams leads to fun cruiser 5.8 with maybe a fragile flake or two to a bulge move to the most glorious 5.3 hand and finger crack to the belay stance. So fun!
Pitch 14. 10d or C2. 130'
Cams - 2-3ea to #1 Red Totem or Camalot
1ea #2 to #5 Camalot
A super fun but slightly tricky pitch. Deal with a few challenges low on the pitch and you will be rewarded with super fun 5.5 to 5.7 scrambling to the belay; if you're not mindful of rope-drag early the second half of this pitch could be a miserable struggle.
Aid or mantel onto a shelf and walk left for twenty feet to a wide gully. It's best if you can just put a piece in the bottom of the gully and walk back and remove the piece you put at the beginning of the traverse - this will help with rope drag and will allow your cleaner to just walk across a lower ledge to start following the pitch. Back at the gully a couple 5.10 or awkward C2 moves on .5 Totems / Camalot gets you to better cracks and easy cruising. Look for a good spot to put your #5 Camalot above a ledge after the fun cracks that will keep your rope straight for the follower (not necessary if the follower is free climbing only if they are jugging) and will give you the confidence to quest left and around and back up to the spacious belay ledge and its 2 bolts. I like to fix the rope to a piece in a crack on the far right of the ledge because there are a lot of edges on the route - there is a bomber finger-sized crack there - i back the rope up to the two bolts of course.
Pitch 15. 10c or C2. 140'
Cams - All of your cams.
Camhook might be useful in case you don't have the right size thin piece or if you cannot reach a higher, bigger placement - it's never harder than 10a/b at the thin spots.
Awesome but challenging 5.10 or C2 pitch. Some slick rock for the free climbers and few random thin placements for the aid climbers keep things interesting. Def use all your long runners on this pitch, in the zigzag section. Save some fingers to #1 Camalot sizes for the last bit to the belay.
Pitch 16. 10b or C1. 140'
Cams - 2-3ea Black Totem or .2 Camalot to #3 Camalot
Finally the difficult eases to downright pleasant mostly 5.7 with a touch of 5.10 or easy aid - well I did it once too early in the spring running with water and that sucked but usually it's great. A ton of easy 5.5+ free climbing even for the folks wearing approach shoes on this one.
Pitch 17. 11a or C1. 90'
Cams - 2ea .4 or Yellow Totem to #1 Red Totem or Camalot.
2ea #4 and #5 Camalots - can be done with one #5 if you are taller or if you like 11a ow ;)
Short, splitter hands to five inch crack leads to a mantel and easy cruising with a short 5.6 face section before the palatial Thanksgiving Ledge. Fun, quick pitch. Don't miss the anchor on the face to the left of the ledge that allows you to fix your rope straight above the previous belay - don't belay off the bolts in front of the cave.
Pitch 18. 10b or C1. 95'
Cams - 2-3 ea to #3 Camalot
2ea #4 Camalot
Super fun jug / crack/ boulder mantel start leads to splitter twin cracks which you eventually commit to the left one and head into a short strenuous gully. The gully protects well with cams to #4 and after just fifteen to twenty feet you exit left into an epic hand and finger crack to the belay. Def save 1ea cams .5 to #2 Camalot for this last section. Ends on a cool pillar directly above the belayer.
Pitch 19. 5.3 Glory! 135'
Cams - 1ea to #3 Camalot
Fun, juggy featured face leads to a corner with more jugs and cracks, past a cute Limber Pine and eventually right to the chains. You Did It Woohooo! Jun 7, 2024
Yosemite, CA
Not Quite Over Yet! -
Walk up and right to a large boulder. The wall behind the boulder has scuff marks and is pretty exciting 5.4 slab or hopefully there is a fixed line there that leads to a more summit-ledge-feeling area at a large tree. If there is no fixed rope you will want to just have a leader take the rack and rope and run up and fix to the tree so the second can jug with the haulbag.
From the Tree Ledge look right at 2 O'Clock for a faint trail that zigzags through low brush to a short slab which hopefully also has a fixed rope, but is otherwise 5.6 and not worth messing with if there is no fixed rope as you can brush struggle around this short cliff section to the right.
After the second rope / slab section you are on top! You have to scramble up fifteen feet of slab to a wide ledge that you walk right on. Look for a faint trail angling up and right to a large, cool-shaped boulder on the hillside in front of you. RESIST the urge to walk further uphill - a trail mirage seems to indicate that you should just walk up to what must be the summit flatness but this is a never ending illusion that costs many Lurking Fearers mucho time wandering with heavy packs. Angle right and barely up but mostly across until you reach the cool shaped boulder - go around on either side and immediately start angling down and skier's left on slabs that will bring you to the edge of the cliff and the Nose topout with it's famous tree and camp / cooking area a hundred feet over left of the tree.
Proceed to Mandatory El Cap Lieback! Woohooo! Jun 7, 2024
1. 1ea to #3, hooks
2. 1ea offsets, 1ea #0.75, hooks
3. 1ea offsets, 2ea to #3, 1ea #4, camhook - just in case
Save #4 for last move to anchor ledge
4. 2ea offsets, 2ea to #4, hooks, camhooks
5. 2ea offsets, 2ea to #3, 1ea #4, hooks - optional, camhooks or nuts could be helpful if you have fewer small cams, or just need to do one move that you are missing a crucial size in.
Save 1ea offsets or small cams for right before the belay.
6. 2 ea offsets, 3ea to #1, 1ea #2-3
Camhooks and/or thin nuts useful if you are shorter or don't have lots of small cams
Save 1ea offsets for the last section
7. 2ea #0.4 to #4, 1ea #5, hooks
8. 2ea #0.5 to #5 - Can be done with only #4s but if you have the #5s it will make it easier.
Save a #3 for right before the belay
9. 1ea offsets, 2ea to #3, 1ea #4-5 for right before the belay
10. 2ea offsets, 2-3 ea to #0.75, 1ea #1-3, camhooks and thin nuts useful
Save 1ea offsets and small cams for the end of the pitch
11. 2ea offsets, 2-3ea to #0.75, 1ea #1-3, camhooks, grappling hook - optional
12. 2ea offsets, 2ea to #1, hooks
Save the two smallest offset cams for right before the belay if you don't like doing easy free moves with rope drag
13. 1ea offsets, 2-3 ea to #1, 1ea #2-3
14. 2-3ea to #1, 1ea #2-5
For rope drag, it's best if you can put a piece in the bottom of the gully and walk back and remove the piece you put at the beginning of the traverse
Fix the rope to a piece in a crack on the far right of the ledge because there are a lot of edges on the route - there is a bomber finger-sized crack there - back the rope up to the two bolts of course.
15. all cams
Camhook might be useful in case you don't have the right size thin piece or if you cannot reach a higher, bigger placement - it's never harder than 10a/b at the thin spots.
Def use all your long runners on this pitch, in the zigzag section.
Save some fingers to #1 sizes for the last bit to the belay.
16. 2-3ea #0.2-3
17. 2ea #0.4-1, 2ea #4-5
Can be done with one #5 if you are taller or if you like 11a ow ;)
Don't miss the anchor on the face to the left of the ledge that allows you to fix your rope straight above the previous belay - don't belay off the bolts in front of the cave.
18. 2-3 ea to #3, 2ea #4
Save 1ea #0.5-2 for the last section (hand and finger crack to the belay)
19. 1ea to #3 Nov 15, 2024
Los Angeles, CA
Los Angeles, CA