

 Avg: 3.4 from 69
votes
Avg: 3.4 from 69
votes
 Access Issue: SNOWPATCH SPIRE ROCKFALL
Details
Access Issue: SNOWPATCH SPIRE ROCKFALL
Details
In the late 1930's, Snowpatch Spire was "talked of as the continents number one climbing problem." After Snowpatch Spire was ticked, only one major peak remained unclimbed, South Howser Tower.
Fritz Wiessner, 1938, made the best attempt before Bedayn and Arnold's success. After the highest attempt yet, Wiessner is famous for saying it would be: "...merely an affair of driving iron in the virgin rock!" (The 2010 movie, North Face, about the Eiger in 1936, is accurate for the rack and other gear of the day). But the story twists, Bedayn and Arnold found the upper headwall to be well within Wiessner's ability. (Climbing in North America, Chris Jones, 1976)
NOMENCLATURE
This route goes by three names; Snowpatch Route, Southeast Corner, and Wiessner's Route. The current guidebook, Bugaboo Rock, left one name out.
During the 1970's, I often would hear climbers proudly say: "We did Wiessner's!". The guidebook used in the 1970's gave the route no name at all (Bill Putnam, 1971). Climbing in North America states that the successful team "quickly concluded that Wiessner's route offered the best chance for success" (Jones, 1976). So the route was named before it was climbed.
RATING
Bill Putnam's 1971 AAC guide gives the route 5.6. The next book published, Bugaboo Rock rates it 5.6+. I've met people on the summit who thought the Vein was a sandbag.
APPROACH
There is an approach map in the photo gallery below. Hike the trail from the hut up to the Pigeon Fork of the Bugaboo Glacier. Once past the steep rock of the southeast spur of Snowpatch, snow leads up to the col in the southeast spur where the roped climbing starts.
The Association of Canadian Mountain Guides has a forum for guides to report current conditions in both the Canadian Rockies and Columbia Mountains: acmg.ca/mcr/archives.asp
ROUTE DESCRIPTION
The climb can be separated into three sections; the initial five pitches up to the Wiessner Overhang Traverse, the six pitches up the left side of the snowpatch that is the mountain's namesake, and the final three crux pitches up the summit headwall.
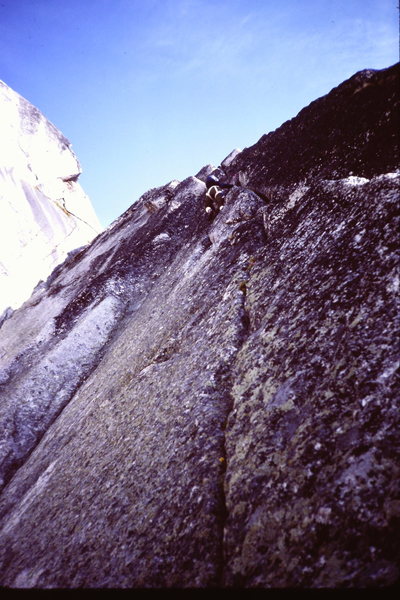
From the notch, a couple of easy pitches lead to a large corner, the first 5.4 bit. The corner faces left, away from the hut and the low angle left wall is climbed. Next, a 5.4 spur is followed to a stance below the Wiessner Overhang, which is not climbed directly. Move right to the 5.5 hand traverse used by Wiessner to dodge the roof and gain the easy slabs next to the snowpatch. The start of this bit is shown with orange dots on Kevin Crag's shot of the south face.
Several easy pitches parallel the left side of the snowpatch, then move climbers right (north) a couple hundred feet, eventually passing a large detached flake. The 5.9 Direct heads left from this flake.
The first pitch up the headwall is a 5.4 chimney followed by a hand traverse left to a belay below the Vein Pitch.
(The Vein is actually an aplite dike. Miners call dikes veins and aplitic means the crystals in the dike are smaller than in the surrounding granite, relatively fine grained. The famous Snake Dike, 5.7, on Half Dome is a famous example of aplite dike climbing.)
For the Vein Pitch there is a choice: either a 5.6 offwidth or the fine climbing on the vein, rated up to 5.8. There is consensus that the route is not done unless you do the Vein. After the crux, hopefully still protected with good fixed pins (in once-virgin granite), move left to rejoin with the offwidth line and stretch the pitch to a belay on flakes.
An account of both cruxes, the Vein and subsequent traverse, by Jack Arnold is found at the bottom of this page.
The third and final summit headwall pitch starts by climbing up to a leftwards traverse. The traverse leads to a zig-zag crack, 5.6. The pitch ends with a 5.4 ramp crawl right to the belay spot. One final easy lead to the top.
DESCENTS:
There are three ways to get down; Wiessner's, Kraus-McCarthy to Bugaboo-Snowpatch Col, and Kraus-McCarthy to the Pigeon-Snowpatch Rappels. Photos and a map can be found in the photo gallery below.
1. The original descent was to reverse Weissner's route. This is what the American Alpine Club Climbers Guide to the Interior Ranges of British Columbia recommended: "On descent, one long (150') rappel from below the summit ridge will reach the chimney (on Wiessner's)." (William L Putnam, 1971) By 1974, most parties were rappelling the West Face, but not everyone.
2. The most popular and best way off the South Summit of Snowpatch Spire is to descend the backside (west).
First, rappel the Kraus-McCarthy route. There are bolt anchors every 30 meters; Either four 60 meter rappels or eight 30 meter rappels. The 30 meter way can be stretchy.
Second, walk north to Bugaboo-Snowpatch Col and descend via rappels or down-climbing the 40 degree snow or ice. There is more than one bolted route down the "couloir". Should be a small sign to help find the anchors. The last rappel often requires two ropes to get past the bergschrund. Summer of 2009, extreme melting made the col too dangerous to use and a new way started to get used.
Col rap anchor photo: mountainproject.com/v/inter…
3. The Pigeon-Snowpatch Rappels are now an alternative to the Bugaboo-Snowpatch Col. Unlike the col, this way does not get climbed. If your staying at Applebee, then this way home is much longer than the col.
First Rappel the Kraus-McCarthy.
Next head south on snow, staying close to the rock of the Snowpatch's lower Southwest Ridge. A large cairn on the rock marks the anchors. One guide's report mentions having to cross 25 degree bare ice to get to the anchors. His party got across late day without crampons but he didn't think it would have been doable, sans crampons, when really frozen.
Several 30 meter rappels on rock, close to an icefall, end on the Bugaboo Glacier.
Rope up for the hike down the glacier, notorious for crevasse hazard. Some have avoided late season crevasse hazard by side-hilling on the unstable moraines instead. They admitted to a preference for rockfall hazard instead of deep icy holes.
Finally, rejoin the approach hike to return to the Hut.
EQUIPMENT
My guess for your rack is to bring a wide range on the rack, but not too many doubles. Lots of slings too. This route has been done a lot with a small rack.
KRAUS-McCARTHY ORIGINAL RAPPEL ANCHORS
The old summit anchor was a 20 kilogram flake, about 80 centimeters in length, tied off and laid across the top of the Kraus-McCarthy chimney, where it splits the flat summit ledge. Before weighting the very directional and portable anchor, climbers would have to squeeze down into the chimney. Once under the sketchy flake and on rappel, the security of the chimney was replaced with 240 meters of exposure. The next anchor was a tied off pancake flake, somehow wedged between the walls of a 90 degree corner.
Thanks for the anchors!
MORE BETA FROM THE PAST
Jack Arnold's description of the crux:
"On a very smooth, vertical face and, running upwards across the face at a seventy degree tangent, was a quartz vein with small knobs protruding. None of these knobs extended more than an inch and most of them considerably less. Raffi, placing pitons in the vein, led up on these small knobs, to where he was stopped by a large overhang. This necessitated a traverse left on, purely on the arms, to the base of a large chock-stone where this pitch ends. On following, I found balance on these knobs very critical and the arm traverse so difficult, due to the character of the sloping hold, that the only way I could get adequate purchase was to balance with my right fore-arm and, with the left hand helping, inch my way across. The entire pitch is done under extreme exposure and I dare say the next party will find it interesting indeed."
(The Mountains of Canada, Randy Morse, 1978)

 Continue with onX Maps
 Sign in with Facebook


Not being a jerk, just calling it like it is. Oct 16, 2007
on the road
BC
Thanks to all for wanting the best quality information, and for keeping it civil. Feb 22, 2010
North Conway, NH
On a later climb, with more Beta, my recollection of climbing from a "stance below the Wiessner Overhang, which is not climbed directly. Move right to the 5.5 hand traverse used by Wiessner to dodge the roof and gain the easy slabs" is that this traverse starts significantly below [50-100ft??] (like at the level of the BELAY stance) the OH itself, which is in a south-facing inside corner ramp. The text sort of implies you climb up to the OH and then go right. No so. I remember distinctly that I said "The route CAN'T go out there!", but it did/does.
In Feb 2016 I added some photos, (digitized from 1982 35mm slides) two of which show the headwall. If someone knows the route through it, please add it. I can e-mail the original photo(s). Jun 22, 2015
Spokane, WA
Calgary
Canmore, AB
Whitehorse, Yukon
The approach without crampons may be more complex, although I don't know what the approach up the glacier is like. Hike from applebee, descend to the plateau below the Crescent Glacier and weave your way through tarns and boulders to reach the Son of Snowpatch ridge. Some snow slopes may need to be traversed but these were well booted for us. Contour around to the Bugaboo glacier side until you find a fixed rope with knots in it up the slabs. Once at the top of this follow cairns through the scree field that will take you higher up on the slope. There will be a second section of fixed ropes eventually. Keep following a decently packed down trail following cairns until you reach the bowl below the notch. A steep section to reach the rock is required and without crampons steps may need to be cut. The rock here is super loose and sketch. Keep your spacing.
Eventually you'll reach more solid but steep rock. Most people solo this and you'll find two short easy 5th class sequences. Once you top out on this you'll see a nice corner on the left and broken ground to the right. Much faster and easier to scramble up right but you can also rope up and climb the corner. This will top you out on the notch. The key here is to stay on the Applebee side and pass all pinnacles on the right (ie keep your left shoulder against the ridge, requires a little downclimbing) until you ridge the steep wall of the ridge proper. Above you'll see a short finger crack that will take you over the crest to the lookers right of the last pinnacle. Climb up this (we simuled) and cross the crest back to the Bugaboo Glacier side. You'll downclimb easy ledges from here and can continue downclimbing to reach a ledge at the start of the 5.4 corner. Or you can traverse an easy slab higher up. From here the guidebook is pretty clear. Climb the easy cracks on the right of the steep wall to the base of the Weissner overhang traverse pictured on this page. I was confused by the description as it describes a hand traverse but it starts out as a foot traverse on the hand sized crack until a lip forms and you need to transition to hands. Beautiful, easy handjamming with good friction feet. Belay once past the OH to avoid rope drag then one more pitch to gain the slab by the snowpatch. Easy simuling up most of the slab then a couple pitches higher up where the rock quality degrades briefly that you may want to pitch out, heading towards the inverted pear feature. Traverse from the inverted pear to the base of a chimney/fist crack. Not 5.4 but not too hard either. A #4 is useful to walk and protect here but there is a fixed pin by the crux, whether or not you trust it. Head left up a slab after topping out on this, pull a final steep move to a large ledge where you have the OW option or the dyke. As of July 2021 there were 2 pins on this pitch and there was a meh #1 placement as well. Airy and fairly technical but straightforward. Hand traverse the small crack then belay on the slab although you can keep climbing and do the first portion of the flakes/cracks on the rights side of the slab on the outer face of the corner. Follow up to the small roof, hand traverse on a small crack (take a 0.3 sized tcu and protected by a pin). Easy beta but slabby feet make it a bit burly feeling. Some awkward climbing traversing left until you pass a finger crack (looks like good pro, maybe goes at 5.9?) and step up on to a large detached flake where you'll find a vertical slabby face with 3 pins to protect the moves. After climbing past the 3 pins, head right on the ledge to reach a fairly steep corner (not really a ramp as described in the guidebook), belay at the base, then 2 pitches from here will top you out right in front of the raps. The raps off the west face are simple and apparently best with a single rope as there are many spots for it to catch. Some sketchy downclimbing after the raps is required than a flat hike left of the glacier/icefall will take you to the icefall raps easy. From here it's just reversing the approach. Look for cairns on the scree to follow back if you don't have crampons for the glacier.
Using StephABegg's blog and printing pitch images from there helped with most of the routefinding. Hopefully this can clear up some of the issues a lot of people seemed to be having with the routefinding. Aug 4, 2021
Las Vegas, NV
If you do choose to climb the route. The guidebook was a little fuzzy about the ledges trending up and right from the Inverted Pear. There are a couple corner system ramps. I took the further right one that was lightly vegetated and ended up having to traverse back left under a chossy rooflet and pulling over while avoiding some loose blocks, maybe athletic 5.8? I would recommend the corner that is to the left with the dyke running vertically through it. This seemed to take a more direct path to the belay stance (large monolith with a decent sized sloping dirt ledge). From this belay, work left and upwards continuing through the dyke underneath the large roof, you'll find a few pins protecting the dyke, none of the climbing is difficult. The dyke takes you to the roof, there you can easily hand traverse underneath. There is good gear available and a pin in the hand traverse. From here, I never found an offwidth. I took a chimney with a hand crack in the right wall (#1's BD ish) and plenty of features up and around to the left of the roof. Above this is a another small stance with a small block on the ground that could be slung or some cracks at chest level (#0.3-#0.75 BD) for a gear anchor. Just above this is a beefy looking pin protecting a thin crack and hand traverse to the left again. Either way, move up and left gently, and you will see a few more pins. There should be three clustered together protecting a 5.8 face move, after this, it is easy rambling to the top of the notch. The Krause-McCarthy rappels are on the climber's left wall of the notch. Easy straight forward and clean rappels to the lower Vowell glacier. I recommend bringing a 70m rope despite the book saying a 60m will work, we found many raps to be close to the ends of our 70m rope. Also recommend bringing an axe and a screw/threader in case the glacier is dry and firm.
From here, we went down to the Pigeon-Snowpatch Icefall rappels, which were also relatively painless. The first station is on the skiers left wall. Aug 5, 2023