
 Continue with onX Maps
 Continue with Facebook


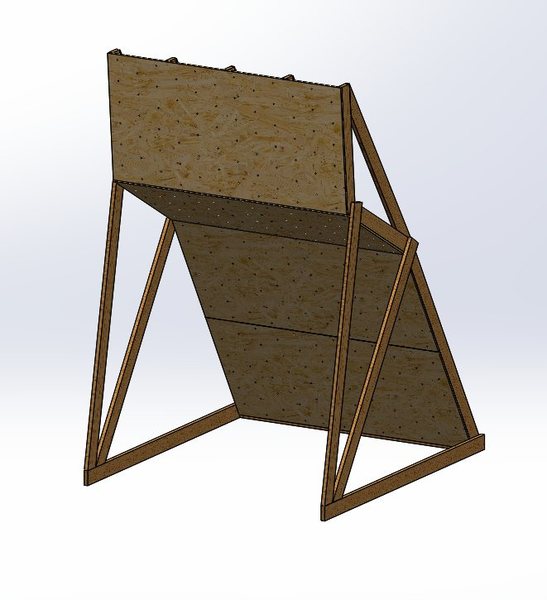
Critique my home wall design
|
|
I've done some research and used threads around mountain project on this topic for inspiration and I'd like some feedback / constructive criticism on this design I've put together using CAD.
The structure consists of:
The total height of the structure is approximately 13 ft, and the supporting members extend approximately 9.5 ft from the rear of the lower wall.
   |
|
|
I'm an engineer I'm not going to do the load calculations. But I will recommend additional bracing based on my gut.
Alex May wrote:What are some good options for outdoor, weather-proof crash pads?Find a local supplier to build one but they aren't cheap. At LEAST $700 for a good PVC mat I'd be thinking. I paid $1700 for mine, but it was bigger and more complicated shape. (I recently did this for a local climbing club.) Or search ebay for old gym equipment. |
|
|
According to this a basic 2x6 that is 10feet long with not mid bracing only has a capacity of 500lbs. And that is assuming the end is braced! |
|
|
Patto, |
|
|
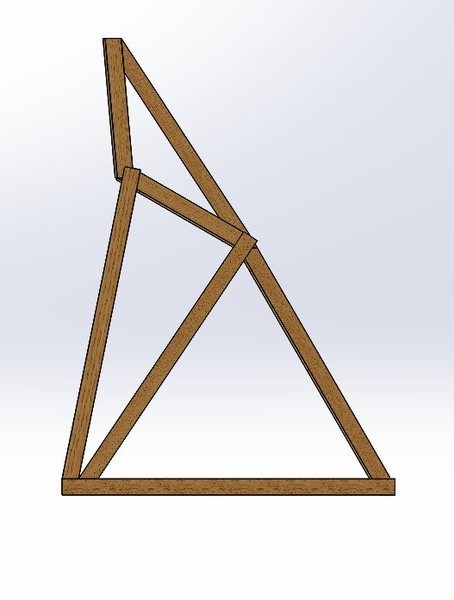
 I'd recommend these changes: 1) Eliminate the joint at E and make brace A-B a continuous 2x4 2) Sister another 2x4 at E-B to stiffen the vertical post and provide bearing at E 3) Eliminate brace B-D as it is unnecessary and creates a constriction you could fall into at B 4) Build A-C from 2x6 and everything else can be 2x4 5) Eliminate plate B-C. Fasten the wall to the concrete slab at B with post anchors and tapcons, and fasten plate C to the slab with expansion bolts. 6) Any studs resting on concrete (ex. plate C) should be treated. The plywood should be "CDX" grade but I'd still paint it for weatherproofing. Use "deck" or "framing" grade 3 inch star drive screws for framing. |
|
|
Didn't read through all the previous suggestions, but I would move point B in Doug's labeled picture to the left a bit. There is a chance when you are hanging or pulling on holds near the top you could topple the whole wall, especially if you pull in a down/leftward direction. |
|
|
I think you need to add a horizontal beam at the red lines in the pic. The only thing that is really holding up the middle sections of the entire thing is the plywood. The bracing behind the plywood doesn't do anything if it isn't braced by something itself. The horizontal beam could just be a 2x6 or 2 2x6's put together. And then you would need to brace the horizontal beams with the vertical boards that you take to the ground. |
|
|
Less structural and more conceptual comment: |
|
|
I built one really similar to this. The front vertical 2 x 6" ran plumb from the ground straight up to the top of the headwall. There wasn't any need to angle it out. I ran a couple 2 x 4" verticals as studs on the side walls and then put plywood on that as well. 3/4" plywood gives you more than enough bracing. Same goes for the side to side bracing. No need to run extra bracing on the backside of the 2 x 6". The plywood will be plenty strong and the addition of the headwall at the top will make it completely rigid. You could always add bracing later, but I think you will find you don't need it. We picked up some cheap plastic corrugated roofing from Home Depot and ran it down the backside to make it mostly weatherproof. |
|
|
Does it have to be on concrete or can the location be moved over soil? if so you're design can be simplified, by using steel stakes and removing the horrible bottom horizontal, its kind of an accident in wait. |


