
 Continue with onX Maps
 Continue with Facebook


Any constructive criticism on this anchor?


|
|
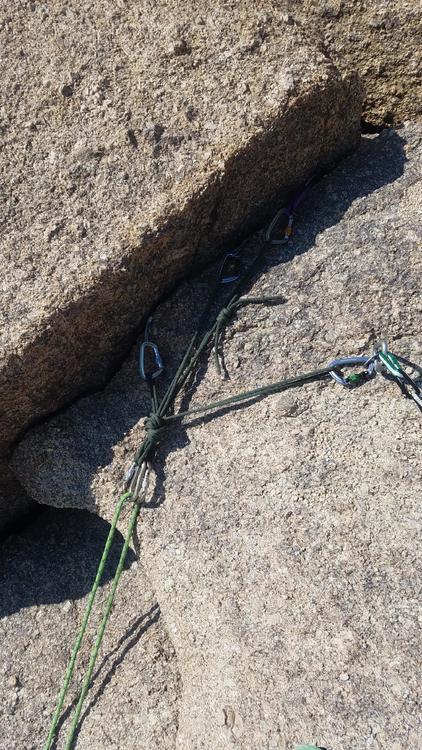 Any tips on this anchor I built? |

|
Can't see the placements, so that makes it hard to judge. Assuming those are bomber, the 1st thing I notice is that if your masterpoint was extended lower, you would get less wear on your rope. Looks like the TR set-up would cause a lot of unnecessary abrasion on that rough looking rock on the right side of the rope. Other than that, I'd trust it, follows SERENE (assuming it was efficient to build). |
|
|
Overall, the thing is bomber, you have a bolt in there and those pieces are probably good. How did you feel about the quality of each individual piece? I like that you made sure the rope and carabiners were not loaded over that rounded edge. IMO. the cordelette is too short for all the anchor pieces, this results in the bolt to the left having a poor equalization angle. In reality, that bolt is probably super strong so it can handle it. Fixes: 1: use a shoulder length sling as a sliding x on both the middle pieces, and have 3 legs to the cordelette. 2: clip both the middle pieces to one of 3 legs of the cordelette. 3: pick one of those pieces and skip the other. How long do you think it took to make this anchor? Could you have done it faster and made an anchor acceptable for your purposes? |

|
Not much can be said without seeing your placements. More placements does not always make a better anchor. By using the bolt and two of the trad pieces, you could have made the angle of your legs more acute (as well as lowering the masterpoint), thus reducing the force on each piece. The masterpoint would ideally be below that lip so your ropes don't abrade, but it looks okay. If you decided that four pieces was the minimum to make this anchor safe (unlikely), you could have untied your cord to lower the masterpoint, improving both the angle and the abrasion issues I already mentioned (why I prefer tying my cord using a flat overhand). If you didn't want to untie your cord, you could have connected two pieces as if they were their own anchor and then clip the masterpoint as one piece, incorporating it into the larger anchor. Another thing to note is all your trad gear is in one feature; ideally, you would use different features so a macro rock failure doesn't compromise the anchor, but you also have the bolt so it's fine. |
|
|
Pick the best piece, and just use it and the bolt, assuming the bolt looks ok (it takes more than a little surface rust for me to not trust a bolt). Then you would have enough length to extend the masterpoint further over the lip. |
|
|
Good rule of thumb is to have the angle of your cord between each piece less than 60 degrees as it reduces the forces exerted on each piece. In your case, the angle between the bolt and your outer most left piece are closer to 90 degrees. Like others before me mentioned, you should try to extend your masterpoint so that it is not in contact with any surface of the rock (i.e. free hanging). This is also generally true for a multipitch anchor as well, as the belay device could pinch against the rock in the event of a fall and prevent you from being able to lower the climber if necessary--or worst case (never heard of it happening, but theoretically possible) disengage the autoblock mechanism to the point where you lose friction in the system. That being said, your anchor was solid overall. |
|
|
Jonathan Croom wrote: If you don't need the shelf, a clove hitch master point can save you some material as well.
|
|
|
Short answer: Looks plenty safe. Other comments: For a multipitch anchor I'd be comfortable with one less piece and non lockers on the pro. But I actually like a little extra redundancy on a top rope anchor. Not that the loads are anything to worry about, but the anchor may go through lots of loading cycles over a long time period without anyone there to monitor it. Plus you're less concerned about time efficiency, weight of the rack, or saving gear for the next pitch, so you might as well be conservative. There are good comments above about lowering the master point to avoid abrasion. |
|
|
i am more worried about how you have your PAS biner loaded than your anchor... |
|
|
slim wrote: That is not me hooked in with the PAS. I was not taking the picture. I let the guy know that was not safe when I seen him do it. |
|
|
+1 on using non-lockers to attach cordelette to pro unless your going to be top-roping all day on it. Might as well save lockers for uses with less redundancy like tieing into master point/etc. It will also be less scary when you run out of lockers 3 pitches off the ground if your used to using non-lockers in your anchors. |
|
|
Jacob Washington wrote: good catch. |
|
|
it's bomber |
|
|
Since you have the bolt on the right I would count this as a second section of rock, but when you're building an anchor on gear only later on consider using more than on section of rock. When you have a split in the face of a wall, take calculus crack for example: https://cdn-files.apstatic.com/climb/107928946_large_1494251303.jpg then you can be very assured the rock isn't going anywhere. Put all your pieces in a line in one section. When you're dealing with corner cracks, blocks, flakes, shields, etc.. I wouldn't trust one section of rock to hold. Try to find pieces in as many separate sections of rock if possible (using the rope with cloves to build your anchor, relying on a cords makes this difficult). Last summer I built an anchor in what appeared to be a bomber hand crack, #2 to #.75 cams, I tied a mastepoint, then leaned back on my clove and heard a giant crack. The whole truck length rock cracked clean through at it's base. Granted this was off the beaten path on an obscure alpine route, but rocks move on even popular routes: My friend's experience: https://www.mountainproject.com/v/hyperspace/106279399
|
|
|
Thank you everyone for all the feedback. It has helped alot. |
|
|
slim wrote: How could the PAS biner set-up be improved? |
|
|
Well, I'm curious as to why there is a bolt there even though there are gear placements available. This makes me question the gear placements, although it is impossible to evaluate from this photo. The way your cord is set up it's going to put most, if not all of the load onto one piece of gear, possibly the left most piece. This is just the nature of a tied of cordalette. Equalization is nearly impossible, but not necessarily a bad thing if the gear is solid. But, since the bolt is at almost a 90° angle to your master point it is carrying almost zero load, even though it may be the strongest piece in the anchor. I would consider moving the master point down and right, more underneath the bolt so it will share the load much better. Perhaps eliminate the worst piece of gear, which will give you much more cord to work with and allow you to move the master point much more beneath the bolt and improve the angle of the dangle. And forget the lockers on the individual pieces. |
|
|
MClay wrote: It's torqued because that other carabiner is already in the small hanger. You could attach yourself to the masterpoint or shelf (the best options), or if you really want to use that bolt alone, clip into the locker already on the hanger. |
|
|
MClay wrote: it is pinched in the hanger such that loading the PAS would lever it, similar to a nose hooked biner. it would have been better from the start if the biner was clipped with the gate upwards instead of downwards. sure, it's a locker, which is helpful, but it's always better to just avoid problems in the first place. one particular situation where i see beginners make this mistake all of the time is when they clip a biner into a piton. you generally want the gate facing away from the rock. if the gate is facing the rock it pretty much always loads the biner in a jacked up manner. my first introduction to a nose hooked biner came pretty early in my climbing career. i saw a guy fall, the biner break, him crater, and a flight for life chopper carry him out. |
|
|
Agreed slim. Another place where I see lockers attached in a less than ideal way is on a bolt with a steel ring attached to it. Some people try to force their locker directly into the hanger and it gets all jacked and torqued. The logic for this is to eliminate an additional failure point or some other reason believe that this is safer. Usually the steel ring is of the order of 50 kN or so. Clipping the biner into this would allow it to sit much more naturally and in a safer orientation. |
|
|
Greg D wrote: ha ha, not to mention it is a PITA for the last person to clean if it is at a hanging location... |


