

 Avg: 3.4 from 59
votes
Avg: 3.4 from 59
votes
Overview
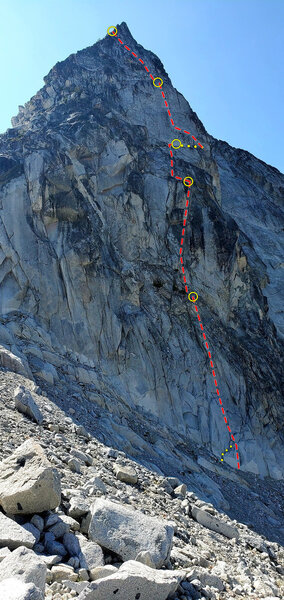
900+ feet of quality, sustained crack (and some face) climbing on very good rock, up the elegant East Face of the NE Towers of Dragontail Peak. This climb offers a real alpine climbing experience with long pitches and no fixed protection or anchors, engaging and playful movement, at a surprising and unusually-accessible grade. It takes a natural line up a relatively less explored aspect of one of the most prominent peaks in the range, with a nice position and a friendly scramble descent. The route has comfortable belay ledges approximately every 55 meters, and is in the sun from early morning until early afternoon.
Established over the 2nd week of August, 2020 by Andy and Katherine Wyatt, Chris Potts, and Margot Fahey. The first climb of the route (by Andy and Chris) was an onsight, ground-up, and C2C ascent. Later in the week, Andy, Katherine, Chris, and Margo returned for multiple days and rigorously cleaned the route. Regardless, the route remains a true alpine endeavor that requires careful travel and consideration.
Note: The E and NE aspects of Dragontail (including the NE Towers) terminate into the E summit of Dragontail. This is atop Dragons of Eden, and the other routes on the east half of the mountain. The East summit is separated from the main summit by a long serrated ridge. Conceivably, one could traverse the ridge connecting the East summit and the main summit (this may or may not have been done before). While not the termination of this route, the highest summit can be reached by descending off the E summit (see descent notes) and ascending the southern slopes via 3rd and 4th class scrambling.
Route
P1, 5.9+, 58M. Ascend fifty feet of easy climbing, climb ten feet of face around the right side of a recessed pod, and then back into the main crack. Punch up the main crack, with some smaller over lapping cracks, offering very fun and engaging movement. Atop the main crack, continue through broken and moderate terrain to the obvious ledge and climb 20 feet beyond the right of the two tree/bushes. Belay on .1-.3 cams and small nuts at the base of the beautiful corner above. Note, this pitch protects well using slightly more thoughtful placements relative to the other pitches on the route; all 5.9 moves could be pulled through on gear.
P2, 5.9, 55M. Stem your way up the initial 10-foot OW pod before launching up a gorgeous and sustained corner crack, offering spectacular and pure crack climbing from locker fingers to perfect hands. This is a powerful pitch that rewards strong arms and good jamming technique. Look for foot features along the way to ease the grade and add more creative movement. When the corner ends, continue up and left approx 20’ and stop at a crack on the right that accepts bomber med-large nuts and cams.
P3, 5.6, 45M. Ascend the broken crack system directly above the belay, gaining a sloping ledge beneath a pair of obvious zig-zag cracks. Climb through these zig-zag cracks to a wide and large sandy ledge. Belay in the clean crack in the middle of this ledge.
P4, 5.7, 58M. This clean headwall with a splitter crack that catches your eye from the ground is even more spectacular than it looks. Even more defining is the friendly grade and secure climbing, especially for such a dramatic and full pitch. Begin approx 15-20 feet right of the belay and climb easily up the right side of the protruding ear. Move left a few moves along a thin crack rail to gain the main crack, offering phenomenal and varied crack climbing with excellent movement. Take this long pitch up and slightly right to a large, flat ledge. Belay on the right side of the ledge, to the right of the vertical leaning block.
P5, 5.7, 55M. Climb up and left through broken ledges for approx 20 feet gaining a crack that climbs, pleasantly, up the right side of a right facing dark ear feature. Zig zag up and generally left through varied crack systems, face features, knobs, and small ledges. Exit off the left side of the face, turning the corner into a belay alcove approx 20’ below and to the left of the summit pinnacle.
Descent
After summiting, work S and W across broken 3rd and 4th class terrain, slowly losing elevation until you gain a clean gully (approximately 500’ from the final belay station). Descend this to a large and obvious ledge, then scramble SW to walkable terrain, intersecting the standard summit descent to Aasgard Pass. Note, this was the easiest descent found by the FA party, however, many alternatives exist. Walk on cairned, braided and rocky trails to the top of Aasgard Pass.
The route is not set up for rappel.
Hike to the south side of Colchuck Lake, then up approx 85% of the trail up Aasgard Pass. At approx 7250’ the main trail crosses right across Aasgard’s largest river braid; continue approx 5-10 min past this point, leaving the trail between approx 7300-7400 feet, crossing loose scree up and right, heading directly to the base of the route. The route begins approx 300 feet below where the top of Aasgard pass meets the toe of Dragontail, and below where two small tree/bushes sit on the first belay ledge, up approx 190 feet; start below the right side of the right bush. It could also be identified as starting in the middle of the protruding tower.
Doubles from .2-#2, singles of .1 and #3, a healthy set of stoppers (route takes good nuts), and an assortment of runners. If leading at your grade, or not comfortable putting distance between your gear, add your choice of triples from .3 to #2, a second #3, and a #4. Note that the pitches on this route are all nearly 60M, with no fixed protection, and use gear belays. If you prefer feeling well-protected, it will require a fairly-significant amount of gear (which the cracks will gladly accept).

 Continue with onX Maps
 Continue with Facebook


Seattle, WA
Descent was straightforward, glad we did it in the light as there are so many options.
Very hexcited to go back and pair this with something on Prusik. Sep 7, 2020
Seattle, WA
Rack:
Double rack .3 - #2 w/ single #3, triples .4, .5, .75
60m rope
Pitch 1. From the ground the obvious crack about 3/4 way up (the crux) looks like a hand crack but it's not quite deep enough to jam. Gear is around but not everywhere, so take it when you get it. I found this section to be very insecure and physical. You could aid through this short section if necessary. (5.10)
Pitch 2. Holey moley this thing is quality. Moving off the belay starts out a little awkward / wide / physical - but it's easily protected. From there on it's just pure corner climbing joy and easy to protect anywhere you want the entire pitch. Eats up #1 and #2 - and it's a very long pitch so be sure to save some for the upper section. Towards the top you pass through 2 mini roofs, which I found to be secure but quite physical. (5.10-)
Pitch 3. A little wandery but generally head straight up. We had this pitch at 35M to the ledge which looked more gravely to me then sandy. Belayed from the crack in the middle of the wall, on bomber gear, and then bumped us both over to the base of pitch 4 (one small piece) before starting pitch 4. (5.6)
Pitch 4. WOW. Seriously? So good. A full 58 meters of hand jams that never stop. About 3/4 of the way up the crack splits - straight up the hand sized crack to a scary looking tooth or step right into thinner cracks - either goes. I tested the tooth a bit and it seems solidly in place, but opted not to pull / stand on it. Top anchor took #1, .5, .3 - but other options exist. This is a solid and consistent pitch of climbing. (5.8)
Pitch 5. Fun wandering through cracks and edges to the top. (5.7)
Moving at a casual pace:
Approach: 4 hours
Climb: 5 hours
Decent to base: 1 hour
HUGE thanks to the crew for establishing this line. Sep 10, 2020
Hobart, WA
Hobart, WA
Pitch 1, is definitely the crux and is harder than 5.9+. The crack is fun, but steep and a bit insecure. Good moves with good gear. 5.10-
Pitch 2 is the money pitch. 175 feet of corner crack climbing. sustained at 5.9, but if you stem and use your feet there are rests throughout most of the the pitch.
Pitch 3 is the worst of the bunch, and basically just links the bottom 2 pitches with the top 2. This pitch was dirty and likely will never clean-up, but do not be deterred. the other 4 pitches make this transition pitch easily forgotten. 5.6
Pitch 4 is the second money pitch, with great sustained 5.7 crack climbing on the headwall. Wherever the jams are not solid, the feet are big. Overall just a fun pitch. 5.7
Pitch 5 is a good finish to the climb. 5.7 face and crack to the top.
we took a double rack from purple metolius to BD #3, and had enough. P2 and P4 eat up gear, but there are enough options that we did not feel triples were required. a set of nuts was good for belays, and could be used as pro if needed.
the descent was not too bad, but hopefully someone will find the best way down and put some cairns out to guide the way. Many options, with some cliffing out... We generally went SW and down until we hit the dragontail trail. there was a couple sections that were a bit more exposed/tricky, but overall not too bad. Oct 2, 2020
Seattle, WA
Approach: straight forward from the description, but just in case, coordinates are: N 47.481258 W 120.825989. Gets morning sun, but goes into shade mid-day. Dress accordingly.
Gear: agree doubles will do if you are OK spacing gear. We found triples of 0.3-0.4 handy. Tricams were not necessary but were carried for good luck.
P1: My partner & I weren't sure whether to call this 9+ or 10-. Either way, it's definitely the mental crux, so if you are pushing your grade, be aware that this pitch starts to feel pretty insecure since the crack gets too shallow to properly jam, and pro becomes more tricky, right as it steepens.
P2: SUPER pitch. Again 9+ or 10-. Very physical, but very secure. Would be a solid 10 were it not for the regular rests that are present if you look a bit.
P3: what? was there a pitch 3? Pretty forgettable but offers nice rest after P2.
P4: SUPER pitch. Recommend shuffling the belay to the bottom of the headwall crack. We belayed from the "middle ledge" crack at the top of P3 and scooted a cam up for about 30ft off the ledge to avoid rope drag which worked fine too. The "tooth" is loose so take care, or bring a dentist.
P5: After setting the belay just to the left of the head-high, vertical, leaning pillar (where P4 naturally ends), we realized we should have followed the FA beta and placed it to the RIGHT of this pillar to avoid potential for rockfall in the first part of this pitch. Exit is 20-30 ft left of the obvious central chimney/crack at a breakdown that turns into an alcove.
Descent: We headed a little too much South (down), and not enough West (right) and ended up backtracking a bit before finding the proper exit. This upper section could use some cairns when someone figures it out, but once you are walking out, cairns are nicely placed (thanks!). Oct 5, 2020
Seattle, WA
There’s still lots of loose crap on ledges above P2 and P4, so be careful belaying your follower. Oct 10, 2020
Seattle and Eastrevy
Cashmere, WA
North Bend, WA
Richland, WA
P1 and 2 are great, 4 and 5 are a little on the dirty/loose side but will clean up nicely with all the traffic it's seeing. Agree with comments about P3, it's likely going to be choss forever.
Be ready to dodge raining granola/rocks at the base of P4 if there are people above you, if you are waiting for another party it's probably best to wait at the P3 top-belay spot which is a little offset to the left. Jul 26, 2021
None of the moves on p1 is harder than 5.8, protection can be tricky. I placed two .5 and .75 and a .5/.75 offset. Also find offset cams handy on other pitches. Jul 28, 2021
Seattle, Wa
cascadeclimbers.com/forum/t… Sep 14, 2021
Seattle, WA
P1 flaring crack features some insecure, technical jamming. More insecure and awkward than powerful. Thoughtful climbing on great rock though. Gear on p1 takes more time/looking to place, but solid placements can be found throughout and all the harder climbing on the pitch can more or less be sewn up. This is especially true if you have some small-medium totems or offset cams. I think 10a is probably justified.
P2 was amazing. Perfect hand jams and finger locks the entire way, with lots of variety and some fun stemming and laybacks thrown in. This pitch is sustained, but definitely felt more 5.9 than 10a.
P3 we found to be better than expected. Some 5.easy climbing brings you to a chossy ledge and a nice zig-zag 5.6 crack with fun movement and decent rock quality.
P4 we moved the belay across the big ledge. We started up some cracks and the short right-facing corner, then followed a short diagonal crack up and left into the main splitter. Main crack was sustained 5.7 with either perfect jams, good feet, or both. Toward the top where it splits, my partner took the right two cracks which had a couple tricky moves and gear. Left crack may possibly be easier? A bit of crispy rock on this pitch, but it should clean up well. Overall another fantastic pitch, almost 60m!
P5 had a mix of fun climbing and choss. Had some runouts, but only on 5.5 or below terrain. Starts up through some class 4 to a shallow right-facing corner and then follows discontinuous cracks to the top. The topout was just about 20' left of the true pinnacle, in a small notch next to a horn/block that can be slung.
Gear: We brought doubles .2-3, with a single .1, some small-medium nuts, and a third .4 and .75-2. This felt pretty perfect for us. Triples in .75-2 made the climb more comfy. I may have used a third .4 once and never placed the .1, so I'd likely leave those next time. We had black-purple totems, which were very useful, especially on P1. A green totem or .5/.75 offset would be handy as well. Definitely no need for a #4.
Descent had a couple tricky 4th class sections getting to the last big ledge, though we may have dropped early. We followed cairns though, so it seems like a number of people had gone this way. Aug 8, 2022
Seattle
Leavenworth, Wa
I would recommend moving the belay at the base of the 4th pitch to just below the splitter crack. We found that belaying 20ft to the left of the crack system was awkward and presented a huge potential for rope drag. I ended up not placing a piece until I was actually in the crack to avoid the rope drag. Running this out ~20ft off the deck was secure enough but felt unnecessary. Sep 29, 2022
Seattle, WA
Seattle, WA
Really fun climbing bottom to top, great work by the FA team! Jun 20, 2023
Beijing, CN
Holtsville, NY
P1 was heady, but has great gear and didnt feel too physical. If P2 was on the lower town wall I think it would vastly exceed Godzilla in popularity Jul 16, 2023
Portland, OR
p1 - a flaring crack in the middle was awkward and technical (I was happy to have Totems), the upper half was nothing special. 5. 10-
p2 - a sustained 5.9 corner
p3 - multiple variations on the upper half. I went more left, in another flaring crack, to a huge ledge. 5.7
p4 - a great pitch with a big wall feel. It has multiple exits at the top. 5.8
p5 - a loose mediocre 5.7
For the descent, we followed a cairned scramble trail to the dead end which seemed like a very exposed cl. 5.
At which point, we did two 30 m raps off small trees which landed us almost at the top of Assgard pass. Aug 6, 2023
For an alpine route, this climb is pretty damn clean and we didn't encounter choss on any of the pitches. The ledges will have your typical rocks sitting on top, but nothing scary and it is all pretty easy to avoid. We did the route with a 60M rope and had plenty of rope for each pitch. The last pitch only left 5 feet of extra rope.
The true crux of this climb is getting up Aasgard Pass without destroying your calves (I had never been here before). It took us a total of 4:08 to get from the TH to the start of the climb, which included a break at the lake, a trip to the toilet, and refilling water on Aasgard Pass (1 hour of sitting around). My Suunto said 6.55 miles and 4,572' of gain. Aug 9, 2023
Portland, OR
I had just came from Index the day before and cruised PBR (10b) and pitch 1 and 2 of this are harder.
Pitch 1 is flaring weirdness with crap jams and feet and flaring gear.
Pitch 2 has great jams and is physical. Def a 5.10 crack in almost every area around. Used a #4 to protect the initial offwidth and triple #1 and #2 for the rest. Some .75 areas make this section more difficult.
The rest of the pitches seemed to match the grade. I'd maybe call Pitch 4 5.8
The descent we found a little tricky. Went straight down toward the lake for about a hundred feet or so, then trended right for a bit, then up a bit, then more right. Finally follow cairns down and left to get to top of Aasgard.
17.5 hrs C2C Aug 28, 2023
We took a big rack: Triples 0.3 - 2, 2x #3, and a #4, and .3/.4 and .4/.5 offsets. We used it all, and were happy to have it. I'd recommend this approach if 5.10 isn't significantly below your OS grade - The pitches are long and having ample gear kept us climbing quickly and feeling secure. It seems like every pitch of this climb could've taken tons of #1s, so if you want even more security 4-5x #1s would almost certainly be used.
Don't be scared off by the "flaring crack" description of P1. There are plenty of spots to put in gear and sew up the crux, even without any offsets. Just don't expect the parallel sections to be large enough to give you any good jams.
#4 was nice for the start of P2. Smaller gear can be gotten here but you're going to work for it. It was nice to put the #4 in and keep going, keeping the arms fresh for the mega pitch of jamming above.
P4 is the super long perfect crack pitch that you always wanted that last pitch of Outer Space to be!
P5 is looser and dirtier than the rest of the route, but really not bad. If you've done much alpine climbing you've climbed a lot of pitches that were dirtier and looser than this.
We took the clean gully descent described in the route description. Not super difficult but the downclimbing in the gully isn't a gimme. It would probably be easy to find an anchor above the gully and 1-2 raps would get you past the more difficult section.
Huge thanks to the team that put the work in to get this route together - what an incredible addition to Washington climbing. Sep 10, 2023
Terrebonne, OR
Portland, OR
One unique thing about this route is that the comment beta is all over the place, however I found the noncomment beta most accurate/helpful.
We took doubles from 0.2 to 2, one #3, and some tripling around 0.4 - 1. That worked very well. I left my beloved hexes and tricams behind - tricams might've been useful as tripled cam substitutes but hexes not.
I'm new to granite, can usually onsight 10- basalt, and am new to crack, so bear that in mind: I found the first pitch to be pretty easy ("is this the crux? Can't be") and secure to protect. It's just not mindless protection, if you're used to crack. Look around you, it's fine!
Pitch 2, HOO BOY. I'm getting shaky thinking about it! I gave that everything I had. Literally, like if there were a couple more feet of that I would've fallen. I'd rate that 10- if comparing to the 9 cracks around Portland (which there aren't many of). For comparison: I can't climb Dod's Jam (Beacon Rock, 5.10c), but this was far harder than Nosferatu (Klinger, 5.9).
Pitch 3 was a welcome break.
Pitch 4 was life changing, blah blah blah, you've heard it.
Pitch 5, easy climbing but gear was least secure. It was fine though, just make sure you trend gradually left some time after leaving the ground, I had a couple false starts partway up which I retreated from more because I couldn't protect than I couldn't climb.
It's a gem, my friend. Oct 8, 2023