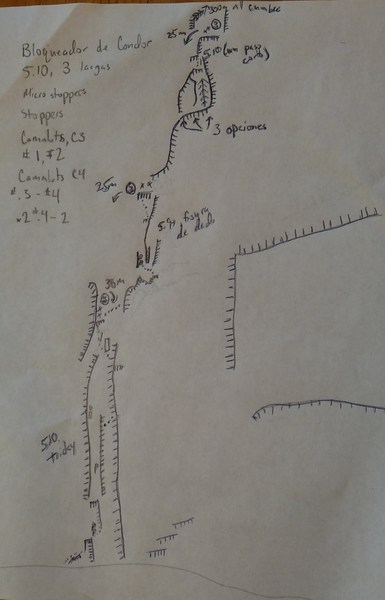
Bloqueador de Condor
5.10,
Trad, Alpine, 300 ft (91 m), 3 pitches, Grade III,

 Avg: 2.3 from 6
votes
Avg: 2.3 from 6
votes
FA: Brad Ward, Becca Schild, and Chris Barlow
International
> S America
> Chile
> N Aysén
> Cerro Colorado (aka C…
 Access Issue:
 access through private land and the mountain is located at Reserva Jejimeni (managed by CONAF)
Details
Cerro Colorado is located in Chilean Patagonia (Reserva Jejimeni - CONAF). The access to the mountain is by Chile Chico town (by the border with Argentina). It needs to register at CONAF Office in Chile Chico.
Description
Bloqueador de Condor is likely the most moderate route that currently reaches the top of the wall. It was established to be a more accessible multi-pitch route, with less sustained crack climbing, better protection, and requiring a smaller rack. Still, each pitch offers some high quality climbing, diverse challenges, and enough "crunchy" alpine rock to keep your attention.
Bloqueador de Condor es probablemente la ruta mas moderada que hace la cima del muro. Se estableció para ser una ruta multi-larga mas acesible, con escalada de fisuras menos sostenibles, mejor protección, y necesitando un equipo mas pequeño. Cada larga ofrece poca escalada de buena calidad, desafíos de todos tipos, y bastante roca poca suelta para mantener la atención.
Pitch 1: Begin on the left and traverse easy ledges back right into a short finger crack and ascend 2m to a ledge with 2 pitons. After clipping the pitons, step right to a right-facing dihedral with a finger/hand crack. At the top of this, climb directly up the "elevator shaft" with sustained, tricky stemming (passing another piton). Just below a stack of loose-looking blocks, step right again on good holds to another right-facing corner. Ascend this, eventually veering left past a large, rectangular block and a very thin crack and up to a grassy ledge/alcove with two bolts.
Larga 1: Empezar a la mano izquierda y hacer una traversa en repisas a una fisura de dedos muy corta y sube 2m a una repisa con 2 pitones. Con las pitones enchapadas, mudarse a la derecha a un diedro con fisura de dedo y mano. Arriba de esta, escalar directo el "hueco de ascensor" con contrapresión sostenido y tricky (pasando otro piton). Justo debajo de dos bloques sueltos, mudarse a la derecha otra vez con agarras buenas a otro diedro orientado a la derecha. Seguir arriba y eventualmente virar a la izquierda, pasando un bloque grande y una fisura muy delgada a una repisa con dos chapas.
Pitch 2: Look up and right for an obvious crack splitting a clean face - that's where you're headed. Traverse up and right on slightly shattered rock and ascend the crack to a point. Step over, down, then across further right to stand on large flakes. Climb up on more somewhat loose rock, clip two pitons way out left, and squeeze a narrow pillar. The left side of the pillar quickly forms into the splitter finger crack. At the top of the crack trend generally left to a nice ledge with two bolts. (The two pitons on this pitch were placed so that the leader doesn't have to place gear behind the hollow bottom part of the narrow pillar).
Larga 2: Buscar arriba y a la derecha una fisura obvia que parte una cara - esa es a donde vas. Hacer una traversa poco arriba y a la derecha en roca poca destrozada and seguir la fisura al punto. Mudarse encima, bajo, y hacia la derecha para subir hojuelas grandes. Escalar sobre mas roca poca suelto, encontrar dos pitones muy a la izquierda, and montar un pilar. La parte izquierda del pilar rapido se hace la fisura de dedo. Encima de la fisura, seguir generalmente a la izquierda a una repisa buena con dos chapas. (Los pitones en esta larga fueron puestos para que el líder no tenga que poner protección en la parte suelta de abajo del pilar.)
Pitch 3: Climb directly up, using a series of cracks/blocks to a ledge. From the ledge, you have 3 options: the dihedral directly above, a splitter thin-hands crack to the right, or a double-crack dihedral further right. All have advantages and disadvantages and lead you to a small stance below the route's technical crux. Place a high stopper in the fading crack and execute a shorter, weird boulder problem up and left to much easier climbing in groove. A few more meters lands you at a comfortable ledge with two more bolts.
Larga 3: Escalar directo, usando fisuras y bloques a una repisa. A la repisa, tienes tres opciones: el diedro directo arriba, una fisura de mano a la derecha, o dos fisuras en un diedro mas a la derecha. Todos tienen ventajas y desventajas y siguen a una repicita debajo del paso clave de la ruta. Poner un stopper muy arriba en la fisura y ejecutar un paso de bulder para llegar arriba y a la izquierda a escalada mucha mas facil. Pocos metros mas y llegar a una repisa muy comoda con dos chapas.
From here, 300+ meters of 4th to easy 5th class climbing will get you to the summit, or rappel the route.
Desde acá, 300+ meters de escalada de clase 4ta-5ta se queda para llegar al cumbre, o se puede rapelar la ruta.
It is possible to rappel with a single 70m rope, but the final rappel to the ground is long. To manage this, rappel a bit climber's right to a series of ledges that you can scramble back to the actual ground.
Es posible rapelar con una cuerda de 70m, pero el último al suelo es largo. Para manejar, bajar a la mano derecha (del escalador) para encontrar alguna repisas que se pueden escalar debajo al suelo.
Location
BdC is on the far left side of the wall. From the Prow, walk left to arrive at the cave (~10 meters high). Continue about 100m left from the cave to a large concave section of dark, lower-angle rock (maybe 50m before the wall bends around to the south). BdC begins just right of the darker rock. Look for two pins about 10m off the ground and the lighter-colored "elevator shaft" of the middle of the 1st pitch.
Protection
Micro-stoppers (critical)
Stoppers
Camalots C3: 1, 2
Camalots C4: .3-4, x2 .4-2
![Pitch 1 - the elevator shaft climbs over the obvious white rock
<br>
<br>
Larga 1 - el hueco de ascensor sigue por la roca blanca]()
[Hide Photo] Pitch 1 - the elevator shaft climbs over the obvious white rock Larga 1 - el hueco de ascensor sigue por la roca blanca
![Overview photo of route (pitches 2 and 3 are very forshortened)
<br>
<br>
Foto de resumen de la ruta (largas 2 y 3 parecen poco recortadas)]()
[Hide Photo] Overview photo of route (pitches 2 and 3 are very forshortened) Foto de resumen de la ruta (largas 2 y 3 parecen poco recortadas)


 Continue with onX Maps
 Continue with Facebook