Freezeway
5.7 X,
Trad, 30 ft (9 m),

 Avg: 3.3 from 22
votes
Avg: 3.3 from 22
votes
FA: Darren Smith (2014)
Colorado
> Boulder
> Flatirons
> North
> Second Flatiron
 Access Issue:
 2024 Crag Closures & Temporary Trail and Raptor Closures
Details
Description
This route grants access to the top of the 2nd Flatiron from the north side of the Pullman Car. It is part of the most direct way to the top of the 2nd Flatiron from the base of the east face under 5.9 with surprisingly good rock quality, and it is lichen free.
As far as I know, this route was unclimbed until 2014, most likely being overlooked due to its inconspicuousness and there being no safe way to lead it.
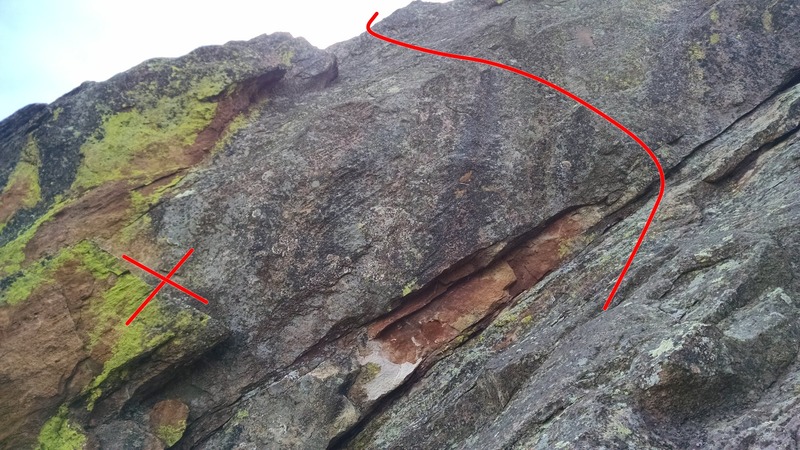
Start with right hand under cling/sidepull in the 45 degree slightly exposed flake. Either get your left foot high on a sloper or gain a high good crimp hidden in a ledge with your left hand. Then grab the not-quite-a-jug horn, move left, and gain a tiny ledge with your left hand allowing you to balance and bring your left foot way over. This feels exposed, and you're now doing the splits. From here if you are tall, you can reach an awesome jug pocket on the top the Pullman Car, but it is hidden, you will have to feel around for it and reach really far. If you can't find it or aren't tall enough, this move may be a little harder, but it is certainly still possible. From here, it is about 150 feet of easy climbing to the summit.
Overall, the route isn't difficult if you know the beta, but I would recommend practicing it on top rope first if you have any doubts (rappel or downclimb from the true summit, and build anchor at top of the route), a fall could result in a >40 foot free fall onto the 45 degree Flatiron. Many holds are reachy and hidden.
Location
This is 40 feet above the tunnel from
Dodge Block Tunnel Variation (between the Pullman Car and the top of
Freeway). See the picture.
Do not try to climb the large flake ~10 feet below this route (the red X in the beta photo), it is unstable and leads to very poor rock quality anyway.
Protection
No pro for the actual route. There is ample protection right before the route and as soon as you get past the vertical section and onto the pullman car. (Standard rack of nuts + medium/small cams would protect these).
![Jon on Freezeway from above.]()
[Hide Photo] Jon on Freezeway from above.
![Somewhere off of the west side of Freeway [or Second Flatironette, per [[Long Ranger]]108576161].]()
[Hide Photo] Somewhere off of the west side of Freeway [or Second Flatironette, per Long Ranger].


 Continue with onX Maps
 Continue with Facebook


![Somewhere off of the west side of Freeway [or Second Flatironette, per [[Long Ranger]]108576161].](https://mountainproject.com/assets/photos/climb/121139777_medium_1628634648.jpg?cache=1699892787)
Boulder, CO
Boulder, CO
Great find, Darren! Jun 3, 2015
Boulder, CO
1. The Piton Headwall ~ chimney type moves and the hardest crux for me.
2. The Tunnel ~ a little slick sometimes but so freaking cool.
3. The Freezeway section ~ probably 5.7 as the rating suggests, but after a few laps, it becomes super casual and secure. Good to have somebody show you the beta first time through though. Also, it is not easy for short folks, as the few I've seen do it have a hard time. Aug 14, 2018