
 Continue with onX Maps
 Continue with Facebook


Routes in Shield


|
Cathedral of Western Fire T 5.12d 7c 28 IX 28 E6 6b |
|
|
Chicken Chop Suey T 5.9+ 5c 17 VI 17 E1 5a R |
|
|
Knife Edge T Easy 5th 1+ 3 I 5 M 1c |
|
|
Odyssey, The T 5.10a 6a 18 VI+ 18 E1 5a |
|
|
Once In A Blue Moon T 5.7+ 5a 15 V+ 13 MVS 4b |
|
|
Procrastination T 5.8+ 5b 16 VI- 15 HVS 4c R |
|
|
Promise Land, The T 5.12c 7b+ 27 IX- 27 E6 6b |
|
|
Purple Haze T 5.11b 6c 23 VIII- 23 E3 5c A4+ R |
|
|
Rage Against the Dying Fire T 5.10c 6b 20 VII 20 E2 5b |
|
|
Rainbow Dancer T 5.11a 6c 22 VII+ 22 E3 5c R |
|
|
Rap and Catwalk Approach from Easterly End T 4th 1 2 I 2 M 1b |
|
|
Route 2 T 5.6 4c 14 V 12 S 4b PG13 |
|
|
Route 6 T 5.6 4c 14 V 12 S 4b |
|
|
Slipping Into Darkness T 5.10c 6b 20 VII 20 E2 5b |
|
|
Smorgasbord T 5.8 5b 16 VI- 15 HVS 4c |
|
|
Standard S (Winter) T M4-5 Easy Snow PG13 |
|
|
Standard S Route T 5.6 4c 14 V 12 S 4b |
|
|
Western Bypass T 5.11b 6c 23 VIII- 23 E3 5c |
| Type: | Trad, 750 ft (227 m), 6 pitches, Grade III |
| FA: | unknown |
| Page Views: | 2,855 total · 20/month |
| Shared By: | Bill Lawry on Aug 19, 2012 |
| Admins: | Jason Halladay, Mike Hoskins, Anna Brown |

Description

The name Route 6 comes from the guides of Lawrence Kline and Mike Hill. Thanks to Chris Wenker for pointing out the relevance of Kline's Guide and for pointing out the feature that is the crux pitch of Route 6.
Climbed the route with Howard Snell. We think the rating is 5.7 for a few moves here and there on the crux pitch. At the same time, I've posted it as 5.6 per Hill's guide. The description in the 3rd edition of Mike Hill's guide is good. However, the below photo also gives a pretty good idea of what to do.
P1 And Then Some: Climb the first part of Standard S Route to the large clump of trees. Then continue hiking up as the gully narrows. Scramble as high as possible up the gully through a portion where the gully narrows and then kind of opens up again; in this there is some 3rd / 4th class through a slot for about 15 feet. Then find a nice, flat, table-sized belay ledge off to the left with scant pro 0.5 to 0.75 inch cams for an anchor. Above and left of this ledge is a relatively broad patch of rock with black water stains.
P2 (5.5, ~150 feet): From the table-sized ledge, trend up and left via a short, shallow dihedral/ramp. After about 80 feet (?) of trending left, straight above is a right facing dihedral with a small tree on top. Climb the face to the right of the dihedral and belay near the tree at some loose blocks. Or perhaps continue climbing another 10-15 feet and anchor in a horizontal crack around 1 inch cams / nuts standing on a narrow ledge - not sure but might be a nice alternative to the loose blocks.
P3 (5.5, ~150 feet): Make a fun traverse rightward about 30 feet along an obvious and intermittent horizontal crack with narrow ledge for feet. Then head straight up over a slight bulge finding more pro in a ~1 inch crack after a few moves. Continue up on mixed terrain aiming for just right of the cave which is by now mostly locatable by trees.
P4 (3rd class and easier, ~100 feet but longer if belay not moved to left end of cave): Make a horizontal traverse to the left on an obvious ledge - takes relatively little time. Set belay at the bottom of the crux pitch which is line "X" in the below photo. For the ending belay anchor, there is a head-level silver piton in a horizontal crack which can be supplemented with other gear below: 2” BDC4 and / or BD #13 nut.

P5 (5.7, 120 feet): Climb up up the crack until at a huge belay ledge. Stemming is largely the name of the game. A #4 BDC4 cam well protects the crux at a small roof where the left side is blank. Historical note: there was fixed nut about 20 feet up on the right that used to have a remnant of a sewn sling directly through the wire; this has been removed.
P6: Climb to the top of The Shield via the last pitch of the Standard S Route, labeled "U" in the above photo. If doing so, consider moving the belay sightly up-couloir of the start to avoid any rock.


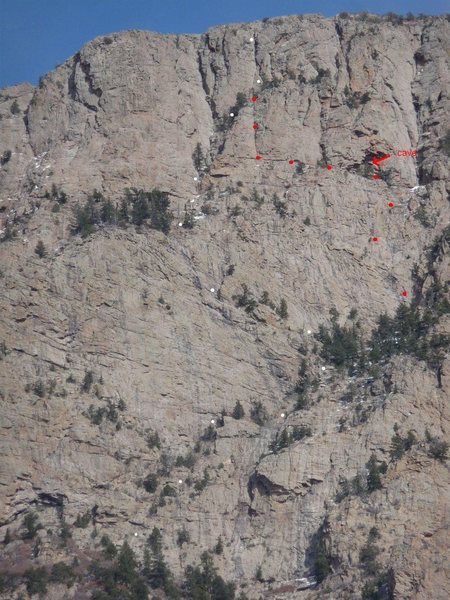
![Route 6 is marked (roughly) by red dots - variations are possible for the first couple of pitches that gets one to the "cave". For reference, [[106351352]] is marked by white dots (roughly).](https://mountainproject.com/assets/photos/climb/107756625_smallMed_1494209492.jpg?cache=1701317635)


3 Comments