To save paper & ink, use the [Hide] controls next to photos and comments
so you only print what you need.
Lunch Bucket Ledge
5.8+,
Trad, 300 ft (91 m), 3 pitches, Grade II,

 Avg: 2.8 from 8
votes
Avg: 2.8 from 8
votes
FA: ??
California
> Sequoia & Kings…
> Hospital Rock Area
> Main Wall
 Access Issue:
 Always check SEKI road conditions and peregrine closures
Details
Description
As described in the 1993 guidebook, this is more of a series of interwoven lines than it is one single route. Lunch Bucket Ledge is a route towards the left side of the Hospital Rock "Main Wall", the largest visible formation, north of the Hospital Rock parking lot.
The first pitch passes two bolts. You can either belay on the first ledge and break up the first pitch into two pitches, or climb past the anchor and up to the bigger ledge. Many variations past this first two bolt anchor (I prefer the face/cracks to the left).
Pitch two (or three) climbs the green left facing corner, and is best rapped with two ropes.
Chains for rapping are on each belay (3 belays total).
Location
The route can best be reached by parking at the turnoff about a half mile further up the highway from Hospital Rock and trudging directly up the hill. Or, buschwack from the parking lot. Appropriate attire is highly recommended, or you'll be spending half your day picking stickers off.
Protection
Standard rack, bolted belays, rap ring descent.
70m rope or two 60m.
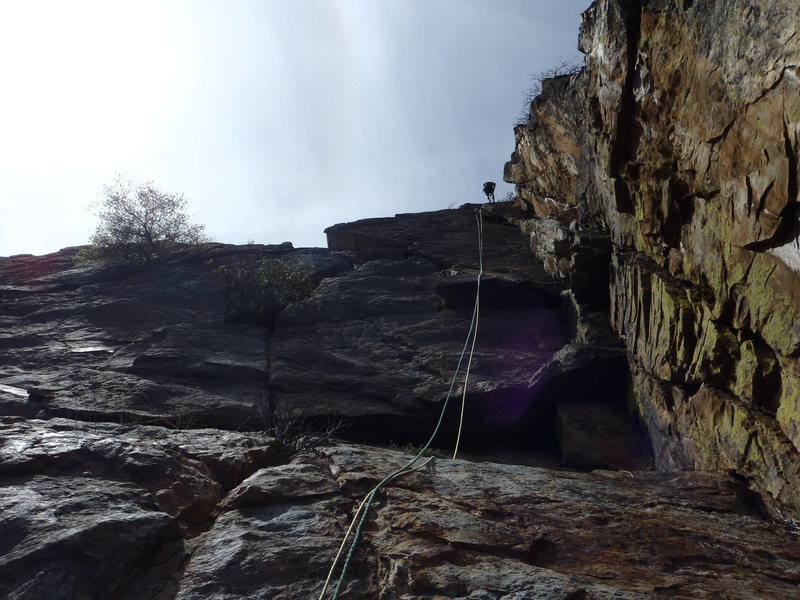
![Looking up pitch two as Phil raps down. Follow the corner, it's fun!]()
[Hide Photo] Looking up pitch two as Phil raps down. Follow the corner, it's fun!
![Looking up pitch one. There are a couple of hard to see bolts 10-15 feet off the ground.]()
[Hide Photo] Looking up pitch one. There are a couple of hard to see bolts 10-15 feet off the ground.


 Continue with onX Maps
 Continue with Facebook


Middle of CA
Orange County, CA
Ridgecrest, CA
First thing is first, although the approach is not technically long, bring some hiking shoes of some sort because the approach is relatively steep on unmaintained trail.
You'll know you have found the base by seeing two bolts just off the deck on some semi slabby wall.
Pitch 1: Climb up about 30 feet to and past a pair of bolts. Once you get about 20-30 feet above these bolts the fun part begins. I found that there are two ways to go about this section. One way climbs to the right and the other to the left. I find the left way to be a little bit tougher due to one very committing mantle that (if done unsuccessfully) would lead to a pretty nasty fall. Another good point to make is that it is tough to protect this section of climbing so be solid on 5.7 climbing here! Go up to a ledge with the obvious anchor bolts on the wall. Belay from here..
Pitch 2: Climb up the corner on some really fun 5.8+ climbing. The pitch is fun and easy to protect. Once at the top you will find another pair of bolts where you can belay.
The route can easily get rapped in two pitches with a 70 meter rope. It takes three raps to get down with a 60 meter rope. Dec 11, 2018
Vancouver, BC
Approach: Park at the turnout (36.52230, -118.77169) that is actually only 500m (0.3 miles) from the hospital rock parking lot. Walk up the road about 100m to where the hill is easy to start climbing (36.52237, -118.77224) and start the steep hike up the hill trending at times up or right to eventually get to the base of the route (36.52341, -118.77363). The approach "trail", such as it is, was very faint if at all present.
P1 (5.7): We never did what might be called the "direct" start to this route, which would be the two-bolt line directly up the face. If I had to guess I'd say it was probably .9+ face/slab, with an uncomfortably high first bolt. We opted instead to climb the small left-facing corner about 2m to the right of the bolts, which was better protected, and then at top of the corner trended right across 5.7 face to the first pitch's belay ledge to find the first set of bolted anchors. Cams #.3 - #1, doubles in the #.4-#.5 range were nice to have, well protected the whole way.
P2 (5.8): I liked having my belayer close for this pitch (i.e. not linking) so they could keep me relatively tight for the mantle and small overhang moves, since both of those have uncomfortable fall zones. Additionally, it was nice to have more gear with me to figure out the kind of tricky gear placements. Climb up and slightly left from the anchors, placing #.5 - #1 where you can. Surmount a block / small ledge - bring tiny pieces here (.1-.2), otherwise a fall could result in decking to the ledge at the bottom of the pitch. From there go straight up. After climbing a meter you’ll need to surmount a small overhang; for me this was the P2 crux, with few footholds, an awkward angle, a committing move with mostly just an off-angle pinch for hands, and tricky protection. BETA: There’s a sloping far left foot that was key for me. A .3 and a small-ish nut should protect it well enough. There’s a spot for a marginal #1 as well. After this move, climb straight up for relatively smooth sailing and straightforward protection (bomber #1). Belay at bolted anchors.
P3 (5.8+): Climb the left-facing corner. Moves were all doable and protection was pretty straightforward. I appreciated a full double rack for this somewhat lengthy pitch, especially in small-medium sizes (I think I only used one each of #2, #3). There were 2 committing moves, one down low climbing past a small roof on the left side of the corner, and another towards the top where the feet are sloping and tenuous. Both are well-protected.
The anchors at the top of this pitch are much higher than I expected them to be. After finishing the corner, continue to climbing blocky broken stuff to the next ledge. You can’t see the anchors from what I would call the real finish of P3.
One 70m rope is totally sufficient to descend. One rap to the top of P2, another rap to the ground.
Props to the FA! Loved this route. Puzzling, committing, and very rewarding. May 31, 2021