Free Tibet
5.10a/b,
Trad, Sport, 450 ft (136 m), 5 pitches, Grade II,
 Avg: 2 from 4
votes
Avg: 2 from 4
votes
FA: unknown
International
> Europe
> France
> Gorge du Verdon
> Grand Cañon - P…
> Falaise de l'Ey…
> Secteur Free Tibet
Description
If only for the top pitches themselves, Free Tibet would be a short but classic line. Unfortunately the first pitch detracts from the line as a whole.
P1(5.7, mostly low 5th class) Follow the line of bolts as it zig-zags in a general rightward direction past dubious rock. Belay on a dirt pedestal from bolts that are up and right of a large bush. This pitch is a rope stretcher and should be carefully managed for drag. 175ft
P2(5.9) After a lack-luster start, the second pitch begins to develop some interesting characteristics. Follow the bolt line upwards with a slight traverse left to navigate a tricky, slab crux. 100ft
P3(5.8) From this point on, Free Tibet climbs parallel to the large dihedral on your left as it diagonals in a righward fashion. Follow pockets, ledges and bolts across the featured face. 100ft
P4(5.9) The first of two spectacular pitches! A few harder moves lead you a smile-inducing traverse right on perfect runnel pockets. 60ft
P5(5.10a) From the belay, continuous climbing past thin pockets and interesting sequences leave you to contemplate an overhanging dihedral above. Start cranking through the buckets and move left over the final roof. Traverse right on the narrow ledge to the final set of anchors. 100ft
Location
Follow the first approach option to the Free Tibet Secteur, dropping down into the Gorge from Chalet Malines along the Sentier Martel. The line is obvious when viewed from the opposite rim of the Gorge, but not so clear on the approach. From the low point of a toe/narrow buttress that potrudes from the main cliff line, walk up and left to find the line of bolts.
From the top of the climb (the last anchor) walk right following a barely perceptible trail through the weeds and bushes. This will cliff out in certain sections and will take some time to navigate as it winds up through various gullies and one 4th class band to reach the rim of the Gorge. From the rim, walk in a slight leftward direction to reach D23. Hike or hitch a ride from a friendly tourist back to Chalet Malines.
Protection
10 draws with extra long runners. Double ropes come in handy drag-wise. The first couple of pitches have some longer runouts between bolts on easy but loose ground. A VERY light rack might help alleviate any anxieties about the rock quality.
![Pulling the final roof moves to gain the narrow ledge.]()
[Hide Photo] Pulling the final roof moves to gain the narrow ledge.
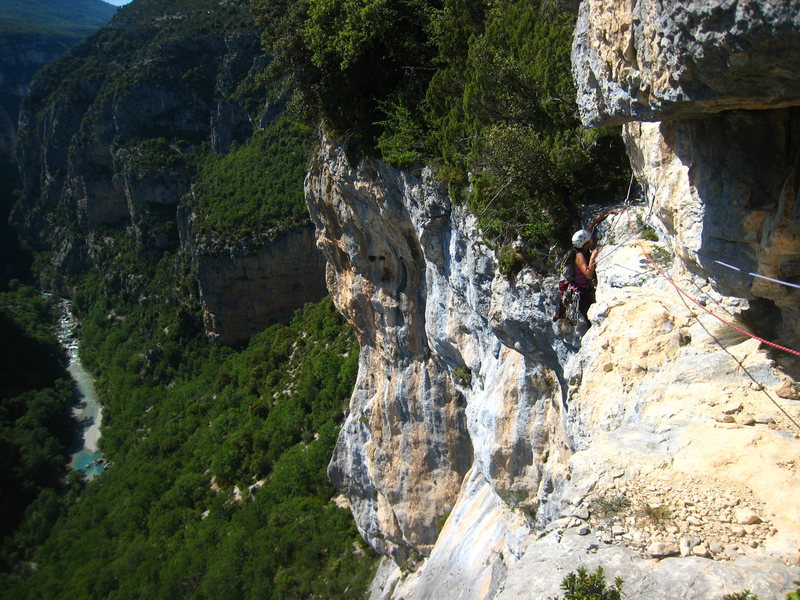
![Looking down on the last 2 pitches. The final roofs are hidden in shadows above the climber. Down and to the left of the climber, the 4th pitch follows the arcing line of pockets that straddle the line between the streaked rock and the gray face.]()
[Hide Photo] Looking down on the last 2 pitches. The final roofs are hidden in shadows above the climber. Down and to the left of the climber, the 4th pitch follows the arcing line of pockets that straddle th…
![General route and belays of Free Tibet. Walk off right until possible to scramble up a loose gully.]()
[Hide Photo] General route and belays of Free Tibet. Walk off right until possible to scramble up a loose gully.
![Free Tibet starts on the potruding buttress on the left side of the wall (just to the right of a recessed gully.) From there it aims for the right side of the large dihedrals higher on the wall.]()
[Hide Photo] Free Tibet starts on the potruding buttress on the left side of the wall (just to the right of a recessed gully.) From there it aims for the right side of the large dihedrals higher on the wall.


 Continue with onX Maps
 Continue with Facebook


PAYSON
It is mostly well bolted but for the finish; the roof is easier than it looks. Oct 1, 2013
Fruita, CO
There are more bolts on the final pitch and it feels decently protected. Much of this climb is more run out when the climbing is easier but that is true for many climbs in the gorge. The last three pitches are pretty short making communication pretty easy up there. There is a belay that you can do on the final pitch after the overhang and before the traverse but it is a bit uncomfortable and but then requires you to treat the traverse as its own pitch even though it is easy Aug 22, 2019