To save paper & ink, use the [Hide] controls next to photos and comments
so you only print what you need.
Parapet Corner
5.9,
Trad, 200 ft (61 m), 2 pitches,


 Avg: 2.7 from 6
votes
FA: unknown
Colorado
> S Platte
> Buffalo Creek
> Castle
Description
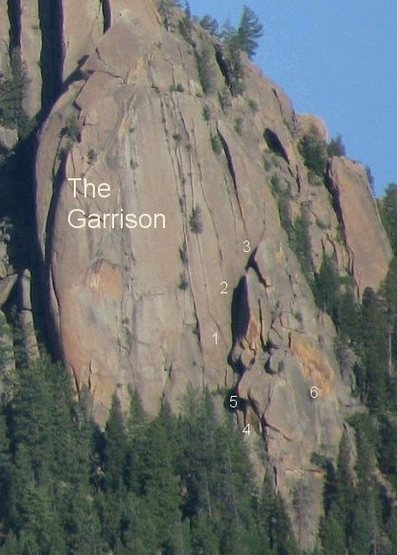
This is crack #3 in the photo. Climb up the main gully and the dihedral between the Garrison and the James Brown Pillar. Continue up the crack until it splits into 2 cracks and climb up to the left facing dihedral. Sustained for a bit. Climb the face to the left of the dihedral or the crack itself (a bit more difficult) to a small roof. Continue to the ledge.
If anyone has FA information, please let me know.
Location
Quite a few folks I think were referring to this formation on the lower
right side of the Castle as the Garrison, so I'll continue to use that designation.
Protection
Standard Platte rack.
![<br>
Climbs on the Garrison.<br>
1) Hardgumbi's Lament<br>
2) Winterlude<br>
3) 5.9 climb<br>
4) You Can't Chop This<br>
5) The Camel Walk<br>
6) The James Brown Pillar]()
[Hide Photo] Climbs on the Garrison. 1) Hardgumbi's Lament 2) Winterlude 3) 5.9 climb 4) You Can't Chop This 5) The Camel Walk 6) The James Brown Pillar


 Avg: 2.7 from 6
votes

P1: to get to the actual corner, you must do a short pitch of 5.7 to access the corridor between the lower tower, which the book (and MP) call the Garrison. Instead of aiming straight for the gully from the ground, climb the awkward wide crack left (about 5.4) up about 10 feet to the ledge, then go right (4th class). You'll hit a small chimney off of a large ledge that you can either wiggle into (fun!) or layback. From here, charge up the crumbly gully until you can get both hands into the crack on the right side. Pull over the surprisingly solid chockstones into the corridor and keep moving up until you see the super obvious dihedral on the left. Belay here. Pitch and belay both use finger - hand sized cams.
P2: great! Launch out of the corridor on wide hands, up to a nice stance. Don't go out right, stay left. Jam and lock your way up the increasingly flared crack, sustained pretty much all the way, with a few mediocre stances. You'll eventually come to a full body rest in a weird, rectangular pod below a tree. Pretty much pick your own adventure here, I chose to go left below the tree, sling it, and pull through it. You can also follow the original crack up and through the roof, or climb the face. Belay on the large ledge above. We felt this pitch was harder and more sustained than the first pitch of Throne Room, so probably closer to mid-5.10. This pitch protects well with doubles from about 0.3 - 3. You may want a 4 for the very top if you choose to go left at the tree. Belay takes hand sizes, mostly in the 0.75 - 1 BD range.
Descent: you can either rap the tree on the left to an intermediate tree and rap again, or, if you are as cold as we were and the wind was not appealing, hop over the blocks above the belay and trend left into the Mountaineers Gully. Rap or downclimb, all in the 5.4 range. Oct 15, 2017