

 Avg: 3.8 from 100
votes
Avg: 3.8 from 100
votes
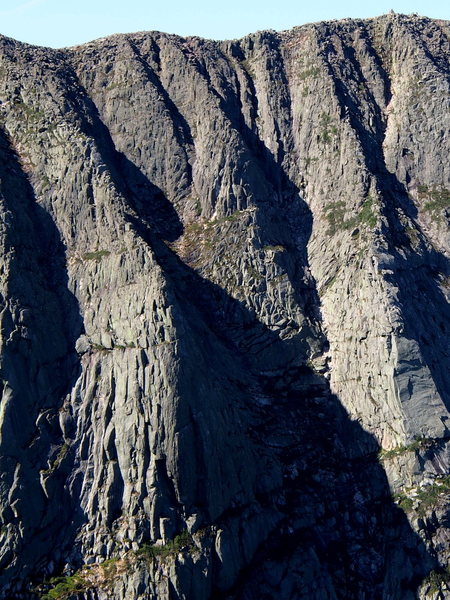
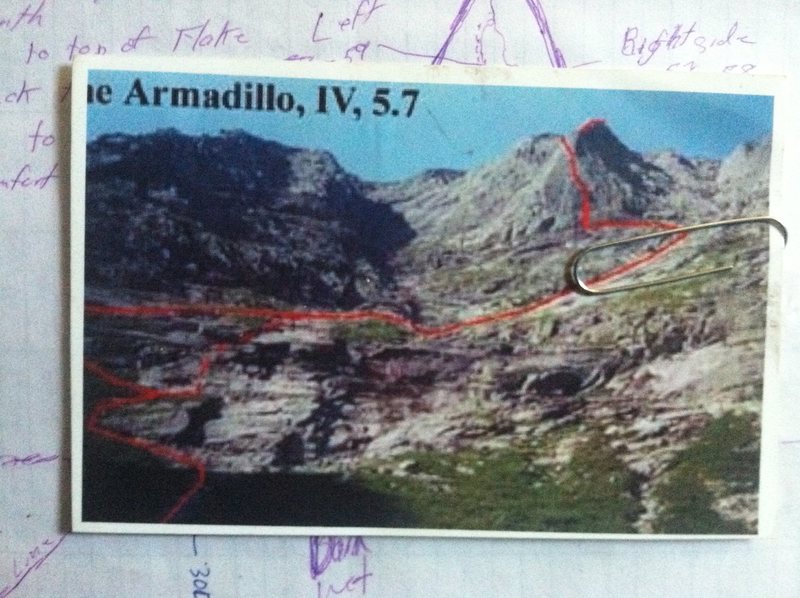
The Armadillo has just about everything you could hope for in an alpine climb: Chimney climbing, face climbing, crack climbing, ridge climbing, big time exposure, solitude on the route mixed with gawking, awed filled hikers at the top.This route climbs at least 6 pitches of the huge pyramid and ridge in the middle of the south basin to the rim of the mountain, 10 minutes from Baxter Peak.
Expect to get an early start and plan for a long day. The rangers will inspect your gear and require you to bring a #4 camalot, or equivalent cam. You'll need to fill out an itinerary form and leave the camp by 8 am.
The approach is long, and somewhat sketchy. Rock hop around the right side of Chimney pond until you come to the stream bed on the south side (back.) Follow the stream bed (which will have a lot of water after rain) south to the headwall of the basin, at the waterfall which makes up the start of the Ciley Barber route in winter. Skirt the waterfall on the left (in the trees without a rope or via some easy but technical climbing through the rock band.) Cross the stream at another headwall and follow loose wet slabs and vegetation up and to the right until you can access a narrow vegetated ledge which will lead left to the start of the climb. There is a chock stone blocking convenient access on this ledge, which can easily be passed, however it is very exposed and roping up before this point is safe and convenient. Build an anchor below and to the right of the small flake with a pin. Plan for at least 2 hours on the approach but it may take you 3.
NOTE- For a recent update on the approach see the excellent comment by Joshua King in the COMMENTs. Perhaps a bit long but excellent Beta.
Pitch 1, the chimney: From the vegetated ledge clip an old pin on your left and boulder up to the next ledge system, move left to the base of the huge detached flake. Stem, jam and wedge you way up the chimney behind the flake to the second comfortable ledge, about 2/3 of the way up the big flake. (5.5)
!Pitch 2, the face: Climb on the fat arete of the flake for about 20 feet (protection can easily be found in the hand crack on the right.) Move left just below an old pin (when you run out of comfortable feet) onto the face of the flake for some very exposed face climbing to the top of the flake. (5.7 PG)
Pitch 3, the bad ass crack: Climb straight up the splitter crack. It starts as big hands and is easily protected with a #3 cam (keep sliding it up with you if you only have one.) Quickly pass a chock stone (red TCU) and climb up to the Bong. Dump the #3 as the crack turns into fist and more and start to protect with a #4 cam (again, slide it up with you if you only have one.) 30 feet or so above the bong the crack widens to 6 inches for a few feet. Soon the climbing eases up and protection can be had with a #9 and #10 nut as well as a #2 cam a little higher. At the top of the crack belay with gear in the 1.5 in range behind a solid flake at a comfortable ledge. Be careful of the loose rock at the top of this pitch. (5.7) WooHoo!
Pitch 4, the corners: From here the quality of climbing changes character. Access a ledge 15 feet above the crack and make progress through a few short dihedrals to the left separated easy climbing and rest ledges. Belay just below the crest of the ridge, or the spine of the Armadillo. Again, be careful of the loose rock. (5.5)
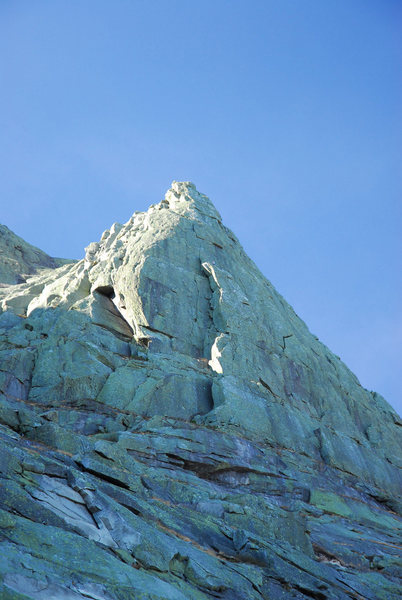
Pitches 5 and 6, the ridge: Climb the ridge to the top, which is basically 4th class hiking with a few 5th class moves. Be careful as most of the rocks are pretty loose. Many people simulclimb the last two pitches.
From the junction of the Armadillo with the knife edge trail you can hike to the summit (Baxter Peak) if you go right (northwest) and then down the Cathedral or Saddle trail. The Saddle trail is much nicer to hike down with your rack and rope in your pack. You can also go left and cross the knife edge and Pamola four/Chimney Peak and then down the Dudley trail.

 Continue with onX Maps
 Continue with Facebook


Denver, CO
Manchester NH
Denver, CO
Portland, OR
Seattle, WA
Boulder Colorado
Seattle, WA
Paonia, CO
Westerly, RI
Seattle, WA
Wolfeboro, NH
I thought the approach was the crux of the climb-- I had climbed the Grand Teton a week earlier, car to car, and in many ways, I thought this approach was tougher.
Since the upper hand/fist crack, varies in size, I don't think a #4 cam is needed, but I would take a 3.5. We did all the technical climbing in 2 pitches.
Near the top,we got slammed by a storm, with much lightning and heavy rain, which made the climb more alpine and memorable.
To give some perspective, my partner and I had a combined age of 139, I at 67 and my partner at 72. Aug 30, 2013
N.B.
Saint John, NB
Seattle, WA
Roaring Brook-Chimney Pond took us 1.5 hrs, Approach took us 2 hrs. Descended via Saddle Trail
The forecast was 60s and sunny. It was 36 degrees at the base, 65 at the top.
No gear inspection Sep 9, 2014
NEPA and Upper Jay, NY
We banged out the approach to Chimney pond in a brisk 1:15, and stopped in to see the ranger. You could easily slip by if you wanted, but stopping in was no trouble. There's no longer an 8am cutoff, at least not with the rangers we found. I would not want to start any later, though! We got some great beta on the approach, filled out a checklist ourselves (no inspection) and then headed up. Recent rain made sections of the approach tricky, but if you're ok with typical steep Eastern bushwhacks, you'll make it. The ranger said most parties don't find the route, and turn back... I could see that, if the potential suitors are expecting an alpine cragging experience, and not a mountain route that demands some attention to routefinding. Reversing that approach would have been really miserable.
If the grass was dry, ledge-walking to the flake would be trivial, if very exposed. As it was wet, roping up was extremely prudent for the walk to the base of the route from the high point of the approach drainage.
The flake is much less awkward if you're pack-free and used to throwing in a mix of jams, stems, and laybacks. For a brute-force second wearing a pack (like my partner), it's a grunt. The second pitch face has good pro, and the moves are certainly no harder than 5.7, but there's a ton of air under your feet. Hard alpine climbers will cast off and march up slopers and small flakes; punters like me, used to 4th class ridges, will quake and slot every wire on their rack as they inch up to the top of the flake.
I love big cracks, so the wide was awesome. A 3 and 4 let you climb most of it on top-rope, while leaving behind nuts and small cams in various features. I was as happy with that pitch as I was terrified of the face below, but I freaking hate face climbing. And I A0'd it, with my foot on the bong for a nice rest and photo-op. I'd say it's a 5.7 Daks crack, or 5.10 at Squamish. 5.8 seems about right on average. I don't have huge hands, and found nice fists and smaller jams all the way up. Chicks might need a little off-width technique.
From there, it was easy climbing to the top, with rock getting looser as the climbing got easier. I wouldn't call it exceptionally loose for an alpine route, as normal hold-testing caution prevented us from pulling a single rock free. I'd grade the dihedrals and widely-spaced moves on the ridge as modern 5.5, old-school East Coast 5.4, or Cascades Fred Beckey 4th class. In many places you get to choose between easy, exposed moves, or harder moves with limited exposure. I suspect most parties that aren't shaken after the crux pitches will be very happy to shorten the rope and carefully simul to the top, or even drop the rope, slip on approach shoes, and just solo up. Loose rock and slippery grass spots are the hazards here, not the moves.
I sewed this whole climb up very tight, and felt that 10 nuts, 4 tricams, and a single set of cams (TCU 1-4, Camalots 0.75-4) was plenty. In general, the rock on this route is the sort where you could toss a handful of nuts at it, and half would stick. For the BA climber going light, I'd bring Camalots 0.75, 1, and 2, plus a set of nuts (skip the small ones) and a set of offset nuts. And a bunch of slings; singles and doubles. You can sling all sorts of stuff up there. Sep 14, 2014
Los Angeles, CA
We were climbing the ~5.5 headwall section (just before accessing the long 4th class ramp up to the grassy ledge) when the weather turned foul, and we bailed off a tiny fixed nut there.
We also had to leave a nut (with quick link attached to it) further down---if you choose to climb this particular start, the nut is off to the right in harder territory (which had water running down it when we bailed), so don't be led astray.
Another observation: the roughly two pitches were climbed were just COVERED with huge loose blocks---definitely death blocks. And we could hear invisible rockfall toppling down the face in the mist. Climb VERY carefully here!
Cool route with an awesome feeling of alpine adventure, I'd love to finish it one day. Oct 1, 2014
Los Angeles, CA
---Beta spoilers below---
We were strong climbers and above-average hikers, and though I knew the approach path, I had not done most of it before. Here is how long each stage took us:
Roaring Brook parking to Chimney Pond ranger station: ~1.5 hours
Chimney Pond ranger station to base of the Ciley Barber waterfall: ~1.5 hours
4th class approach ramps to the base of the technical climbing: ~2.5 hours
300 feet of pitched out climbing plus ~700 feet of simulclimbing: ~3.5 hours
Descent to Roaring Brook via the Knife's Edge and Helon Taylor: ~3 hours
It took us ~9 hours from Chimney Pond to the top of the route. Add in a lunch break, the Chimney Pond check in, etc. and it was 13 hours car to car.
More details on the approach:
From Chimney Pond, we plunged straight up the wet stream created by the Ciley Barber waterfall until a dry one branched off to the right slightly; mainly just keep walking up toward the Ciley Barber waterfall. At the waterfall we went right up the vegetated slabs and roped up for about 15 feet of technical climbing to break through the first rock band; there were a few promising weaknesses, we chose the left one. From there we unroped and traversed back left along the first horizontal ledge to beside the waterfall, and then angled up and right following the apparent ramp beside the stream. Until about 500 feet below the flake it was possible to refill water from the waterfall (we carried 4L capacity and a purifier). Eventually we moved right away from the stream below a band of wet slabs and picked up an obvious climber's trail, where steps had been cut into the dirt, which led us very easily to the base of the technical climbing. This part was solidly 4th class and in places pretty exposed.
The technical climbing was actually quite good; we did it in 2 pitches: one to the top of the flake (a bit less than 200 feet), and the second to the top of the hand crack and then up and left to a spacious belay ledge (about 100 feet). From the ledge, we simul'ed up the technical corner (25 feet of ~5.7 or so) and then broke left, following the path of least resistance up the left side of the ridge, and then up and right and onto the spine of the ridge (SUPER cool and exposed!), and then finally straight up to intersect with the Knife's Edge. This was at least 600 feet and probably more like 700.
My fists are roughly a #3 and the crack was perfect fists for me. There were also plenty of (fragile) face holds, and the "offwidth" section had tons of holds inside and around it...I felt that it was reasonable at 5.7.
Once we got up high in the basin we could see folks up on the Knife's Edge looking out at us. Our friends did say they were able to spot us (I was wearing bright colors) but that we were TINY!
All in all it felt good to tick this objective and get my fill of alpine climbing for the year... :) Jul 8, 2015
Left variation splitter face crack (Wind in the Willows-5.9) is highly recommended; starts in the left-facing left-hand corner of the Armadillo buttress -- be sure to move up left into crack on the face and not climb the corner itself.
Climb is easily done car-to-car from Roaring Brook in a day. First time my friend and I did it we left our car at 5:30 a.m. and were back to the car by 12:30 p.m. Second time (just a few days ago) we left car at 6 a.m. and, crossing the Knife Edge at a leisurely pace, were back in parking lot by ~2:30 p.m.
For those not experienced in alpine route-finding the hardest part might be the approach. You need to scout out the 'best' route from below. If you stay on the right bushwhack there is a fairly good primitive trail to follow.
Best approach beta:
1) skirt Chimney Pond to right, then up main drainage OR dry braided drainages immediately to right.
2) work up right below steep slabs to point where you can traverse horizontally back left across good ledge system underneath steep slab headwall -- traverse to far left end of this ledge system and look for steep handcrack you can 'bust through' back right to gain next ledge system above (short 5.6-7 move; easily soloed, but I always rope it). There may be a way to avoid this short crack, but we always choose this way.
3) continue up and right following right-hand edge of slide material and then follow the base of slabs more steeply up and right right through scrubby growth; avoid cutting back left too soon, instead keeping up and right to nearly the height of the base of the route and then traverse perfectly horizontally across ledge system. This last part of approach is quite exposed in places and care should be taken.
4) one can walk to base of the right-hand corner of Armadillo; to gain left hand side continue along very exposed short traverse (great holds, 5.0) after navigating a large block (you can tunnel behind/through this). Superb safe ledge is found at start of Wind in the Willows variation.
Contrary to original beta I had from years ago, you CAN get to the Wind of the Willows variation by traversing the ledge coming in high on the right side of the Armadillo ledge. There are two exposed parts of the traverse (5.0), but we did these unroped without issue -- great protection if you wished to rope this.
Not sure exactly where all the 'loose rock' is. Rock quality is exceptional and only a few rocks here and there might be called loose. Sep 20, 2015
buffalo, ny
On Friday, October 2nd, 2015 we began our approach as a recreational pursuit, after the 3rd pitch of our alpine class 5.7/8 climbing I found myself climbing for survival. I wont ever know if I was better to turn back and accept that conditions were not welcoming to our goal, but I know that after 3 hours of bushwhacking through dense vegetation and high water levels that kept us from simply taking the creek bed, I was not turning back.
When a friend from out of town was coming in to visit I began to look into what we might do. The weather outlook was grim, it looked like bad climbing conditions and wet crags throughout most of Maine. The highest temps, most potential for sun dry out, lesser winds and potential clearing was north. I began my idea with a hiking summit of Mount Katahdin, this quickly transitioned into making Jonathan's first multi-pitch experience an alpine one.
I am usually not a fan of long approaches, so alpine is not usually my jam. I would rather push myself on the wall, not the approach; by climbing smarter, not harder. I got an idea in my head though, usually once they are in, thats it...We made our 3.3 mile hike upto Chimney Pond with 1,425 of elevation gain. We then added an elevation gain and loss of 1,988 and 2.6 miles to our day to explore the Dudley Trail. When we arrived back to camp we checked in with the Ranger (very chill, no attempts to turn us from our goal, as previous posts may indicate). She was very helpful and informative, though mountain conditions put a damper on most of the valuable information she shared.
After a chilly night we awoke and began our departure (0755). After being forced to boulder scramble the left side of the pond (vs the recommended right side rock hop that was under water) we forged our way through dense vegetation to yet another overflowing creek (due to the 7 inches of precipitation over the last 48 hours). We made our approach and as we got closer chose a zig zag scramble through loose rock and 4th/5th class climbing. and further realized our (Black Gully) approach to the 2nd vegetation ledge was iced and slick. So, instead, we turned our 6 pitch climb to an 8 pitch.
The real climbing began in our first chimney, below and to the left of The Armadillos start. We were past our turn around time (1300) just before we began our first very exposed pitch up to our 5,200 top out. At this point I had watched the summit and top 4 or 5 pitches move in and out of the clouds as high winds moved about. By the time I topped our first pitch (1415) I realized I needed to climb to keep warm. The core layers kept me alive, but the extremities and legs were suffering, especially since my pants had 3 new vent holes from our approach, haha!
Being the sole leader put me in the position that I was to keep focused and determined, there was no other way out, and I was not leaving gear to rap. Though the hardest and most exposed climbing was only through the first 4 pitches (3 of which were the actual route) it was pretty difficult since exposure and a few gnarly fall lines, mixed in with cold weather cramping and numbness made for a interesting head game.
We suffered through the worst of it and took on the two cruxes, in high winds that both scattered flurries and surrounded us with frosting vegetation (both not in the mostly sunny and 57 degrees forecast). Never have I been so excited to embark upon 2.5 pitches of 4th/5th class scramble up the spine of The Armadillo. A true shout of excitement and accomplishment after both mine and Jonathan's top out (1803).
We shed gear just before the sun was no longer able to provide any visual assurance (1815) and made our way to Mt. Katahdins Baxter Peak at 5267. I wasn't over, the sun was down and winds picked up. We had 5.5 miles and almost 4000 of elevation loss before we were back to the car, and we were still in the clouds. At least now our bodies could keep moving. The will to kicked back in once we left Chimney Pond, physically and emotionally exhausted we had 3.3 more miles of decent and made it to the car just before midnight. We did it, we made, we suffered, we gained, none of which was tangible, all of which is ours forever. Carpe diem. Oct 3, 2015
Milford, NH
I would highly recommend the Cathedral Trail if time is of the essence. If you finish early go for the Knifes Edge or Saddle to descend. The approach is tricky to find so we just took the straight up option more or less. Some of the slab can be wet so be ready for a full length adventure! The climbing on the actual route is so amazing, every pitch is great! All in all its worth everything but be prepared for the unexpected ad watch the loose rock on the top ridge. Sep 15, 2017
Hooksett, New Hampshire
Get the approach beta from the Chimney Pond ranger, it was very good and well worth the time. We nailed the approach with the ranger's beta. Everyone is trying in these comments and in the description, but they are really not very good directions compared to what you will get from the ranger who has done it before and will describe the approach with a picture of it in front of you. This is a very complicated and sometimes treacherous approach with a lot of decisions to make, some not-so-obvious turns, and some mistakes you could easily make that will effectively bring you to a dead-end. With that said, both the leader and the follower need to be very comfortable navigating 4th class terrain with deadly consequences of a slip or you should not be doing this route. You will even need to do some short bursts of 5th class moves during the approach. If the idea of doing a 5.3 move that your life depends on scares you, this route is not for you to be leading.
A standard rack with tricams and up to #4 cam is perfect. The advice to "go light on the smaller gear" is weird advice. Just bring a standard rack. 13 alpine draws and 3 double-lengths was perfect, bring a few extra draws if you plan to combine the first two pitches.
There is no potable water in Baxter. Roaring Brook has a river and Chimney Pond is obviously a reliable water source where you should fill up, but both need to be treated or filtered. You will pass what I can only assume is a very reliable water source (ask the ranger) in all but the driest years near the end of your approach (about 30-minutes to go) when you are crossing the Cilley-Barber drainage after bypassing the main headwall. This assumes that you bypassed the headwall zig-zagging through the trees to its left. If you end up doing technical climbing up the headwall, you might miss this. Regardless, other than that source and/or Chimney Pond you will not come across any water until the descent when you are basically back to Chimney Pond. A lightweight filtration or treatment option like a Sawyer Squeeze or Aquamira is basically a necessity for this trip.
On September 23 we were in the shade throughout the entire approach and for almost the entire climb.
Tons of loose rock on this climb's upper pitches, though the three money pitches have overall surprisingly good rock quality. If another party beats you to the route, you will want to give them a lot of space. Better yet, get up early and be first. The rangers will even try to talk you out of doing the route if there is a party ahead of you - but they won't force you.
We were told that if there needed to be a climbing rescue in Baxter it could possibly take days. This is not a place to push your limits or learn mountaineering techniques. By the time you've made it to the base of the route, your easiest way down is probably to climb the route. I can only imagine that the approach would be pretty heinous to have to reverse.
Saddle Trail is the easiest descent option from the summit. Sep 24, 2017
Woodstock, CT
The climb was great and offers a little of everything: crack climbing, face climbing, chimney climbing, alpine ridge climbing, and tons of exposure!
There is currently a "fixed" #4 Camalot just above the fixed bong on the crack pitch. Someone jammed it in way too far and over-cammed it. I would have tried harder to free it, but if was cold AF and I wanted to keep moving.
-Chimney Pond to start of climb approach-2 hrs
-Climb the Armadillo to top out-3.5 hrs
-Descent back to Chimney Pond-2 hrs Oct 3, 2017
Connecticut
Free as the breeze
The approach is the sketchiest part. It is long, bushwacky, and can be wet. You'll want to be comfortable soloing low 5.x moves and be comfortable moving through steep talus (in order to make good time). The ridge climbing after the climb is pretty mellow but still require you to be pretty careful.
That being said the climb itself is totally doable without a #4. I moved my #3 up until I got to the bong, then back cleaned the #3 and found a spot for it above the bong before the crack got really wide. I would say feel free not to bring a #4 if 5.7 is well below your limit and you are comfortable with fists/off width technique.
Also I think the ranger is only letting one party do this per day, so wake up early.
Amazing adventure! What a treat to have something like this in the northeast! Jul 15, 2019
The Socialist Republic of M…
on the road
Durango, CO
Climb: First pitch was soaked. As such, it was insecure and felt to me, the hardest of all the pitches. Every other pitch was mostly dry, protected well, and had an incredible feel.
Rack: I brought a single rack (0.3-4), set of offset nuts, 6 sports draws, 4 single-length, and 2 double-length slings. This felt more than sufficient. With fixed gear, pins and lot of features to sling, I never felt run out. If this climb is at or near your limit, perhaps a couple extra cams in the 0.5-1 range wouldn't hurt.
Overall: Amazing route. Best alpine route I've done in the east. Be prepared for loose rock, weather, and suboptimal conditions. Overall, it felt true to the grade and was as good as advertised. Sep 28, 2020
Lexington, KY
gaiagps.com/datasummary/tra… Jun 28, 2021
Camden, ME
Check in with the ranger, they give great beta and we had a nice conversation with them (they do not check your gear, but ask you about it). Don't attempt this climb if the weather isn't good. We found a lot of nuts and other anchor material on the approach, I'm guessing from people who bailed in bad weather. The approach would be heinous if wet, and miserable to reverse.
We didn't have much issue route finding on the approach. Other people have good instructions in previous comments, but if you want other instructions read on: follow the dry stream bed away from Chimney pond, it will get wet after 500 feet. After 1/4 mile or so it clearly forks left, follow this auxiliary stream bed to the base of the Great Chimney, traverse right through scrubs to the bottom of the low cliff band. We all climbed it to its top in our trail runners. Go up the broken arete / right facing corners (low 5th) to a ledge 2/3rds of the way up. Instead of roping for the 5.6 crack, we went further to the left up the grassy ramp. There is a really nice flake/jug in the middle of the slab about 50-75 feet left on the crack. Mantle up onto the flake then do 2-3 spicy slab moves (with climbing shoes these would be easy 5.4) to grab some bushes, traverse left to a corner (easy climbing) than takes you to the top of the mini band. From there work your way right and up grass band then hit an open scree field. Go up it a few hundred feet feet, then cross the stream (filled up on water here) and grovel up the black gulley to the right. The wet rocks here are insanely slippery, use care. Its easy to see where you are going, its a mixture of rock and new England bush scrambling. Hit the second grassy ledge and traverse right. Go around the first boulder and belay at the base of the block (20 feet right and down of the pillar).
Came down Knife's Edge / Helon Taylor. 1/10 would not recommend. Go down saddle. Jul 19, 2021
Windham, ME
Once roped up I found the climbing to be not too difficult but awkward in spots. The first pitch was wet and is a mix of chimney moves, stemming and intermittent cracks. The pro is mostly good with the exception being the second pitch where you step out onto the face of the giant flake. I guess I missed the 'thank god' nut placement because I was run out about 30 ft until I mantled onto the top of the flake. Bit of a mental crux there.
The crack pitch is wide, too big for hand jams but great for foot jams and perhaps the occasional fist. There are currently two #4 cams stuck in the crack. Can ride a #3 almost the whole way up this pitch, clipping into the metal bong and bringing the #3 above it for a few moves. The #4 goes in about 3/4 of the way up the pitch. As others have mentioned there are lots of good holds in and around the crack. A 0.5 goes in a horizontal along with a choke stone to sling just below the belay at the top of the pitch.
Above the crack pitch we stayed roped up for three more easy pitches up the ridge, soloing the top 200 ft or so. Overall a great day out. Went up to the summit of Katahdin and down Saddle trail back to Chimney Pond. 10/10 would recommend this climb. Jul 25, 2022
I reserved a day use parking spot at Roaring Brook. We got to Togue Pond gate at 5:45. We departed Roaring Brook by 6:45 and arrived at Chimney Pond by 8:00. Contrary to what BSP states on their website they did not seem to be sticklers about leaving Chimney Pond by 8:00, and the Chimney Pond ranger was fine with our descent plan to cross Knife's Edge, down Helon Taylor, and check out with the Roaring Brook ranger. No gear inspection either.
Leaving Chimney Pond at 8:30 we circled right around the pond, the stream to follow begins by the sandy beach through a field and some trees, not through the large boulder field past the beach. At several points the stream becomes overgrown or has downed trees on it from recent rockfall, so we moved in and out of the streambed, occasionally following faint trails through the woods. If you're going generally in the right direction and in a streambed or low-lying forest, you should be ok, don't overthink it.
After about half a mile the terrain steepens as the trees change to lower-lying scrubs. At this point, pick out the bottom left of the headwall and make sure you are headed there. The scrub brush gets pretty thick as you approach the headwall. After hitting the headwall, take a sharp left and follow the faint path that runs along the base. For the rest of the approach there's a faint path that you can pick up if you're headed the right way.
Keeping the exposed rock of the headwall on your right, climb up the slope to the left and then turn back to the right aiming for the large dark overhang of rock. This is the split for bypassing the rock to the left in the trees, or taking the shortcut right with a roped up 5.5 pitch. We opted for the 5.5 pitch and it was much easier than the bushwhacking nonsense from before. Work up the slabs to the right, aiming just to the right of the large dark overhang following a faint climbers trail. Just to the right of the overhang is a vertical finger crack with a stuck nut and a biner, we setup a belay anchor maybe 30 feet down and to the right of the finger crack, and climbed through the obvious right facing corner 15 feet to the right of the stuck nut. The climb is about 15 feet of climbing with a mantle, easily protected by a midsize cam and nut, with a sturdy crack and a horn for a top anchor 30 feet above the mantle. After the mantle you can easily see up the valley to grassy ledge.
The next part of the approach was sustained sketchy, loose rock, wet slabs, and a thin layer of tundra on top of loose slabs up to the grassy ledge. After traversing left on the grassy ledge, we setup a belay in a crack in the corner before the boulder on the ledge (I couldn't find the piton mentioned on some topos), it was an easy walk around the boulder and 20 feet later, just below a flake system on a vertical wall there was a good belay point. It seems like some people start the technical climb here, but we did another ~30 foot pitch up the flake system to the left to reach the bottom of the large flake. Started climbing around 1:00 PM.
Pitch 1 was easy, stemming crack climbing until a 10 foot chimney up to large jugs to top the large block to end the first pitch. I used two cams and a nut in the cracks of the second pitch to the left of the block.
Pitch 2 is easy crack climbing up to where the finger crack ends, get your feet on the flake on the face (visible from the belay anchor), clip the piton just around the corner (My follower was unable to remove my back up nut at the top of crack, so as of yesterday, it's stuck there) work left with feet on the flake, hands on the ledge until you're just to the left of the handhold on the face above the ledge, use that as a right handhold to mantle up onto the ledge, work left on the ledge, using the small flakes and outcrops as underclings and pinches, work your feet up the good footholds to the left until you can place a nut in the "Thank God" nut placement on the small flake. There are two possible places to put a nut, I think one size 6 and one size 4. Then move up to the left (possible small cam placement in horizontal crack), then pull over the ledge onto easy terrain, and belay up top. I set up an anchor on the block just below the tip of the flake, to the right of the crack with a girth-hitched flake, a nut, and a cam in a crack.
Pitch 3, easy crack climbing with plenty of jugs as well. The climbing gets steadily easier throughout the pitch, with incredible foot jams throughout. As Nick Downs mentioned, 2 stuck #4s, one just below the bong, and one just below the wider section up top. There are a couple other placements throughout: a small purple cam on the bottom right side of detached block 15 feet up, mid-size nuts or cams in the horizontal crack ~halfway up, and chockstone near the top. I belayed at the grassy ledge, rope drag wasn't terrible. Topped this pitch around 4:00.
Pitch 4, loose rock, easy climbing, 3 sets of dihedrals, each easier than the last. When confronted with a steep section, you can typically work to the left around it. Belay a few feet below ridge line.
Pitches 5 and 6, each about 50m, went until rope drag was too much, put in protection every 30 feet or so. Last anchor was right before another ridge line where slope flattens covered by just small loose blocks. Topped Pitch 6 at 6:20.
Easy walking similar to Knife's Edge for a couple hundred meters until you join Knife's Edge, arrived at Baxter Peak at 6:40 PM. Went down Saddle arrived at Chimney Pond at 8:00, got to Roaring Brook at 9:30 PM, and made it through Togue Gate before it closed at 10:00 PM. Jul 30, 2022
Edgecomb, ME
Grade IV? Seems excessive... Dec 27, 2022
?Answer? - Maybe climb a few of the old school 5.7’s such as the Whitney Gilman on Cannon, NE Ridge of Pinnicle in Huntington Ravine, Hans Puss at the Gunks ( and other Gunks 5.7, 5.7+’s ) and since Armadillo is a crack climb maybe do “ Reppy’s crack “ or a few other crack 7’s and 8’s. Of course, the approach is itself a factor, especially if you’re coming in from Roaring Brook. Don’t “ ignore other factors” when those factors are inescapable in the whole picture. R. Hall Admin, ME May 21, 2023
Kansas