To save paper & ink, use the [Hide] controls next to photos and comments
so you only print what you need.
Sheila
5.10b,
Trad, 180 ft (55 m),
 Avg: 3.9 from 347
votes
Avg: 3.9 from 347
votes
FA: John Fischer and Jay Jensen, 1971
California
> Sierra Eastside
> Bishop Area
> Pine Creek Canyon
> Scheelite Canyo…
> Pratt's Crack / Dihed…
Description
A must-do classic right around the corner from Pratt's Crack. Follows a huge, clean-cut dihedral starting from the top of a 4th class ramp.
An initial tricky finger crack on the right face leads to a long section of hand jams in the corner. A burly lieback up a brief overhanging offwidth leads to a final short chimney. Traverse right, passing the anchors for Queen of Heartbreaks to the anchors for Sheila (directly above the chimney).
Location
Pratt's Crack area, on the right side. A large corner whose right face is split by a large roof 1/3 of the way up.
Scramble up 50' of 4th class to a bolted belay below a tree and the start of the real climbing.
Protection
Cams from micro to 3". Optional #6 for upper lieback.
Rappel with 2 ropes. A single 80m just reaches with stretch, or might require a few feet of 4th class downclimbing.
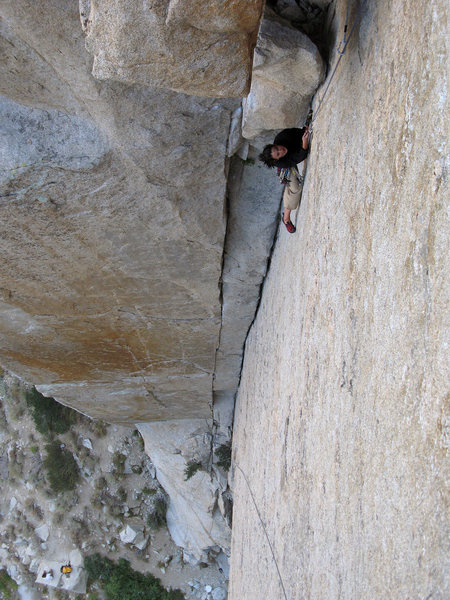
![full exposure of Sheila's seemingly endless jams - such a pretty lady she is - taken by Victoria Kohner @vickyvicti (instagram)]()
[Hide Photo] full exposure of Sheila's seemingly endless jams - such a pretty lady she is - taken by Victoria Kohner @vickyvicti (instagram)
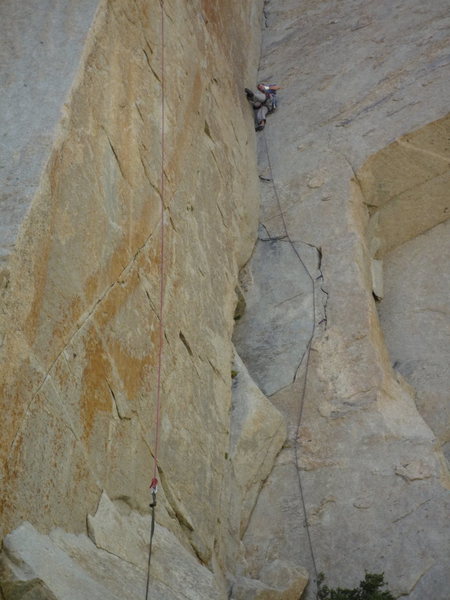
![stylin sheila with pink hair and pink rope - taken by Victoria Kohner @vickyvicti (instagram)]()
[Hide Photo] stylin sheila with pink hair and pink rope - taken by Victoria Kohner @vickyvicti (instagram)


 Continue with onX Maps
 Continue with Facebook


Las Vegas
Big Bear Lake
San Francisco
Sacramento
Tehachapi, CA
1. One below the start of the crux lieback. (got stuck when my partner whipped off the crux, she didn't have a #6)
2. One up and to the left of the lieback. (It is possible to actually climb around the crux and do a variation up and left of the flake. I think this piece is from someone else also climbing this variation, 5.9???)
3. There's a fixed forged friend in the chimney if you look for it. You could actually avoid bringing the #4 at all if you trust this piece. (It was also there in 2008 when I led it.)
Also, the crux is not that difficult, but I recommend moving quickly through it. It is not a place you want to be looking to place gear. Aug 31, 2010
Los Alamos, NM
The crux for me was clearly at the bottom of the route during the ridiculously thin traverse: mountainproject.com/v/calif… much harder technically than the layback, not to mention the gear is much harder to fiddle in!
Bring a selection of super small wires and micro-cams. No extra 2s and 3s required (1-2 each are sufficient). I personally did use a #4 above the chimney at the top as my last piece before making the long traverse to the anchors. Sep 8, 2010
Berkeley, California
Hate to go buy a huge cam... but dont want to run it out... thanks for any beta..
cheers
lou May 16, 2013
Bishop, CA
I took the ride up there once, when my foot slipped at the very top of the layback. Even though I wasn't really that far above the #6, I still went quite the distance with all of the slack and rope stretch at that point.
Don't worry, it's exciting, but it's a clean fall! May 16, 2013
Hamilton, MT
Truckee, CA
Awesome pitch! Sep 4, 2013
Maine
Heaven
The feet at the lieback suck in my not so humble opinion, but I also suck at liebacking. I find that going out left when halfway up the lieback is easiest, but I also have a 6'7" wingspan. . . Jan 16, 2014
The easy chimney moves above the lieback are really fun! Followed by a fun, exposed traverse to the chains. May 27, 2014
South Lake Tahoe, CA
Small Town, USA
Colorado
Technical crux is down low, physical crux the layback section. Good pro to be had before both and on the route as a whole. Leave the #6 on the ground and get on this beauty! May 31, 2016
Saint George, UT
Los Angeles, CA
SANTA CLARA CA
Oak Park, CA
to clarify any confusion from a prev comment, Ecstasy is the arete located to climber's right of Pratt's Crack, and Queen Of The Heartbreaks and Eclipsed are the face and arete to the right of Sheila Jul 30, 2017
Las Vegas, NV
no need for triples of 1",2",3" size if you're comfortable with the long 5.9 glory hands in the middle. I would've brought triples of C4 .3 maybe to protect the crux finger crack and before the lieback. Sew up the vertical portion of the crux finger crack because when it jogs horizontal for the crux its verrrrry thin (purple 0 metolius at the widest). 6" piece was nice to have but there is gear about 6' lower without it. Lieback is burly but quite short just dooo it! Dec 31, 2017
Wellington, NZ
Los Angeles, CA
Rack was doubles from .3-3. You could probably get away with one #3, one .75 and one .5. Mar 31, 2020
Story, WY
San Diego, CA
Joshua Tree, CA
mammoth lakes, ca
Los Angeles, CA
Avoid if you don’t want spray or details
..
..
..
..
..
For my own notes
-lower crux traverse high and step across the little crimp rails on the tiny horizontal crack. Traversing lower is awkward and requires lots of time under tension in splits
-upper crux felt more chill by under cling lay backing, with right hand leading, stemming, and going left half way up the feature.
-gear: route has good gear and stances to place literally everywhere. black and blue totems protect the lower crux well, as well as the small crack before the number #6 in the upper crux. all other small(or smaller) cams are fine but not really needed. Don’t need #4 at all. The 1 #6 is nice. Doubles from black totem to #3 is probably fine for the main rack. I took triples in #1 and #2 but didn’t use more than doubles. Maybe some extra black and blue totems wouldn’t hurt but that would be for excessive pro. Awesome route. Approachable for a budding 5.10 trad climber. 40m pitch exactly, from the upper belay ledge. Oct 18, 2021
Reno, NV
Orange County, CA