Southeast Face
5.8+,
Trad, Alpine, 1500 ft (455 m), 13 pitches, Grade IV,

 Avg: 3.7 from 80
votes
Avg: 3.7 from 80
votes
FA: John Evans, Dick Long, Allen Steck, Chuck Wilts - June 22, 1963
California
> High Sierra
> 04 - Ritter & M…
> Clyde Minaret
Description
Ironically, one of the Sierras greatest Alpine rock climbs isn't even on granite! But rather a steep, smooth rock with angular holds from more ancient times. Watch out for more loose rock than usual.
Start the climb up the lefthand gully, uphill from the base of the face. There may be a cairn.
P1-2 5.6. Make a long traverse right and slightly upwards then around onto the face proper.
P3-7 5.7. There's a shallow dihedral up high on the right side of the face; aim for it, but don't go too far right. Pitch 7 finishes with a tricky traverse to a hanging belay at the bottom of the shallow dihedral.
P8 5.8. Climb the shallow dihedral to an alcove.
P9 5.8. Left out of the alcove then wander across and up the white scar to a ledge just below the large summit dihedral.
P10 5.8. A short strenuous corner leads to a ledge at the bottom of the main dihedral.
P11-12 5.8. Two pitches up the summit dihedral lead to a notch.
P13 5.7. Traverse left on a large ledge then up the face to the summit ridge.
Scramble the ridge to the summit.
Location
See schematic.
Approach:
From Cecile Lake.
Descent:
Cross Class 3 rock towards the Ken-Clyde Notch, down climb this to the start of the climb - a rappel is necessary at one point.
Protection
Most climbers will want a double set of their preferred cams, especially given most modern topos have 170'+ pitches. A full set of nuts, minus any super small, is helpful. 15 or more alpine draws, with some extra shoulder length slings.
![Hamik climbing the mandatory flake before the final traverse.]()
[Hide Photo] Hamik climbing the mandatory flake before the final traverse.
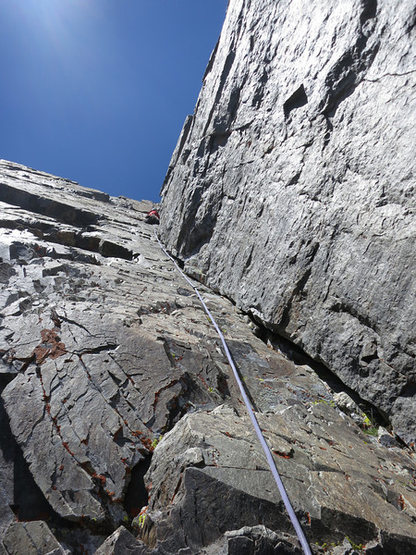
![Southeast Face of the Clyde Minaret. Somewhere in the upper section of the climb.]()
[Hide Photo] Southeast Face of the Clyde Minaret. Somewhere in the upper section of the climb.
![Southeast Face, Clyde Minaret.]()
[Hide Photo] Southeast Face, Clyde Minaret.
![Looking down the classic corner on Pitch 2 of the direct start.]()
[Hide Photo] Looking down the classic corner on Pitch 2 of the direct start.
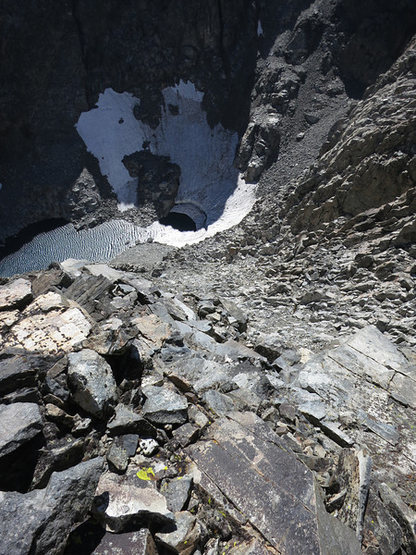
![The descent route. This is a little after the first rappel (first rappel is from some black webbing). Following the ridge down the gully. DO NOT GO ALL THE WAY TO THE WATER. You turn left into another gully that will eventually take you to the base of the Normal Start. There is one more rappel waiting in the gully.]()
[Hide Photo] The descent route. This is a little after the first rappel (first rappel is from some black webbing). Following the ridge down the gully. DO NOT GO ALL THE WAY TO THE WATER. You turn left into anot…
![This is the ledge. Walk up the small bouldery ramp and then climb straight up.]()
[Hide Photo] This is the ledge. Walk up the small bouldery ramp and then climb straight up.
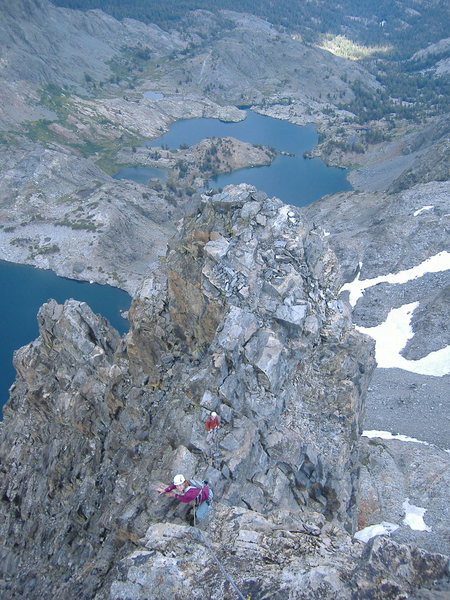
![Approaching the summit]()
[Hide Photo] Approaching the summit
![Spoiler Alert<br>
<br>
The route can be done in 6.5 pitches if you stretch a 70m rope as shown here.]()
[Hide Photo] Spoiler Alert The route can be done in 6.5 pitches if you stretch a 70m rope as shown here.


 Continue with onX Maps
 Continue with Facebook


Big Bear Lake
This is the way we went - you may find a better way.
I've changed the "Protection" section to make it more contemporary. When I climbed it all I had was a set of nuts/hexentrics - and didn't feel particularly short of pro but times and attitudes change. The same could be said for stances - the original belay spots seemed to make sense and it never occurred to us to feel the need for a longer rope. Mar 24, 2006
Littleton
Los Angeles, CA
Three more pitches lead to a ledge atop a pedestal where you start the crux 5.8 + traverse R. into the dihedral, which really isn't indicated on this topo. From there, you following the dihedral to the traversing pitch up and left.
A great climb, but not for 5.8 newbies. It's long, committing, with route finding issues. A 5.8 climb for solid 5.9 climbers. Dec 12, 2007
Redwood City
Boulder, CO
There was a lot of snow in the descent couloir when we climbed this. We got by without ice axes by doing a few more rappels. Aug 18, 2008
Big Bear Lake
As far as the traverse being one pitch, perhaps we had a shorter rope, or maybe I just stopped short at a convenient spot, didn't think 5.7 was called for when compared to the technical difficulties of the rest of the climb.
The traverse into the Shallow Dihedral is shown as 5.7 at the end of P7 (also in description as "Tricky Traverse"), but I didn't think it was the crux at 5.8, but rather the Shallow Dihedral itself. But then again I did this route in the 1980's (long before there were any schematics) maybe a hold broke off or something. Mar 5, 2009
Broomfield, CO
Salt Lake City, UT
Location: West of Mammoth go to Mammoth, pick up your wilderness permit for entry at the Shadow Lakes trail head at Agnew Meadows. Drive (or take bus depending on season and time of day) toward the Devils Post pile two choices park at Red Meadows and hitch hike back to Agnew Meadows (allowing for a circular hike coming in from Agnew and exiting to Red Meadows) or just park at Agnew Meadows for an in and out approach. Walk the 8 miles into the base of the mountain skirting the East side of Iceburg lake and camping at Cecile lake close to the route.
The Route: Be aware that this is not Sierra granite climbing the rock is much more loose and likely more dangerous because of the large amount of choss in places so be careful and do not climb below another party if you value your cranium. On the good side there are holds everywhere so you can pick your path. We did the direct route these pitches were 5.8, maybe 5.9 and actually some of the better rock on the mountain. It climbs up the right side of a pillar a bit to the right of the descent gully, The start is in a dark broken right facing corner that looks unlikely but is solid, good quality climbing. Pitch 1 was short, ending under a curved small roof. Pitch 2 continued up the corner with the final section a smooth clean dihedral. When you get to a large ledge with a wide crack above going to the pillar top look left there are fixed wires and a nice belay stance. Do not go to the top of the pillar. Instead Pitch 3 traverses directly left and up on loose ledges to a large ledge below a left facing corner and a white face with a large crack in it. Pitch 4 climbs this and continues up. Stay in this left facing dihedral system taking your path of choice for several hundred feet aiming towards an obvious large detached flake with a chock stone behind it. This flake sits just below and right of some large black overhangs. Belay at the top of this detached flake on good ledges. The next pitch is the mental crux face climb right and down aiming towards the base of a large left facing dihedral. Place long slings on any gear to reduce rope drag. Once in the corner climb straight up a fair distance to a small ledge in good rock stepping left and setting up a belay. Straight above you is the remainder of the dihedral. Climb up into it carefully and stay in this dihedral for 2-3 pitches some very loose and dangerous rock as well as some really good rock in the middle dont kill your belayer. At the top of the dihedral step into a notch and traverse left on a ledge to belay. Then climb a short section up over the ridge of the mountain. From here it is primarily 4th class on the West side of the ridge or directly up the ridge for a few hundred feet to the summit.
The Descent: Follow the summit ridge to the northwest down a 4th class traverse, climbing over a 20 foot wall and continuing along the ridge. The gully to the left (South) is not the final gully rather you need to get over to the next gully SW. Descend the left side of the ridge you are on above this first gully then over the crest of this ridge and back north a short distance descending into the second gully. From here we changed into our hiking shoes and walked down to the Clyde-Ken saddle and back down the couloir to the start of the route. One long rappel was needed easy with double ropes.
The gear: Essentially no passive gear (wires, hexes) is needed as almost all placements are in parallel cracks. We had a single set of Camelots to size 3 with 3 extras (0.4. 0.5, .75) plus 4 microcams (C3s). On the entire route we placed 2-3 wires medium sized. Long slings are essential. Due to the large amount of loose and sharp rock I suggest double ropes but this is a personal safety decision. Sep 22, 2013
Perchtoldsdorf, AT
Pitch 1: 5.7, 130'; traverse right 110' to corner, belay 20' beyond corner.
Pitch 2: 5.7, 160'; traverse right 20' to left-facing corner, then up 140' to 8 ledge.
Pitch 3: 5.8, 70'; climb up 70' to 40' ledge, then left to 25' pillar.
Pitch 4: continue up and right.
Incidentally, the final moves of pitch 4, just left of some overhanging loose stuff which might be easier, were really hard. We concur with those who thought the route had a lot of loose rock--be careful and good luck! Aug 25, 2014
Los Angeles, CA
San Francisco, CA
Nevada
On another note: I've never collected so much booty in my life on a single route. Seriously, there are almost enough fixed nuts and cams on the face (plus tons of bail anchors on random blank sections off-route) that a confident climber would hardly need to bring a complete rack. There were some pitches I didn't place a single piece off my own harness. The second pitch (direct start) has three #1 camalots welded into the tight-hands crack. Use long slings!
I would also add that the direct start goes smoothly at 5.8 (not any more challenging than the rest of the route) and the sloper traverse into the corner (P6 I think?) is not really that cruxy. Undoubtedly the biggest challenge on SE Face is routefinding because there are often several options (eg. overlapping flakes) and one needs to choose carefully in order to stay at the grade. Expect to bust a 5.9 move at some point.
I highly recommend sticking to the crest of the final summit ridge instead of traversing the rubble on the right flank... for the exposure and position, you won't regret it! Aug 23, 2017
Tucson, AZ
Claremont/Truckee CA
We used the descent “option 1” per the Supertopo. Followed the summit ridge over the 20ft wall, head down the first gully to a short rappel, and traverse skiers right at bottom of gully before it cliffs out to get into second gully . The first set of rappel slings in the first gully are not immediately visible from the summit ridge , and require down climbing a 4/5th class chimney (or leaving a sling on summit ridge). For the second rappel in the Ken Clyde couloir, we had a 70m rope which dropped us off onto a steep snow chute. Jun 30, 2022
Portland
Supertopo describes starting the descent via First Gully or Second Gully. We found that there are 2 ways to enter 1st gully.
– The 1st entry point is approx 15 meters from the summit and is steep and likely would require a rappel.
– The 2nd entry point is further north on the ridge, approx 70 meters north of the summit, and can be entered via easy downclimbing. No rappel needed.
We descended the 2nd entry in First Gully and found easy downclimbing for approx 50 meters to an obvious wide ledge system on skier’s right. The ledge was marked by a cairn and wrapped around the small rib/ridge that separates First Gully from Second Gully. After contouring around this ledge into Second Gully, we found easy downclimbing on slabby rock.
Below the ledge traverse, Second Gully bifurcates into 2 gullys. After downclimbing a couple hundred meters on the right side, we traversed into the left side gully in Second Gully. We found that the center of this gully had been swept clear of talus by runoff. We found easy downclimbing on clean rock, slabs and stairsteps.
The clean rock eventually cliffs out, and a rappel station is located on skier’s right with fresh looking tat and rap rings. Rappel over the cliff and giant chockstone to ledges and more stairstep features below. This section was streaming with water when we passed thru, so we opted for a second rappel from tat under the giant chockstone rather than downclimb the wet rock.. Talus surfing from there takes you back to Cecile Lake or the start of the SE Face route. Aug 9, 2022
As others have said, the direct start is definitely worth doing and more or less continuous with the difficulty of many of the upper pitches (we thought both pitches of the direct start were 5.9). The Supertopo was especially bad here, as my partner led the second (supposedly 5.10) pitch, pulled through the "crux" offwidth (which is 5.8) without realizing it, and continued past the belay ledge into hard 5.10 R territory because he couldn't believe that was the crux. If doing the direct start, do not continue to the top of the tower, but instead step left onto a ledge with fixed nuts immediately after the clean corner on pitch 2 (per Tim Wolfe's comment above).
The traverse pitch is 5.8 and maybe PG13, but it's more airy than poorly protected in my opinion. Definitely not 5.9 R.
The upper dihedral pitches are quite sustained at 5.8(+) but also really fun climbing.
We were surprised that there was at least one more pitch of technical climbing (5.6-5.7) after reaching the notch. After about a pitch it eases off to 5.5, but with the amount of loose rock it didn't seem like great simuling. We unroped only after 2 long pitches, where it eased to 4th.
Tim Wolfe's descent beta was spot on. The 20ft wall is 5.5, then easy downclimbing from there. No snow anywhere on the approach or descent in August 2022. Aug 28, 2022
I had only seen the Minarets from afar, but hiking in is special. Really nice trail, spectacular scenery.
The nature of the rock and how it is fractured means that you are frequently stemming and face climbing. Jugs, crimps and edges abound, and often the task is to see how to reach the next jug. There is some occasional jamming, but don't expect to be climbing splitters. If it looks too hard, look around more carefully. You will often find options. I lost count how many times I looked behind to my right to find a good right food stemming option (you are frequently in left-facing corners)...
I recommend not bringing any stoppers. I placed only one, and found a couple of fixed ones. The nature of the rock doesn't call for them. Save yourself the weight. A single #3 camalot was plenty for us (nothing bigger) and microcams proved useful very frequently (purple #0 Metolius mastercam in particular).
We took the direct start. Somewhat awkward first pitch, and the second was fairly straightforward (definitely not 5.10a, and don't let the wide portion scare you, it's featured). Tim Wolfe's beta above for finding the ledge belay before the downclimb/traverse pitch into the dihedral is spot on: aim for a detached flake with a chockstone behind it up and right (this wasn't as large as I had expected). There is an old rusty bolt on that ledge, not a piton. For the downclimb itself, go a little further down than you might think, using the line of features you spot from the belay for your hands, and not your feet, as tempting as the latter may be. Despite horrible rope drag on the pitch, we stretched our 60m rope and that enabled us to reach the notch in 1 fewer pitch. A couple of short sleeper cruxes await you before the "slabby corner" that leads to the notch approach pitch. Never found the white block before the notch... At least it wasn't blatant.
After the notch and when on the ridge, we were expecting to cruise on 4th class, but fresh snow and verglas made the going sketchy. So we decided to continue pitching it out and tiptoed around loose rock and wet/slippery stuff and never got to let our hair down.
Tim Wolfe's descent beta above is also spot on. The ridge from the summit is not hard, but pretty wildly exposed and calls for a few heady moves in places. Depending on your comfort level, plan for 4 more traversing/downclimbing pitches if you prefer the safety of the rope. The 20ft 5.5 wall seemed shorter to me. We did 3 rappels in total. One to clear the last technical portion once in the 2nd gully NW from the ridge that Tim describes. The other two rappels were back to back later, once in the Ken-Clyde gully, where it cliffs out. One from a slung block, the other from a chockstone in a shaded alcove. We had a single 60m rope.
Stunning setting, and very enjoyable movement on this climb - highly recommended! Oct 2, 2022