To save paper & ink, use the [Hide] controls next to photos and comments
so you only print what you need.
South Face
5.8,
Trad, 300 ft (91 m), 3 pitches,
Avg: 3 from 27
votes
FA: unknown
Arizona
> Northern Arizona
> Grand Canyon
> Mt Hayden
Description
Lots and lots of people have seen pictures of Mt. Hayden and wondered where that cool peak is located and if it's climbable. It's a great climb in an incredible location!!!
The peak is located (and easily seen) off the north rim of the Grand Canyon from Point Imperial. The approach (and hike back out) is the crux of the day, but the South Face route is pretty mellow and the summit is five-star!
Get a copy of Grand Canyon Summits by the Tomasi brothers for more information!
Protection
Set of nuts, single set of cams to #4 oughta do it. Two ropes, helmets.
[Hide Photo] John Boyd shot this photo of us on the summit of Mount Hayden
[Hide Photo] This is us on Mt Hayden, as seen from Point Imperial through a 240mm lens.
[Hide Photo] Jorge and Joanne Urioste on the summit, looking down-canyon.
[Hide Photo] Charlie was nice enough to take this photo of us on summit from a point along the Ken Patrick Trail between Point Imperial and the road to Cape Royal. This offers an interesting perspecive on Moun…
[Hide Photo] Joanne Urioste with Mt. Hayden, from Pt. Imperial.
[Hide Photo] Approaching Hayden along the Hermit Shale.
[Hide Photo] We rapped down near the Pegasus route. It seems to be a better option than the low angled, brushy south face alternative. Pic. Pseudalpine.
[Hide Photo] Bill Hotz peering down Pegasus, with Maurice Horn, Pt. Imperial in the background.
[Hide Photo] Second rappel, you can see the slings of the last rappel on top of the pilar.
[Hide Photo] Approach Picture No. 5 showing static line at base of Coconino Formation (see comment)
[Hide Photo] This third pitch variation of the South Face Route provides the best climbing on that side of Hayden. Older topo rates the OW crack at 5.8+ and chimney finish at 5.9.
[Hide Comment] Thick stands of New Mexico Locust actually. Inch long needle sharp spears, that scratch, and pierce often imbedding in the flesh. But not the grabbing, flesh ripping action of the Catclaw Acacia.
Sep 13, 2008
[Hide Comment] Five of us climbed the South Face on 9/20/08, finding the route an enjoyable line that had room for two parties, parallel much of the time. The rock is pretty good, protects well, and has some very fun sections. The 5.8 crux is a couple of moves over a bulge, and the topo in the Tomasi guide was pretty accurate. We saw no fixed gear other than the rap stations, though the topo has a few pins scattered here and there. We traversed the east side of the peak to reach the south end, although probably either side is ok. As has been said repeatedly, the approach is the crux. The advice of Matt Snider should have been heeded, which was "walk out to Pt. Imperial, jump the railing on the left, and head down and left". We came back this way and shortened both the time and the bushwhacking, although we followed the guidebook suggestion on the way in. The 'railing jump' choice had no cliff bands to deal with at the bottom of the Coconino, and was much less brushy than our descent, east and north of Pt. Imperial. Clothing: I wore leather chaps (!), overkill, but sturdy double-faced pants, leather gloves, and long-sleeved shirts, also sturdy, will help. Expect a thorny problem. From the summit we looked back at Pt. Imperial and thought it would be easier to scramble down straight towards Hayden, hit the top of the Coconino cliffs, do a couple of raps leaving fixed lines, and jug out to go home. Just a thought. The hike out was not as savage as the descent since we shortened our time in the bush by cutting up to Pt. Imperial as described above. TET: about 11 hrs. car to car. This is such a great formation, definitely "vale la pena". With the Grand Canyon as a backdrop, it was a surreal day. The only downer was the almost constant presence of scenic helicopter flights, sometimes two or three ships at once. And not a one of them offered us a ride back to the rim. Seriously, it was way too many noisy flights in such a sublime setting.
Oct 3, 2008
[Hide Comment] This comment and associated photographs contains some approach and climb details that I gathered before and during our Mt. Hayden climbing adventure on October 15, 2008. First however, I would like to thank Andrew and Jodie for providing a lot of the details which helped us to reach the summit.
Mount Hayden Approach: As mentioned in the comments above, the approach to Mount Hayden requires long pants, long sleeve shirts, and leather gloves. The short thorny locust trees carpet the terrain from Point Imperial to the start of the ridge in the Hermit Shale formation that connects to the rim and Mount Hayden. There are no approach trails or cairns to get you to the aforementioned ridge. At best you might find some trampled brush here and there where others have thrashed through, or logs to walk on or along were the locust trees are not as dense. Yes, it is still worth it!
On our approach, I was most concerned with getting to the Point Imperial-Mt Hayden ridge, more specifically, through the Coconino formation off of Point Imperial. So the following approach beta concentrates on that section. I spent 2 hours the day before the climb hiking down to the ridge and back to make sure I knew where to go on the day of the climb. Given the following information you will not need to repeat this exercise.
We started our approach from Point Imperial as recommended by Andrew et al. First, from the parking lot at Point Imperial, you should walk out on the walkway to the end view point. From here you can look down on Mt Hayden and the ridge that connects it to Point Imperial. You cannot see much of the approach route down to the ridge but now you know what you are gunning for during the first half of the approach. If you want someone to take a picture of you on top of Mt Hayden, tape a note to the rail with such a request and they may email it to you (see Summit Photo). Now walk back towards the parking lot along the walkway until the metal railing on your right side ends. There is a gap here between the metal railing and the wood railing that continues to the parking lot. This is where you start the approach down into the steep bowl on the North side of the walkway (see Approach Picture No. 1).
Make your way down the steep bowl, avoiding a few small 5-10 ft ledges, aiming for the pinnacle of Coconino sandstone that is about 500 feet below the rim and on the right side of the bowl (see Approach Picture No. 2). Once down a hundred feet, turn around and look back up where you started and locate the big pine tree that you can use as a landmark for finding your way back to the walkway (see Approach Picture No. 3). About 200 feet above the pinnacle, follow the shallow gully to a large live fir tree left of the pinnacle (see Approach Picture No. 4, GPS: N 36 deg 16.855 min, W 111 deg 58.588 min, Elev 8249 ft). Attached to base of this tree is about 100 feet of static rope, in good condition, which you can hang on to as the gully turns into a notch and makes it way to the base of the Coconino formation. With this rope, we were able to easily batman down and up the three steep sections in the notch without removing our packs. The static rope ends at the base of the Coconino formation (see Approach Picture No. 5, GPS: N 36 deg 16.877 min, W 111 deg 58.564 min, Elev 8192 ft)
Traverse to the right along the base of the Coconino formation, generally staying close to the wall for easier travel. As you walk around the base, you will eventually leave it for better terrain. We did so at GPS: N 36 deg 16.757 min, W 111 deg 58.436 min, Elev 8025 ft. Continue the traverse/bushwhack until you can hike down to the ridge connecting Hayden and the rim (GPS: N 36 deg 16.704 min, W 111 deg 58.310 min, Elev 7845 ft ). It is easy walking from here to the base of Mount Hayden along the top of the ridge. When you get to Mount Hayden, hike up the talus slope to the NE corner of the tower wall. We found a faint trail that we followed up to the wall. Once at the tower wall it is an easy traverse left along and around the tower to the SE side where the climbing route begins. Retrace your path on the return trip. The key points to getting back to Imperial Point are finding the static rope at the base of the Coconino formation and keeping an eye on and heading towards the landmark pine tree at the walkway once above the static rope. It took us 1.5 hours to reach the climb from Point Imperial. It took us about 2.5 hours to make the return trip.
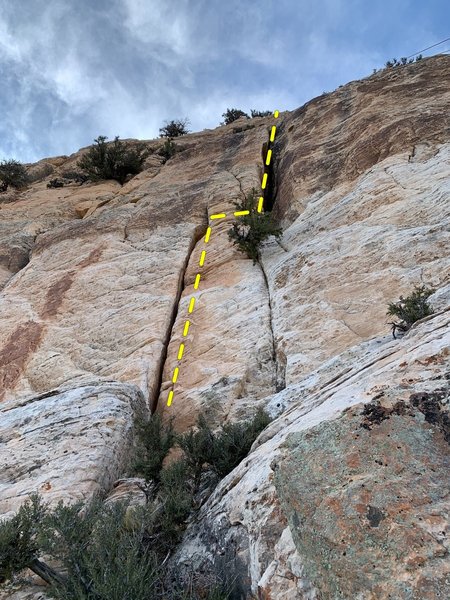
Climb Beta: The SE face of Mount Hayden has two obvious crack systems that can be climbed and the rappel route. The Grand Canyon Summits Select by Aron Tomsai provides a route topo and description for the Original route (5.7-5.8) which is the crack system on the right (See SE Face photo). The left crack system is also shown on Tomsais topo but no route description is provided. We climbed this crack system by mistake because we had an old Mountain Project beta photo that identified this crack as the Original route. Tomsais topo drawing is accurate enough to resolve which crack system to climb, had I bothered to consult it, but hey, a picture is worth a thousands words right! In this case, the picture yielded a thousand wrong words. Nonetheless it was a pleasant crack system to climb and looks less brushy than the original route. On this alternate route you climb past the last rappel station (on climbers left) and up a wide crack (5.9) before climbing up and right to arrive at the final pitch of the Original route. The final pitch of the Original route is mostly a third or fourth class scramble up and left. When you get to the summit block you traverse left around it until you reach a short dihedral (5.5) that gets you to the top (expect some rope drag here). We did not have the large cams required to protect the wide crack on the alternate route and ended up running it out (not recommended). If you climb that crack I would suggest the following Camalots to protect the wide section: 1 #3, 2 #4s, and 1 or 2 #5s. Given the extra weight, it would probably be better just to climb the Original route instead.
Rappel Beta: You need two ropes to rappel off of Mount Hayden. There are three rappel stations on the SE face that will get you back to the base of the climb. The first two stations have bolts with webbing slings and rap rings. The final rappel station is a set of webbing loops around a block with rap rings. There are bolts at this rap station but they are not used. The first rappel station can be found by looking over the SE edge of the top of the tower (see Looking at first rap station photo). While you cannot see the second rappel station from the first it is down and left (climbers right) of your position and you probably used it as a belay anchor for the final pitch. The third rappel station is visible from the second rappel station down and slightly right (climbers left). Throwing the rope from the first two rappels stations can be problematic as there are small trees that you can decorate with your ropes as we so aptly demonstrated. The final rappel station has a clean toss back to the dirt.
This climb was a great adventure with a spectacular summit! Enjoy. --Mark
Oct 24, 2008
[Hide Comment] After the 1.5 hour drive from Home, We started at 5am. I left 1 liter in the car and took 3 liters with me. We followed the Egan's advice and found it 95% right on the money. I added a Google Earth image to highlight the "trail" from the Parking lot. Here's my approach beta; Head down to the view point favoring the lefthand railing. At the bottom of the cement stairs, hop the left metal railing, look down and you'll see the landmark tower in the Coconino formation. Work your way right staying high on the ridge keeping the draw on your left. If you drop down into the draw early, you will be greeted with the WORST of the bushwacking. LEATHER GLOVES, CARHARTT's, and OLD THICK HARD SHELL are the way to go. A light colored rock outcrop on the ridge marked with a rock caren marks the last point to drop into the gully. Once in the gully bottom, wallow till you get to the fixed line. Cashe another liter at the bottom for the hike out, leaving 2 liters for the climb and most of the day. As of 2009 season the fixed line looked great and I'd think its ok for 2010 too. If its not good you can still do the class 3 gully with out it. Its more of a hand railing anyway. Once at the bottom of the gully, work right and stay next to the cliff base for the least bush. After you get to the Hermit Shale, your home free. We climbed the Alternate Route on the Left and found the opening 10 foot section of P1 to be 5.9+ to a pin followed by 5.8. P2 wandered up and right over blocks, and I placed 2 pieces of gear. P3 is were you earn your 5.9 OW wings in a 3 foot wide flairing chimney that heads up for 60+ feet. The leader (Mr. Lean) girthhitched a chock stone in the back of the flair. I'm too thick to get back there and clean it. (Think slot canyon) I had to get creative. We topped out just below the top rap achors. Good times on the summit. The best thing that could happen to this tower is for someone to rap bolt some rap anchors every 30 meters down the North face. The advantages to doing this would be, rapping in the shade, a team could do the tower with one 60 meter rope, and it would create less traffic on the South Face. Also I noticed many newer rap stations poping up in bushes on the South face. I think a dedicated rap route independant of the climbing routes would be a good idea.
Jun 9, 2009
[Hide Comment] Did it in July 2011. The static rope, still there and in good condition as well as the rappel anchors. We went there using the classic approach (down the bowl), came back mostly on the ridge that leads to the viewpoint railings. If I had to do it over, I would consider a way to do the beginning of the approach via the ridge. Car to Car time of 9h40 (lucked out with the approach?). Only brought 2.25 liters per person, and was not enough (mouth parched on the way back :). Leather gloves (gotten at home depot for $3) are a must.
I did the original route, did not find need for camelot/friend bigger than #3. The route is very enjoyable, and the summit spectacular.
I really do wonder how many ascents the summit gets a year? 5? 10? more? someone should bring up a summit register (PVC bottle), if so, please pre-put our names there :)
Aug 7, 2011
[Hide Comment] I ask the Park Service regarding permits, and their answer was:
"You do not need a permit for a day hike. Obviously for overnighters you do. However, the backcountry office strongly suggests that you stop by their office and leave some emergency contact info and your license plate number. The office is located 1.5 miles past the turn-off for the scenic drive towards Pt. Imperial (You will see a sign for the Backcountry Office and Administration). Their hours are 8-5, however you can always leave a note for them as well. Just as a safety precaution."
Considering the remoteness of the climb, it is not a bad idea.
Aug 7, 2011
[Hide Comment] I have a trip on the river in a little bit, does anyone know if there is an approach from the river that has been established?
Jul 23, 2012
[Hide Comment]The summit register is full. If you are planning on making the trip, please bring a new one!
The static line on the approach is still intact and in good condition, although it wouldn't be a brutal down scramble even if it weren't.
The webbing on the last rap anchor (3rd) is in need of replacement. I'd say bring 20 ft, that way the boulder can be wrapped more than once. We left a single 7mm cord running to one of the bolts in the area as a backup to the webbing.
Mark's beta for the approach was right on. There is somewhat of a path most of the way, once below the coconino. Don't make the mistake of missing the path at the base of the rope/gulley. There is a nice path that runs right at the base of the rock. I would just add, as shown in the approach track photo, that the quickest way to the base of the Original Route is to go around the North/North East side of Hayden.
Oct 6, 2013
[Hide Comment] We spotted Mt. Hayden from the South Rim's South Kaibab trail. Hiking to it from there was truly casual in spite of a little third class scrambling. Since we didn't know there was a route on the thing, we meandered around to the west side. But from the spot where we turned west, it looked completely reasonable to go east. It has to be easier and more pleasant than the Point Imperial thrash.
Jun 6, 2015
[Hide Comment] Regarding: "The best thing that could happen to this tower is for someone to rap bolt some rap anchors every 30 meters down the North face" (cuz the route gets so busy?)
There is a very clean rap down the Pegasus face. NNE or N or E face? I still think this is more the N face than the East and Google maps seems to agree. But either way, it's the wider face on your left hand side as you approach from the saddle with the big old yellow jack on the ledge one pitch up.
I think the top anchors are not best suited to this descent but they work. I seem to recall we had to extend the summit slings to drop them over the edge and maybe one of the bolts was backwards but the other hanger was loose enough to spin it around?
Double ropes to the big ledge, then to the ground off a big tree. No point in rapping down bushy, lower angle coke ledges. That's just asking for problems. I guess you'd then have to walk around to the base if you left anything there.
The NM Locust is invasive after the fire. This used to be a pretty casual approach as far as the Canyon goes. Now every area burned is nasty adventure if you're not setup for it.
Jun 17, 2015
[Hide Comment] The approach beta here is very good. We cached a relevant section of Google Earth on our phone, and that really helped us stay out of the worst of the locusts before the descent into the gully ("stay as high as possible until the last minute" was great advice). We started in the dark at 5am because the forecast called for a chance of afternoon showers/storms, and the first hour before sunrise for us was slow. The fixed rope to assist with the lower part of the gully is still in usable shape as of Oct 2015. As others have said, stay as close to the cliff face as possible after the gully - i.e. within 10-15 feet. There's a faint trail with a cairn or two that we followed to the Hermit Shale, where the approach becomes obvious. The locusts were supposedly particularly large this season because of all the rain, but there was really only 1 short (15-20 feet) section of thrashing that got bad for us, and that was in the descent into the gully. Long pants/sleeves + leather gloves is definitely key to avoid painful run-ins with thorns on both the approach and the climb.
There's not much to note about the climb itself. As someone who's used to granite of Yosemite and New England, I found the route to be chossier than I expected, but the whole climb felt <5.7. Single rack to #0.4-#4 should do it. Between the slight wandering of the route and all the brush, we battled significant rope drag, but this could have been managed better in retrospect. Right before the summit, you can see the top set of rap anchors on top of a ~6.5ft-high block. Maybe someone who's taller than me (5'2") can go straight up this way, but there's a pretty easy scramble around and to the left that I'd recommend instead.
The rappel was by far the worst part of the experience for us. There are (at least were when we climbed) thorny bushes everywhere, and despite our best efforts, we managed to tangle the rope/ourselves in these a few times. There are also many large, loose blocks in the wall that could potentially be knocked off, so that's something to watch out for as well. As of Oct 2015, the first 2 rap stations are in good condition, though the top could use an extra rap ring. We used an alternate 3rd rap station that someone else had set up - it's about 15 feet below the one described above in the "alternate" crack/corner system around 2 small trees. Our trip took 10 hours car-to-car: 3 hours hiking in, ~1 hour lounging around here and there, 2 hours climbing, 2 hours rappelling (yes, it was bad), and 2 hours hiking out.
Oct 7, 2015
[Hide Comment] Climbed the south face at the end of May 2017. The weather was warm, sunny, and comfortable. The approach is only 1.3 miles but heinous! After the fire there's no shortage of loose dirt and rock on a steep decline. Finding the route is not a problem but due to the loose conditions it still took us close to 2 hours to travel the distance to Mount Hayden.
The fire wiped out most of the mexican locust and it hasn't yet returned. We didn't really encounter any difficult thorny areas. Thankfully.
As stated on the main page for Mt Hayden the fixed line is gone. There are two short down climbs which are not technically difficult but challenging due to all the loose rock and dirt. While at the bottom of the first down climb I dropped my bag and it proceeded to roll an estimated 200 feet (including dropping off the second 15 foot down climb) down the chute. Surprisingly it held up. +1 for the black diamond creek 50! Aside from a dented water bottle all gear survived!
The climb itself was easy to locate. I thought it was fun, albeit littered with loose rock. Make sure you have a helmet for this one.
The description in the Tomasi book was not easy to decipher and we got off track starting pitch three. I ended up leading, and running out (only using a #4 and #3 to protect ...maybe 30-40ft) the chimney/ fist crack to the right of the actual third pitch. However, it was a super fun climb. If I were to do it again I think a #5, #4, and 2x#3, would protect the chimney and crux well enough. However make sure you have another #4 (or back clean) for the off width leading to the chimney After the chimney the climbing gets easier but is still fun. Especially when you encounter a short bulgey finger crack. The remaining pitch can be protected with a standard rack and leads almost directly to the bolts.
NOTE: IF WE HAD BOTHERED TO SCRUTINIZE THE TOMASI TOPO AND NOT JUST THE DESCRIPTION WE WOULD HAVE HAD NO PROBLEM FINDING THE MUCH MORE MELLOW 5.7 THIRD PITCH. The description isn't great but the Topo is accurate.
Belays P1. belay off wrapped boulder or build gear anchor P2. Gear anchor only, a small tree (manzanita I think) can also be slung. P3. Belay off new bolt + gear (used a BD .5 and a #2) P4. Gear belay
The rappel is pretty straight forward. Rap 1: Rappel of the south east side, at the obvious rappel station, and descend climbers left through the most obvious chute to the two old + one new bolts. This can be done with one 70m rope with length to spare.
Rap 2. 2x70m rappel to the top of P1. angling climber's right to the boulder wrapped with 8mm cord and 2 quick links.
Rap 3. single 70m rappel to ground with a little rope to spare.
ALL THE WEBBING AND CORD APPEARED TO BE IN GOOD SHAPE. WE PRE-EQUALIZED THE CORD AT THE SUMMIT RAPPEL STATION TO ADD "NO EXTENSION" AND REDUNDANCY TO THE E.A.R.N.E.S.T EQUATION. - When we encountered it, it was in a "sliding X" configuration with no redundancy.
Note: rappelling with rope managed in saddlebags really helps as you're descending through a minefield of mexican locust.
Jun 2, 2017
[Hide Comment] Started the hike at 5:30am on June 28th, 2017 with partner Michael Tighe. Approach was heinous but done in 2 hours 10 minutes with a short rest break along the way. Conditions on the slope just below Point Imperial are rough with lots of loose earth and rock. The mexican locusts are returning with a vengeance and there are some thistle plants here and there. Not a big deal if you are a seasoned bushwhacker but it would definitely scare a gym rat. Once below the rocky gully, the approach is pretty straightforward.
Did it in 3 pitches:
Pitch 1: a couple of 5.8 moves to gain the crack system, then easier. About 60 feet up you'll pass a boulder slung with some cordalette where you could make your first belay if there was a need but the climbing is easy, the protection opportunities are ample and there didn't seem to be any good reason to stop. Continued up to a nice wide ledge covered in loose rocks and a few bushes. Set a trad anchor here. Many bushes to sling and cracks to use. Pitch 2(or 3 if you split up the first one):Continue up the crack system with some more exposed, slightly more challenging and enjoyable crack climbing to a bolted anchor with two old stardrive bolts and a newer bolt above and right. Pitch 3: Up a fourth class gully to a large ledge. Once on the ledge you can continue as we did directly up a short 5.10 bouldery face to belay from the first bolted rap station, or take an easier route around to the left.
Gear: Singles to 4" or even 3" is sufficient. We also used only one rope but had sufficient excess webbing along to create another rap anchor if necessary and there are plenty of bushes and blocks to sling.
Descent: We replaced the webbing on the top anchor, the rest were fine. 4 rappels got us down the South Face with no significant issues. (Note: I used the Maxim 70m Alex Honnold Signature Series bi-pattern 9.5 dry rope. This rope is actually 77m long. Maxim sells them with an extra 10% length to err on the side of caution. You may have issues trying to do it with ropes of other makes as our last rap hit the ground with literally only a foot to spare. Be warned.)
We wanted to rap the Pegasus route and try those pitches on toprope prior to committing to leading it as it's rumored to be challenging. I lowered Michael off and he looked around but couldn't find the anchors. I guess we were in the wrong spot.
Overall, a very satisfying day in an idyllic setting. Back to the car by 2:30pm or so. If I get the chance I'll go back with a machete and make some cairns. It really would be totally enjoyable if it weren't for the first leg of the approach which is really awful. There's also a ton of new-routing potential on Hayden itself as well as the cliffband you pass beneath on your way there. Some of those lines looked really nice.
Happy to help if anyone has questions, feel free to hit me up.
Jun 30, 2017
[Hide Comment] If you’re thinking about doing Hayden don’t be deterred by the comments on the approach. We did Pegasus on Thursday Aug 2nd, 2018 and this was the easiest I’ve done in the canyon so far. Took us one hour to the base and slightly over an hour to get out. Not sure it gets easier than that in the GC?
Aug 4, 2018
[Hide Comment] Did Hayden on 11/06/19. The "sling wrapped boulder" on the first pitch no longer has a sling. You must build an anchor for the first pitch. The approach is a bit worn. You can see a faint trail. However the thorns have grown back and are ready to tear through your thin layers. Hayden is impressive and one of the more memorable settings I've been to. Enjoy.
Nov 8, 2019


 Continue with onX Maps
 Continue with Facebook


Wilson, WY
As has been said repeatedly, the approach is the crux. The advice of Matt Snider should have been heeded, which was "walk out to Pt. Imperial, jump the railing on the left, and head down and left". We came back this way and shortened both the time and the bushwhacking, although we followed the guidebook suggestion on the way in. The 'railing jump' choice had no cliff bands to deal with at the bottom of the Coconino, and was much less brushy than our descent, east and north of Pt. Imperial.
Clothing: I wore leather chaps (!), overkill, but sturdy double-faced pants, leather gloves, and long-sleeved shirts, also sturdy, will help. Expect a thorny problem. From the summit we looked back at Pt. Imperial and thought it would be easier to scramble down straight towards Hayden, hit the top of the Coconino cliffs, do a couple of raps leaving fixed lines, and jug out to go home. Just a thought.
The hike out was not as savage as the descent since we shortened our time in the bush by cutting up to Pt. Imperial as described above. TET: about 11 hrs. car to car.
This is such a great formation, definitely "vale la pena". With the Grand Canyon as a backdrop, it was a surreal day. The only downer was the almost constant presence of scenic helicopter flights, sometimes two or three ships at once. And not a one of them offered us a ride back to the rim. Seriously, it was way too many noisy flights in such a sublime setting. Oct 3, 2008
Mount Hayden Approach:
As mentioned in the comments above, the approach to Mount Hayden requires long pants, long sleeve shirts, and leather gloves. The short thorny locust trees carpet the terrain from Point Imperial to the start of the ridge in the Hermit Shale formation that connects to the rim and Mount Hayden. There are no approach trails or cairns to get you to the aforementioned ridge. At best you might find some trampled brush here and there where others have thrashed through, or logs to walk on or along were the locust trees are not as dense. Yes, it is still worth it!
On our approach, I was most concerned with getting to the Point Imperial-Mt Hayden ridge, more specifically, through the Coconino formation off of Point Imperial. So the following approach beta concentrates on that section. I spent 2 hours the day before the climb hiking down to the ridge and back to make sure I knew where to go on the day of the climb. Given the following information you will not need to repeat this exercise.
We started our approach from Point Imperial as recommended by Andrew et al. First, from the parking lot at Point Imperial, you should walk out on the walkway to the end view point. From here you can look down on Mt Hayden and the ridge that connects it to Point Imperial. You cannot see much of the approach route down to the ridge but now you know what you are gunning for during the first half of the approach. If you want someone to take a picture of you on top of Mt Hayden, tape a note to the rail with such a request and they may email it to you (see Summit Photo). Now walk back towards the parking lot along the walkway until the metal railing on your right side ends. There is a gap here between the metal railing and the wood railing that continues to the parking lot. This is where you start the approach down into the steep bowl on the North side of the walkway (see Approach Picture No. 1).
Make your way down the steep bowl, avoiding a few small 5-10 ft ledges, aiming for the pinnacle of Coconino sandstone that is about 500 feet below the rim and on the right side of the bowl (see Approach Picture No. 2). Once down a hundred feet, turn around and look back up where you started and locate the big pine tree that you can use as a landmark for finding your way back to the walkway (see Approach Picture No. 3). About 200 feet above the pinnacle, follow the shallow gully to a large live fir tree left of the pinnacle (see Approach Picture No. 4, GPS: N 36 deg 16.855 min, W 111 deg 58.588 min, Elev 8249 ft). Attached to base of this tree is about 100 feet of static rope, in good condition, which you can hang on to as the gully turns into a notch and makes it way to the base of the Coconino formation. With this rope, we were able to easily batman down and up the three steep sections in the notch without removing our packs. The static rope ends at the base of the Coconino formation (see Approach Picture No. 5, GPS: N 36 deg 16.877 min, W 111 deg 58.564 min, Elev 8192 ft)
Traverse to the right along the base of the Coconino formation, generally staying close to the wall for easier travel. As you walk around the base, you will eventually leave it for better terrain. We did so at GPS: N 36 deg 16.757 min, W 111 deg 58.436 min, Elev 8025 ft. Continue the traverse/bushwhack until you can hike down to the ridge connecting Hayden and the rim (GPS: N 36 deg 16.704 min, W 111 deg 58.310 min, Elev 7845 ft ). It is easy walking from here to the base of Mount Hayden along the top of the ridge. When you get to Mount Hayden, hike up the talus slope to the NE corner of the tower wall. We found a faint trail that we followed up to the wall. Once at the tower wall it is an easy traverse left along and around the tower to the SE side where the climbing route begins. Retrace your path on the return trip. The key points to getting back to Imperial Point are finding the static rope at the base of the Coconino formation and keeping an eye on and heading towards the landmark pine tree at the walkway once above the static rope. It took us 1.5 hours to reach the climb from Point Imperial. It took us about 2.5 hours to make the return trip.
Climb Beta:
The SE face of Mount Hayden has two obvious crack systems that can be climbed and the rappel route. The Grand Canyon Summits Select by Aron Tomsai provides a route topo and description for the Original route (5.7-5.8) which is the crack system on the right (See SE Face photo). The left crack system is also shown on Tomsais topo but no route description is provided. We climbed this crack system by mistake because we had an old Mountain Project beta photo that identified this crack as the Original route. Tomsais topo drawing is accurate enough to resolve which crack system to climb, had I bothered to consult it, but hey, a picture is worth a thousands words right! In this case, the picture yielded a thousand wrong words. Nonetheless it was a pleasant crack system to climb and looks less brushy than the original route. On this alternate route you climb past the last rappel station (on climbers left) and up a wide crack (5.9) before climbing up and right to arrive at the final pitch of the Original route. The final pitch of the Original route is mostly a third or fourth class scramble up and left. When you get to the summit block you traverse left around it until you reach a short dihedral (5.5) that gets you to the top (expect some rope drag here). We did not have the large cams required to protect the wide crack on the alternate route and ended up running it out (not recommended). If you climb that crack I would suggest the following Camalots to protect the wide section: 1 #3, 2 #4s, and 1 or 2 #5s. Given the extra weight, it would probably be better just to climb the Original route instead.
Rappel Beta:
You need two ropes to rappel off of Mount Hayden. There are three rappel stations on the SE face that will get you back to the base of the climb. The first two stations have bolts with webbing slings and rap rings. The final rappel station is a set of webbing loops around a block with rap rings. There are bolts at this rap station but they are not used. The first rappel station can be found by looking over the SE edge of the top of the tower (see Looking at first rap station photo). While you cannot see the second rappel station from the first it is down and left (climbers right) of your position and you probably used it as a belay anchor for the final pitch. The third rappel station is visible from the second rappel station down and slightly right (climbers left). Throwing the rope from the first two rappels stations can be problematic as there are small trees that you can decorate with your ropes as we so aptly demonstrated. The final rappel station has a clean toss back to the dirt.
This climb was a great adventure with a spectacular summit! Enjoy.
--Mark Oct 24, 2008
Melba Idaho
Head down to the view point favoring the lefthand railing. At the bottom of the cement stairs, hop the left metal railing, look down and you'll see the landmark tower in the Coconino formation. Work your way right staying high on the ridge keeping the draw on your left. If you drop down into the draw early, you will be greeted with the WORST of the bushwacking. LEATHER GLOVES, CARHARTT's, and OLD THICK HARD SHELL are the way to go. A light colored rock outcrop on the ridge marked with a rock caren marks the last point to drop into the gully. Once in the gully bottom, wallow till you get to the fixed line. Cashe another liter at the bottom for the hike out, leaving 2 liters for the climb and most of the day. As of 2009 season the fixed line looked great and I'd think its ok for 2010 too. If its not good you can still do the class 3 gully with out it. Its more of a hand railing anyway.
Once at the bottom of the gully, work right and stay next to the cliff base for the least bush. After you get to the Hermit Shale, your home free.
We climbed the Alternate Route on the Left and found the opening 10 foot section of P1 to be 5.9+ to a pin followed by 5.8. P2 wandered up and right over blocks, and I placed 2 pieces of gear. P3 is were you earn your 5.9 OW wings in a 3 foot wide flairing chimney that heads up for 60+ feet. The leader (Mr. Lean) girthhitched a chock stone in the back of the flair. I'm too thick to get back there and clean it. (Think slot canyon) I had to get creative.
We topped out just below the top rap achors. Good times on the summit.
The best thing that could happen to this tower is for someone to rap bolt some rap anchors every 30 meters down the North face. The advantages to doing this would be, rapping in the shade, a team could do the tower with one 60 meter rope, and it would create less traffic on the South Face. Also I noticed many newer rap stations poping up in bushes on the South face. I think a dedicated rap route independant of the climbing routes would be a good idea. Jun 9, 2009
I did the original route, did not find need for camelot/friend bigger than #3. The route is very enjoyable, and the summit spectacular.
I really do wonder how many ascents the summit gets a year? 5? 10? more? someone should bring up a summit register (PVC bottle), if so, please pre-put our names there :) Aug 7, 2011
"You do not need a permit for a day hike. Obviously for overnighters you do. However, the backcountry office strongly suggests that you stop by their office and leave some emergency contact info and your license plate number. The office is located 1.5 miles past the turn-off for the scenic drive towards Pt. Imperial (You will see a sign for the Backcountry Office and Administration). Their hours are 8-5, however you can always leave a note for them as well. Just as a safety precaution."
Considering the remoteness of the climb, it is not a bad idea. Aug 7, 2011
Colorado Springs, CO
Flagstaff, AZ
The static line on the approach is still intact and in good condition, although it wouldn't be a brutal down scramble even if it weren't.
The webbing on the last rap anchor (3rd) is in need of replacement. I'd say bring 20 ft, that way the boulder can be wrapped more than once. We left a single 7mm cord running to one of the bolts in the area as a backup to the webbing.
Mark's beta for the approach was right on. There is somewhat of a path most of the way, once below the coconino. Don't make the mistake of missing the path at the base of the rope/gulley. There is a nice path that runs right at the base of the rock. I would just add, as shown in the approach track photo, that the quickest way to the base of the Original Route is to go around the North/North East side of Hayden. Oct 6, 2013
"The best thing that could happen to this tower is for someone to rap bolt some rap anchors every 30 meters down the North face" (cuz the route gets so busy?)
There is a very clean rap down the Pegasus face.
NNE or N or E face? I still think this is more the N face than the East and Google maps seems to agree. But either way, it's the wider face on your left hand side as you approach from the saddle with the big old yellow jack on the ledge one pitch up.
I think the top anchors are not best suited to this descent but they work.
I seem to recall we had to extend the summit slings to drop them over the edge and maybe one of the bolts was backwards but the other hanger was loose enough to spin it around?
Double ropes to the big ledge, then to the ground off a big tree.
No point in rapping down bushy, lower angle coke ledges.
That's just asking for problems.
I guess you'd then have to walk around to the base if you left anything there.
The NM Locust is invasive after the fire. This used to be a pretty casual approach as far as the Canyon goes. Now every area burned is nasty adventure if you're not setup for it. Jun 17, 2015
Berkeley, CA
There's not much to note about the climb itself. As someone who's used to granite of Yosemite and New England, I found the route to be chossier than I expected, but the whole climb felt <5.7. Single rack to #0.4-#4 should do it. Between the slight wandering of the route and all the brush, we battled significant rope drag, but this could have been managed better in retrospect. Right before the summit, you can see the top set of rap anchors on top of a ~6.5ft-high block. Maybe someone who's taller than me (5'2") can go straight up this way, but there's a pretty easy scramble around and to the left that I'd recommend instead.
The rappel was by far the worst part of the experience for us. There are (at least were when we climbed) thorny bushes everywhere, and despite our best efforts, we managed to tangle the rope/ourselves in these a few times. There are also many large, loose blocks in the wall that could potentially be knocked off, so that's something to watch out for as well. As of Oct 2015, the first 2 rap stations are in good condition, though the top could use an extra rap ring. We used an alternate 3rd rap station that someone else had set up - it's about 15 feet below the one described above in the "alternate" crack/corner system around 2 small trees. Our trip took 10 hours car-to-car: 3 hours hiking in, ~1 hour lounging around here and there, 2 hours climbing, 2 hours rappelling (yes, it was bad), and 2 hours hiking out. Oct 7, 2015
Mesa, AZ
The fire wiped out most of the mexican locust and it hasn't yet returned. We didn't really encounter any difficult thorny areas. Thankfully.
As stated on the main page for Mt Hayden the fixed line is gone. There are two short down climbs which are not technically difficult but challenging due to all the loose rock and dirt. While at the bottom of the first down climb I dropped my bag and it proceeded to roll an estimated 200 feet (including dropping off the second 15 foot down climb) down the chute. Surprisingly it held up. +1 for the black diamond creek 50! Aside from a dented water bottle all gear survived!
The climb itself was easy to locate. I thought it was fun, albeit littered with loose rock. Make sure you have a helmet for this one.
The description in the Tomasi book was not easy to decipher and we got off track starting pitch three. I ended up leading, and running out (only using a #4 and #3 to protect ...maybe 30-40ft) the chimney/ fist crack to the right of the actual third pitch. However, it was a super fun climb. If I were to do it again I think a #5, #4, and 2x#3, would protect the chimney and crux well enough. However make sure you have another #4 (or back clean) for the off width leading to the chimney After the chimney the climbing gets easier but is still fun. Especially when you encounter a short bulgey finger crack. The remaining pitch can be protected with a standard rack and leads almost directly to the bolts.
NOTE: IF WE HAD BOTHERED TO SCRUTINIZE THE TOMASI TOPO AND NOT JUST THE DESCRIPTION WE WOULD HAVE HAD NO PROBLEM FINDING THE MUCH MORE MELLOW 5.7 THIRD PITCH. The description isn't great but the Topo is accurate.
Belays
P1. belay off wrapped boulder or build gear anchor
P2. Gear anchor only, a small tree (manzanita I think) can also be slung.
P3. Belay off new bolt + gear (used a BD .5 and a #2)
P4. Gear belay
The rappel is pretty straight forward.
Rap 1: Rappel of the south east side, at the obvious rappel station, and descend climbers left through the most obvious chute to the two old + one new bolts. This can be done with one 70m rope with length to spare.
Rap 2. 2x70m rappel to the top of P1. angling climber's right to the boulder wrapped with 8mm cord and 2 quick links.
Rap 3. single 70m rappel to ground with a little rope to spare.
ALL THE WEBBING AND CORD APPEARED TO BE IN GOOD SHAPE. WE PRE-EQUALIZED THE CORD AT THE SUMMIT RAPPEL STATION TO ADD "NO EXTENSION" AND REDUNDANCY TO THE E.A.R.N.E.S.T EQUATION. - When we encountered it, it was in a "sliding X" configuration with no redundancy.
Note: rappelling with rope managed in saddlebags really helps as you're descending through a minefield of mexican locust. Jun 2, 2017
Fountain Hills, AZ
Did it in 3 pitches:
Pitch 1: a couple of 5.8 moves to gain the crack system, then easier. About 60 feet up you'll pass a boulder slung with some cordalette where you could make your first belay if there was a need but the climbing is easy, the protection opportunities are ample and there didn't seem to be any good reason to stop. Continued up to a nice wide ledge covered in loose rocks and a few bushes. Set a trad anchor here. Many bushes to sling and cracks to use.
Pitch 2(or 3 if you split up the first one):Continue up the crack system with some more exposed, slightly more challenging and enjoyable crack climbing to a bolted anchor with two old stardrive bolts and a newer bolt above and right.
Pitch 3: Up a fourth class gully to a large ledge. Once on the ledge you can continue as we did directly up a short 5.10 bouldery face to belay from the first bolted rap station, or take an easier route around to the left.
Gear: Singles to 4" or even 3" is sufficient. We also used only one rope but had sufficient excess webbing along to create another rap anchor if necessary and there are plenty of bushes and blocks to sling.
Descent: We replaced the webbing on the top anchor, the rest were fine. 4 rappels got us down the South Face with no significant issues. (Note: I used the Maxim 70m Alex Honnold Signature Series bi-pattern 9.5 dry rope. This rope is actually 77m long. Maxim sells them with an extra 10% length to err on the side of caution. You may have issues trying to do it with ropes of other makes as our last rap hit the ground with literally only a foot to spare. Be warned.)
We wanted to rap the Pegasus route and try those pitches on toprope prior to committing to leading it as it's rumored to be challenging. I lowered Michael off and he looked around but couldn't find the anchors. I guess we were in the wrong spot.
Overall, a very satisfying day in an idyllic setting. Back to the car by 2:30pm or so. If I get the chance I'll go back with a machete and make some cairns. It really would be totally enjoyable if it weren't for the first leg of the approach which is really awful. There's also a ton of new-routing potential on Hayden itself as well as the cliffband you pass beneath on your way there. Some of those lines looked really nice.
Happy to help if anyone has questions, feel free to hit me up. Jun 30, 2017
Tempe, AZ
Salt Lake City, UT