

 Avg: 3.6 from 474
votes
Avg: 3.6 from 474
votes
 Access Issue: Closures
Details
Access Issue: Closures
Details
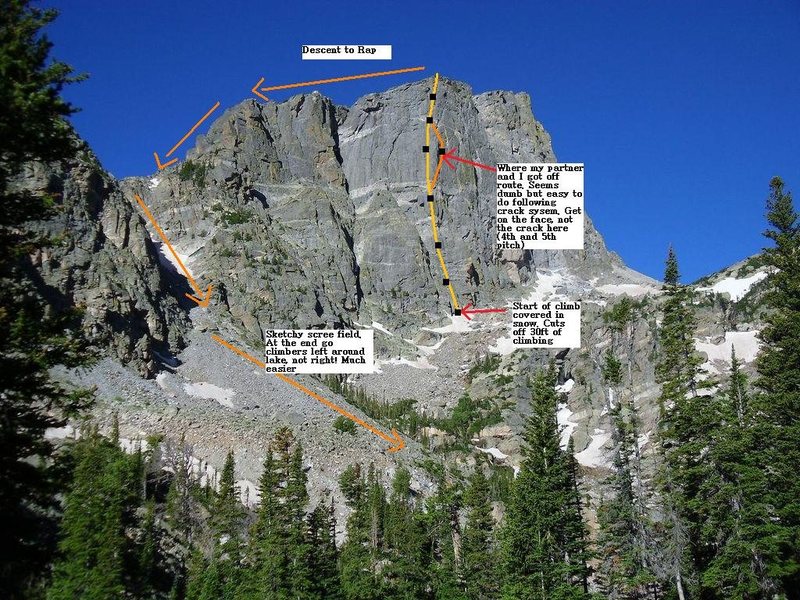
From the Bear Lake parking lot, follow the trail to Emerald Lake. Go left around the lake, scrambling through some talus and taking a climbers' trail that closely follows the base of the peak.
You are aiming for the second buttress. Look for the white/pink band or rock that intersects the base of the mountain - the route starts right there, about halfway across the second buttress. It is about 100 feet to the right of a huge right-facing dihedral, and just right of a couple much smaller dihedrals.
Per C. Vernon:
Begin in a light colored band of rock about 30 feet high in the middle of the Second Buttress, to the right of the huge corner/gully of the Love Route.
P1. Climb up the light band to a good ledge, head up a left-leaning, right-facing corner about 40 feet, traverse right on a grassy ledge to a short thin crack, and climb that to another ledge (5.6, 140 feet).
P2. Go up past rappel slings, climb a crack through a roof and head up and LEFT up a slab into a nice right facing corner (the middle of three such corners) that ends below a large white roof. Belay at the bottom of the corner (5.6, 120 feet). Be sure to traverse LEFT to the larger corner - going straight up the smaller dihedral above the roof is much harder and dead-ends. There are also several sets of bail slings to the right in the vicinity of the Jackson-Johnson - don't get sucked over there.
Pitches one and two can be combined with a 70 meter rope. Alternatively, you can stretch P2 to the top of the corner, which then allows you to combine pitches 3 & 4 with a 60. However, the stance at the base of the corner is more comfortable.
P3. Climb the corner to its top below the white roof, and bypass the roof up a slab (pin) to the right. Turn the roof where it is much smaller (pin), and continue up crack to face (more pins) right of a right-facing corner to a ledge (5.8, 160 feet).
P4. Head sharply left and up on easier, broken terrain to a huge grassy ledge on the left side of a prow (5.4, 75 feet)
The next two pitches are where many parties get off route, ending up to the left of the route in the vicinity of the more runout Hesse-Ferguson.
P5. From the right end of the big ledge, there is an obvious prow, and just left of that, a wide, left-facing flake/corner about 60 feet high. Climb incipient cracks just left of the flake (lots of good nut placements) and belay at the base of a left-leaning, left-facing corner that is just to the left of the prow. An amazing pitch. (5.6, 140').
P6. At this point, many people climb up the left-leaning corner, but that spits you out off-route in nebulous terrain. Instead, step up and right around the prow into a short corner, then work steadily up and right with occasional gear, eventually gaining a ramp with a detached flake. The ramp leads to a short right-facing corner with a good belay stance at the bottom of the corner (you could also belay on the ramp) (5.6 R, 130').
There are all sorts of opportunities to get off-route on this pitch. You're aiming to get below a notch or weakness up and right that allows passage through a long roof band into a continuous crack/corner system.
P7. Climb the runout face (5.7) left of the short corner that you are belaying in (looks like the corner itself could also be climbed, but it looks chossy), and then work up into a steep, exposed crack (pin) that eventually turns into a right-facing corner. Belay below another roof band. (5.8, 150 feet).
Alternatively, P7. Per Aaron Glasenapp: you can climb the corner itself, which is well-protected and also 5.7. We did not find the corner chossy, as the previous description suggested. After the short corner or face, work up into a steep, exposed crack (with a very loose pin - back it up!) that eventually turns into a right-facing corner, and then into a left-facing corner with some dirt & chockstones. Belay below another roof band. (5.8, 150 feet).
P8. There are two ways to do the last pitch. The most obvious continues up the dirty crack directly through the roof (#3 Camalot). However, a less obvious but better way is to traverse right below the roof onto a slab (often wet) and climb a seam with good small gear (micro-nuts helpful) through the right side of the roof where it is smaller. This feels hard for 5.8 but is great climbing with good gear. Also note that, contrary to Richard Rossiter's description in his High Peaks guidebook, there is no bolt out here.
Continue up more broken terrain right of a right-facing corner to a loose ledge just below the top. *It's best to belay on this ledge rather than dragging the rope up through the extremely loose rock above to the top* (5.8+, ~100').
Then, scramble or belay to the top. Be very careful on this loose top-out, as any rocks that come off will head directly down toward the staging area that is common to Culp-Bossier, Jackson-Johnson, and the Love Route.
A standard rack up to #2 Camalot. #3 optional. Doubles are useful in the #0.75-#2 range.

 Continue with onX Maps
 Continue with Facebook


Seattle, WA
It doesn't sound like this was the belay everyone else found, but it sure seemed to work well for us. We tried to decipher the "proper" belay spot, but never did find it.
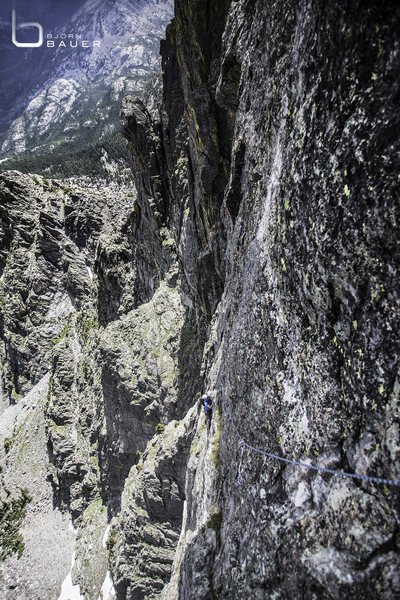
That said, what great exposure! I never expected so much face climbing and "eldo crack climbing" (stemming and face holds, using the crack for pro).
You can link 1 & half of two nicely (maybe you can make it to the top of the corner with a 60m?). The "correct" corner (there are 4 that we debated between) is the largest of the RF corners, that steepens into creamy colorered rotten rock (the route traverses to the right just underneath that section).
From the grassy ledge, it makes total sense to link these and simul-climb as needed (300 feet of super-airy face climbing was FUUUUN.) or as comfortable.
Oh yes, and the pin at the crux roof up high is terrible, it moved about an inch up and down. A perfect red alien placement goes in right above it. Jul 12, 2003
Seattle, WA
Cincinnati, OH
Fort Collins, CO
MO + CA
jer Jul 19, 2004
Boulder, CO
Colorado
Greeley, co
Boulder, CO
Reno, NV
Denver
P7 and P8 (if done up the wide hand crack) are 5.8+ or 5.9 IMO, so be ready to get physical. Sep 5, 2006
Boulder, CO
Reno, NV
Grand Junction, CO
Glad you had an interesting time. Was it very wet up there?
-P vernon Jun 15, 2007
Broomfield, CO
At the final gully there is a tree with slings on a ledge off to the left with a boulder embedded high in the trunk. A 60m double-rope rap will get you past the snow all the way to the talus slope. Jun 25, 2007
Boulder, CO
Broomfield, CO
We didn't go up to the West Gully. We hiked down to the chain anchors on the first buttress, rapped 200', then followed the gullies straight towards the lower half of the east couloir. I didn't see many choices on the way down. I don't think we were off-route. I just think it is riskier than the climb. Jun 26, 2007
Boulder, CO
The descent down the west gully is more of a loose slag heap than the east side, but it is the best way down from the Third Buttress. This one also has a trick to it, at one point you have to go up and over a hump to the left (west) to another gully. There are no rappels needed on this descent. Jun 26, 2007
Front Range, CO
Grand Junction
Laramie, Wyoming
Lafayette
I found the "dicey" sections to be adequately protected. A set of wires nicely protected my partner's 7s section on P7. The 5.6s runout wasn't bad at all - I got pro every 15 feet or so. Small Aliens or TCUs are nice on this route. (black & purple Alien / #0.1 & 0.2 Camalots). If you belay from the ledge at the top of P2, then a 60m rope will not reach the next ledge for p3. (Had to simulclimb 20 feet). You should probably set your belay a bit above the comfy ledge in the right-facing dihedral. Remember: choose the middle dihedral!
Then expect a 200 foot pitch to the comfy ledge at the top of p3. There was a single pin protecting the p3 5.8 section - which is otherwise a right trending ledge/slab. I found this to be the hardest / poorest pro of the whole climb.
We had trouble finding the raps: The descent rappel can be found by hiking roughly 1/3 mile down the ridgeline (maybe 200 vertical feet). Pass the first major incut gully (which faces north) and then go down another 50-60 vertical feet, 400 feet or so of horizontal walking. Look for the cairns marking the rappel to your left (northeast). Rap 30m to a ledge. Downclimb the sections below you, passing the first major lefthand turn after the looming tower on your left. Take either the second or third lefthand turns which will have you drop down/climb up to the gully respectively. Then descend the gully via downclimbing or traversing ledges. The gully felt no worse than 5.1/5.2 in the very worst spots, but perhaps a little harder than 4th class in others. We did it unroped. You will end up about 400 vertical feet below the start of the route (5 minutes back to the base).
The descent would be rather spicy in a rainstorm - there was plenty of tat hanging on lots of boulders in the gully. We cleaned a lot of it up since it had been burned through by ropes pulling across it. We also pulled a taped carabiner from the top of p6 with two slings on it - if you left something up there and want it back, email me.
The hike up took us a little over 1.5 hours, and the drive from Boulder a solid hour. It was darn cold in the morning and the sun dropped behind the formation around 10am -- reappearing briefly on the ledge and on top. Sep 4, 2008
Bozeman
Eric Peers (above) gives a good descent desription which worked for us. The approach was about 90 minutes from the parking lot, although we flailed around a bit on the approach. We got a 5:30 trailhead start and topped out around 2:00. Pulling a second rope slowed us down quite a bit.
Jul 24, 2009
Denver, CO
On Vernon's pitch 8, start your traverse right 20 feet below the roof that has a fist crack on its right side. Aug 2, 2009
Colorado Springs, CO
Boulder, CO
Westminster, CO
Boulder, CO
I ended up with this after I topped out: Better Than Love> Love Route> Englishman Route> Culp Bossier (sounds like a set list I know). Great outing, could not have been more stoked with the climbing! Aug 29, 2010
Green Mnt
Using a 70, we were able to do the first four pitches in two which made for good time. Then we began running into other parties and things slowed. Weather held and all was well, but had we had a free run at the second half of the Culp, it would have gone easily in three, possibly in two, and certainly not in 4!
Chill descent as well.
AMAZING CLIMB!!! Sep 7, 2010
BOULDER CO
Eugene, OR
Was Estes Park, now homeless
Also, for those wary of jumping on a route notorious for dubious routefinding...just get on it. We printed pictures, topos, notes...and almost didn't bother with any of it. The C-B is heroically easy to find and maintain; I have NOOO idea how you could get grievously off-route on this one. But there you go. Jul 26, 2011
Centennial, CO
The Great State -Colorado
Westminster CO
I did this yesterday, found OK rock quality (not as good as the rest of the route), and what I'd put at roughly 5.9R climbing.
There was one old fixed pin, right before the small overhang to the left of the big flake. I didn't see any other fixed gear going this way.
The top out also finished at a fairly well worn trail, so this has obviously seen a bit of traffic but not nearly as much as the rest of the route, judging by the rock quality and amount of lichen. Aug 4, 2012
Colorado Springs, CO
Colorado
Very good route. I'd like to get on it some time when it's fully dry. Is this normal runoff for the route this time of year? Jul 9, 2013
SLC
Arvada, Co.
P1 is the easiest pitch on the route, good pro. The left leaning-right facing dihedral is really low 5th class. The narrow traverse ledge is obvious when you come to it - as is the finger crack.
P2 is obvious as long as you head into the middle dihedral. The finger crack leads into weakness that take you to the cross-over left into the middle dihedral over an easy but balancy buttress. There is no "correct" place to traverse. **You should now be looking directly up into the cream colored roof that marks the crux of p3**. Good pro makes for a number of good belay spots below the roof.
P3 I found the "crux" traverse under the roof to be well protected and only slightly harder than the runout 5.6 pitches above. I found small (nuts mostly) but solid pro about every 5-8 feet. I really only clipped the apparently solid pin onnacounta i was right there. I belayed from a small grassy ledge not far above the roof- stay left!
P4 Low 5th class going to the grassy ledge. You will not see the ledge without going waaay left over easy terrain. It is indeed big enough to BBQ on with 20 friends. I think climbers get screwed-up by starting p5 from the small grassy ledge.
P5/6 You are looking up at a huge, vertical flake system that also defines the prow to your right. You go up a shallow dihedral and put pro in the flake system until you are forced left onto poorly protected face climbing 5.6 stuff. When you first look up at Hallett, you will ask yourself "where might the 5.6 stuff be on THAT thing". The entire climb is pretty vertical. Upper P5 & most of P6 are a nearly vertical sea of partial chickeheads. Many good enough to climb on but none slingable. Pro is sparse and shallow and flaring. The rock is super grippy, but the pro is weeeeeak. Hard to define "where" the route goes here in the "vertical sea of partial chickenheads". There is no "aha!" belay that we found. We ran out of rope (70m) and built a marginal belay at the top of p5(ish). **As long as you head for the right side of the big orange-white roof/flake clearly visible from mid p4** you will be on the route as you reach the right edge of the roof/flake. I belayed on great pro just below the orange/white roof/flake.
P7 Thankfully better pro and harder moves. The route becomes easy to follow as well. Stay in the broken dihedral after passing the right side of the orange/white roof/flake. Some hard moves above good pro as the route steepens for P7 & 8.
P8 The hardest moves of the route. Overhanging off-width. It is short and stiff with good pro. I put a #3 waaay up in there and gunned. I do not think a #2 would have sufficed.
Raps. Craaaaap! We looked for the raps for one hour. I would add to Charles description that you hike down the ridge about 400 feet past the "major incut" to the **small forest of cairns**. I thought they might be marking a walk-off trail or something, but they are marking the vicinity of the raps. I would also add that the raps are on the edge out left as you hike down the ridge and **just before the cliff that marks the end of the ridge**. If you come to the cliff, you have passed the raps by about 40 feet? There is a semi-hidden path that leads out to the cliff edge (from near the cairn grouping) Follow it through the bushes out left (north). When you reach the edge, look down and right and you will see the steel rings on top of a flat rock. You do not need to teeter out to the cliff edge to look over onto the face at any point. 2 single rope raps put you into the gully system following a lot of carins on strong trail *staying left* to the base. The downclimbing is steep for short (5 ft.) sections. Not scary. Aug 6, 2013
Boulder, CO
Also, due to some other descriptions, I read calling this 5.9 R and such I was almost scared away--- dont be this is a really fun route. This really felt in line with 5.8s I lead in Eldo, and while runout at times, if you can trust the pins on p3 to hold a short fall, it is not R rated. Sep 9, 2013
I think experienced trad climbers who are comfortable tackling run-out terrain will find this easy to navigate (e.g., the first two pitches above the ledge have some run out terrain but mostly trend up with a little rightward climbing; other pitches have pretty definitive markers like a roof or dihedral).
I can definitely see how newer climbers (or those uncomfortable with runouts) will get sucked off route by the promise of better pro, though.
Bottom line, if you are an experienced trad climber and comfortable running out (really fun) 5.6 face climbing, then you shouldn't have much of a problem. Jun 29, 2015
Santa Monica, Ca.
Yeah, until the run out 5.6 turns into wet run out 5.8+ because of a wrong turn. Jun 29, 2015
Denver
P5: climb nearly a full 60m on the face to the left of the prow. After a couple steeper sections, you will find a overhanging flake with a decent stance below it.
P6: look up and find the large, dirty looking, white roof. Your next belay is a really good, small ledge nearly 60m above you about 3m below the left edge of that roof (where a left-facing dihedral continues up). Climb on the left side of the prow until it starts to become less prominent and the face opens up above you. Continue on really good holds more or less straight up, past a horizontal ledge extending to your right, and up to your belay. This is the best pitch.
P7-8: continue past a piton up the left-facing dihedral, as it becomes dirty continue on its right side on good face holds. After about 40m, you will arrive below a large series of steep roofs and flakes. This is p8 as described be Vernon. My partner went more or less straight up these steep flakes, linking P7&8, which was quite terrifying to follow. They are not super consolidated. I'd recommend staying on route and passing this section on its right side. Cheers! Sep 14, 2015
Fort Collins, Colorado
Loveland, Co
Colorado megalopolis
Edit: I noticed Kristina's post below and wanted to note that my description tracks Rossiter's description and topo closely as that is the way I climbed it the first time I did it in 1999 and every time since then. Kristina's description sounds like another good way of doing it that differs slightly on the upper pitches and may actually more closely approximate the line that many people take when they get "off-route" on those pitches. Jul 7, 2018
Denver, CO
Route information:
P1. 30m. Once the snow has melted from the base, step off the ground onto a steep white quartz band 30' high which takes one directly into the large furthest-right facing dihedral on this part of the face. After 80', step right onto a ledge, and traverse right 15' past a pin to a splitter crack for the anchor (5.6).
P2. 55m. Step-left out on the ledge to a small, right-facing dihedral up for 15' to a hand-traverse right towards a suspended flake. Clip a knifeblade and then another pin while stepping right into the steep hand crack which is juggy on all sides and has a slung chockstone in the middle section. At the end of the crack where the angle lowers, step left across a slab into the middle of three right-facing dihedrals with a small grassy ledge (5.8).
P3. 55m. Head-up the steep, right-facing dihedral above the belay which is sustained, and when there is a slabbier bit on the right after 70', follow this thin crystal traverse right for 20' to a moderate crack through the small roof and then straight up following cracks to a large belay ledge of yellow lichen (5.8).
P4. 30m. Step left out of the belay, and traverse across this ledge until around the corner and then up moderate terrain staying left to reach the large quartz ledge at its far-right side (5.6).
P5. 55m. Climb straight up out of the belay on the far-right side of the quartz ledge, first in a layback crack and then on increasingly thinner terrain with a bit of a runout on face holds to reach the obvious corner crack which splits the left side of the whitish arete that defines this side of the second buttress. Sustained and excellent climbing brings one to a small stance just 30' below the obvious white ceiling in this side of the face (5.8).
P6. 55m. Head out of the belay trending right and up to bypass the large white roof about 20' right of the wide crack that defines its right edge. Step back-left after the steeps to gain this crack, and follow it mostly straight up and a bit right to another belay stance just below the top (5.9).
P7. 35m. Go straight up out of the belay taking the path of least resistance, and avoid pulling too hard on the somewhat loose blocks just below the summit plateau (5.8). Jul 7, 2018
"Our party left a bunch of gear on the upper pitches of the Hesse-Ferguson and Culp-Bossier routes, on 7/7/2019. Two of our group rapped the entire face urgently from the top and the last pitch of the H-F route in order to assist and help lower a climber injured in a ~70' lead fall on Culp-Bossier's P6 or P7 (hold broke, and 1 piece + a "fixed" pin pulled). We were able to use existing "tat stations" from the White Band down. Be nice to have it back (pm me or call me 5o579544o4, I'll pay you back in some way), but hey, we did the right thing based on the info that was initially yelled to us. We were too lazy to get it ourselves before we had to go home from our vacation the next day. So if you think you deserve it, keep it. More importantly the injured climber will be okay.
Other than that, we had a great time on Hallett! It's totally dry! Very impressed by and appreciative for the other RMNP climbers, rangers, rescue team, and Estes Park hospital staff we met on our trip." Jul 12, 2019
Longmont, CO
Golden, CO
P1: description above is spot on, climb the easy dihedral for 40ft, then cut straight left on a big ledge, follow a finger crack to many belay options. If linking with P2, consider rope drag from cutting straight left earlier.
P2: party in front of us immediately went left to the big dihedral you start in, but the route actually goes straight up off the belay (as the breakdown above says). We actually passed 2 fixed pins along the way and rappel slings, but there is also gear to be found. Just past a small gateway/notch is where you cut left, and head for the base of the middle dihedral.
P3. the dihedral is all sorts of fun with plenty of good gear. Once you get to the roof and begin traversing right, you do come to a fixed pin. However, the gear actually right above it is amazing (#1 Metolius Ultralight Mastercam which is just slightly smaller than a 0.3 C4. You probably could find a spot for the 0.3). Right after this placement or pin, you don't have good gear until the next pin pulling the small roof. Just have your head on straight, use the bomber friction feet and keep moving until the next pin. After the roof, meander your way up to a good ledge with many belay options.
P4: very short pitch. When is says cut sharply left, they mean it. There was actually a ticked hold out left with an arrow marking the way when we were there.
P5: route description above is spot on. Route finding was very easy for my partner. About 2/3 of the way up we passed a fixed sling/ or cord? Gear is great. My partner may have belayed a little higher than normal, but that just goes to show you have belay options.
P6: I lead this, and this is the first moment I could see someone getting off route. As the description above mentions, you want to head out right. However, the description makes it sound like you should do this pretty soon after the belay. I remained in the left-leaning dihedral for about 4 amazing pieces of gear before I headed out right to a larger left-facing dihedral. At this corner, I nearly started going up it; however I peeked around climber's right and saw the large, detached flake and the easy ramp that was on-route to the belay.
P7: get out on the face climber's left. Great climbing with a short 5.8 sequence.
P8: 100% take the crack below the roof! It was the most physical part of the whole climb but also the most fun with some bomber fists up high. If it was dirty before, it has since cleaned up. I did place the #3 for a split second to protect the move and then back-cleaned for the sake of rope drag (I didn't extend it).
Summit belay: the description made it sound like a belay was wise just before the actual summit to avoid knocking down loose rocks; however, I officially topped out and built a bomber belay about 10 feet from the edge. Def. be aware of where your rope is running and where you are standing. I managed to keep my rope and my feet off of any loose terrain.
Descent: make sure you walk past the first large gully on skier's left before you start seeing legitimate cairns. In fact, standing on the uphill side of the gully, I could make out a distinct cairn across the way on the downhill side. After more cairn following, you come to the rappel. 2 raps with a single rope (60m or 70m). The Rossiter guide has a very good descent description - get your hands on a copy, and snap a picture on your cell if you are concerned about the descent. Aug 26, 2019
Allenspark, CO
Boulder, CO
Bend
Westminster, CO
Longmont, CO
Boulder, CO
Denver, CO
Boulder, CO
Mesa, AZ
Routefinding was what slowed us down the most - specifically P6. You won’t see the “”right-leaning ramp with a detached flake… and a fixed pin next to it” - landmark until you’re right on it. So take the path of least resistance and occasional gear, keep moving up and right, and trust that you’re going the right way.
At the top of P5, my partner built a belay at the base of the left-leaning, left-facing crack which was an awkward hanging belay. However, if he stepped up and right a few more feet, he would have been on a comfy (for one) ledge with decent pro for an anchor.
We opted for the crack straight through the roof on P8. It was super fun and more burly (than the rest of the route… maybe .10-?) but had good pro with small gear and a #3 - we enjoyed that pitch considerably. After the roof boulder problem, the climbing eases up and leads to a wonderful blocky belay ledge just below a scramble to the summit.
The descent was straightforward but much looser and steeper than I expected. So just be ready. We dropped our packs near a cluster of trees at the base of the descent gully, and it was nice to not have to go back to the base to retrieve our packs. Saved us maybe 20 minutes and a little bit of work on our already tired legs at the end of the day.
Gear beta: single rack to 3, doubles 0.75-2, and nuts. I also used the smallest size ball nuts which weren’t essential but nice to have. Would take the same again. Jul 22, 2022
Conifer, CO
I brought a #4 as our backup plan was Better than Love. I ended up finding a number of spots to place it. My partner used it on the roof on the last pitch and was happy to have it. Certainly not necessary, but if you like to have lots of options like I do, it's nice to have. We brought 15 runners and used them all on multiple pitches.
Lastly, I didn't find the descent bad at all. Stay LEFT at all possible junctures, and it will spit you out just below the start of the route. Jul 24, 2023
Boulder, CO
- In Sept., the route was mostly shady. The forecasted high was 51F. My hands went numb on P3. A warmer forecast than 51F is needed.
- P6: many topos show a gradual drifting right. This is wrong. Go straight up, and when the crack peters out, make a sharp right turn, and continue traversing right on easy face holds for a LONG time. Steph Abegg's topo shows the right turn and is more accurate.
- P7: I don't understand why the runout face to the left of the crack is the standard route. There's nothing wrong with climbing the crack itself. It's very well-protected at the 5.7-8 cruxes (pro at head level), good climbing, logical line, not chossy, only a little grassy.
- P8: I didn't lead this nor try to place a cam in the "#3 Camalot crack", but it looked a bit too wide for a #3 to me. Secure climbing in the OW though. Bring a #4 if in doubt.
- The #3 is not optional, but one of them is sufficient.
- It is easy to leave a pack at the junction between the approach and descent (for all routes on Hallett not just CB). P8 is much harder with a pack if you choose to climb the OW, so it is probably worth carrying only 1 pack up the route for many parties.
Sep 18, 2023