Movable Stoned Voyage
5.10,
Trad, 1300 ft (394 m), 10 pitches, Grade III,

 Avg: 2.8 from 41
votes
Avg: 2.8 from 41
votes
FA: Jimmy Dunn & partner
Colorado
> Gunnison
> Black Canyon of…
> N Rim Routes
> N Chasm View Wall
 Access Issue:
 Seasonal Raptor Closures
Details
Description
The MSV is a recommendable tour of the South face of North Chasm View. Clean cracks and flakes on the Movable Feast--the kind of pitches one would actually climb on a cragging day-- link into the exposed upper pitches of the Stoned Oven via moderate rockaneering in gullies midway up the route.
Locating the start provided a few moments of uncertainty, although the information in the guidebook proved adequate and accurate as given. Once on route beta is sufficient; listed pitches are evidently long ones as even with a 70m cord we were unable to shave belay stances from the Movable Feast topo. As the guidebook beta is basically accurate, I won't detract from your adventure by providing unnecessary minutiae. I will add that on p.11 of the Stoned Oven we continued past the traverse move at the 1/4" bolt to belay around the corner on a spectacularly exposed ledge, which au cheval stance gives great views of the leader stepping across to a nice hand crack free of the rope drag which would have begun the pitch had we belayed from the bolt.
Thence follows the Womb Fight, a pitch that you pray your sport climber friends never catch you 'climbing', as it embodies all of the distasteful qualities for which bolt-clippers shun the rack. An awkward, graceless wriggle across a dirty ledge brings your face perilously near to ammonial slicks of ancient guano. The rope, your gear, all you've brought with you conspires to impede horizonal progress, while you struggle to clip dubious gear crammed between crusty flakes and dirt. Your partner isn't quite laughing, knowing that he must follow it with the pack. Hopefully no one across the way on the South Rim has binoculars. Although this pitch is indisputably classic, I did wonder what lay directly above, where a peg dish with a bolt appeared to lead into more a conventionally vertical escape. Anyone know about this one?
We were able to pull this off in 8 pitches, climbing at a moderate pace, with no threat of nightfall, so the Grade III tag sounds about right. The 1300' figure includes a lot of moderate terrain and traversing; vertical gain is less. I was pleasantly surprised by the quality of this route, and the way it enabled us to access incredible locations with a relatively moderate standard of climbing.
Protection
Stoppers and hexes, a double set of cams to 3.5", one #4 Camalot, and many long runners sufficed for comfortable leads with a 70m rope.
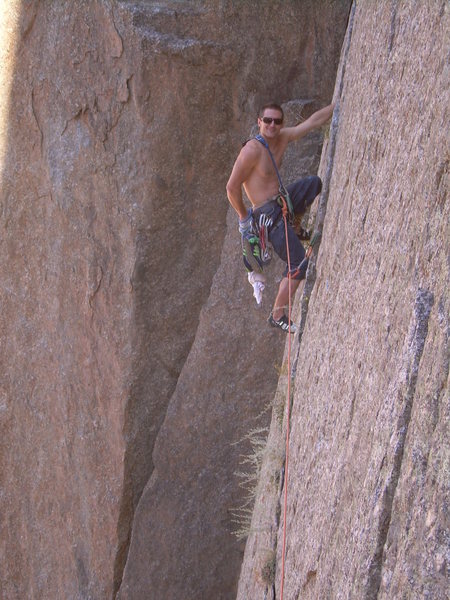
![Jason Seaver enjoying the graceful movements and superb rock of the Womb Fight.]()
[Hide Photo] Jason Seaver enjoying the graceful movements and superb rock of the Womb Fight.
![Jay enjoying the final belay ledge before the rim.]()
[Hide Photo] Jay enjoying the final belay ledge before the rim.
![Nothing else like it anywhere, and if there is, I don't want to see it.]()
[Hide Photo] Nothing else like it anywhere, and if there is, I don't want to see it.
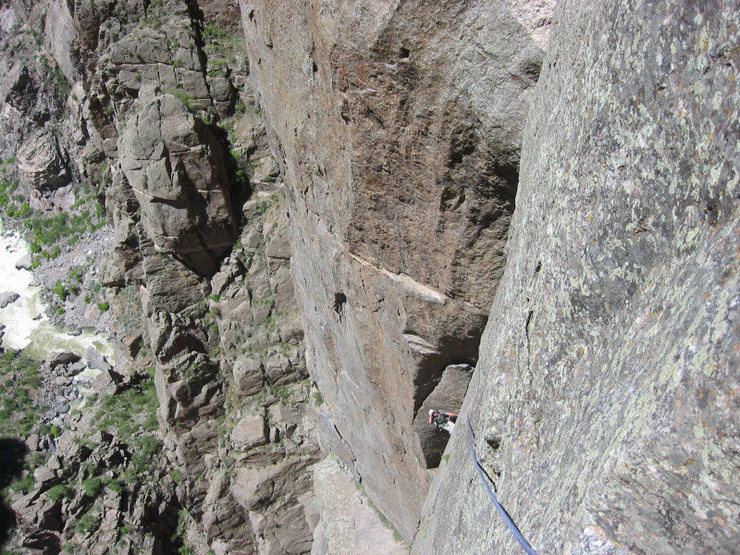
![Fritz on the traverse P3.]()
[Hide Photo] Fritz on the traverse P3.
![BETA! Do not climb the huge dihedral! Route finding is tricky. There should be a horn slung with old webbing, that is where you should build a belay for the traverse. allow plenty of time for the approach, as it is at the opposite side of the wall from the gully.]()
[Hide Photo] BETA! Do not climb the huge dihedral! Route finding is tricky. There should be a horn slung with old webbing, that is where you should build a belay for the traverse. allow plenty of time for the a…
![Wyatt following the 2nd pitch traverse.]()
[Hide Photo] Wyatt following the 2nd pitch traverse.
![Starting up the last pitch.]()
[Hide Photo] Starting up the last pitch.
![Doug Sinor leading up pitch 2 (5.10 bulge). It is best to set the first belay right below the bulge and after the .6 crack.]()
[Hide Photo] Doug Sinor leading up pitch 2 (5.10 bulge). It is best to set the first belay right below the bulge and after the .6 crack.


 Continue with onX Maps
 Continue with Facebook


Edina, MN
Boulder, CO
I've seen two basic sets of descriptions and ratings for this climb: the 10a version from the guide book (which is similar to a different and superior topo the ranger may be able to show you a copy of) and BD's version detailed in this thread. For my money, BD's is far more accurate; much credit to him for exposing himself to the potshots of internet snipers and calling the other route descriptions for the massive sandbags they are. I felt the hardest two pitches of MSV were at least as challenging as anything on the Scenic Cruise although SC contains more climbing and is overall more physically taxing.
Specific beta which annotates BD's annotations:
P2: The roof crack of the right is very good 10- climbing. The fixed sling on the flake is gone. The reach right is wingspan and fist size intensive; someone with shorter arms and smaller fists will find this move extraordinarily difficult for "5.9+". Some people break this pitch into two, belaying after about 60' at a cramped triangular stance; this is not recommended -- save your wider gear for above this point and do it as one, per BD's writeup although from the standpoint of ropedrag, you might be better off belaying at the bottom of the traverse rather than moving up the double cracks. Either way, a sensational pitch.
P3-7. With a little simulclimbing, we managed to do these five pitches as three with a 60 meter rope. The key is to break out of the P6 gully (towards the SO Ledge) fairly early. However you break this stretch up, you will want to belay after the chimney per BD's P5.
P8. A great pitch with pegmatite spice, cruxy underclinging, a long strech of solid hands and wide hands and finishing with a tricky face move and a wild belay perch. You will be glad you brought all of the recommended rack for this one. If this is 9+, Rosy Crucifixion is overrated.
P9. We did the left crack, 10+ per BD and, if I'm not mistaken, the Williams guide. Felt like 5.8 to me.
Womb Fight. Those felt misused by P2's fisty wingspan move have their revenge. The WF itself felt like low 5th (maybe even 4th) class groveling to me. Comparisons to a factory seconds version of Thank God Ledge seemed apt. I would describe BD's "right-facing corner" at the end of the pitch as a ramp.
P11. Still a hard move or two on this pitch. May 21, 2006
Tamarisk Clearing
I once met Don Reid, author of the Yosemite guide. The poor guy. Immediately upon letting on that he was in fact THAT Donny Reid, he issued what was obviously a much-practiced statement: "Whatever happened, I'm sorry." Jun 8, 2006
Western Slope
Overall, I agree with Dougald that this route is hyped way too much. Definitely the least enjoyable of the 5.10s I've done in the Black. Jun 16, 2007
Longmont
Colorado Springs, CO
The womb fight rules! Ha ha!
Give yourself some time on this one with the approach and all.... The crux pitch is NOT 5.9+. May 31, 2015
brad@gwynnepugh.com Aug 15, 2017
Lafayette CO
Carbondale, CO
North Mitten
Plagued by my faulty memory, I led us on a wild goose chase around the back side of the 4th Class scramble, up a narrow gully (closer to SOB). It got us to P1 ... eventually. Not recommended.
P1: romp up a featured splitter, peggish handcrack, belay at a good ledge at the base of the right-facing corner that starts as squeeze then goes to hands.
P2: climb up the little roof to the right of the wide corner, then traverse into the hands corner on good holds and gear. After some slammer jams, belay at a large horn off anything from #0.75 to #4.0, or sling the horn. We didn't see the value in linking into the traverse.
P3: from the horn, traverse right and down on positive flakes (not all of which are solid). Head up and into the opposite corner and pull a thuggy 5.10 move to get established. Your rope management will determine how far you can make it up the corner.
P4: climb a easy but funky section of the corner that would sew up nicely with the hexes you didn't bring. Eventually good cam placements appear. Cut up and right into a peggy trough / slot / corner, and run the rope as far as you can.
P5: continue up the peggy corner until you get to a peg chimney. Take the right of the two steep exits and belay on an excellent ledge.
P6: wander up the bushy gully to your left, then traverse hard right across a good ledge to base of the crux left-facing corner, which starts as a peg groove.
P7: dice it up on poorly-protected, greasy peg slab, heading up and right for the undercling that thankfully takes good gear (#0.5 to #1.0). Don't get suckered left too early. A proper offset fingers cam like a blue-yellow or purple-blue Metolius would take the sting out of the peg slab slightly, but it's still pretty zesty. Keep your head screwed on. Undercling and step left into the actual corner (hard!), and fight your way up some uninspiring, flaring jams in mediocre rock until you get to the bomber modern bolt that was replaced in 2020. The step-across move into the au cheval stance (manageable 5.10d) is superb -- too bad the rest of the crux pitch isn't as good. The belay position is wild. If you can save a #4 for it, you'll enjoy it even more. This pitch is stout for 5.10d, bakes in the sun, and has some bad fall zones on 5.9- terrain.
P8: a big airy step gets you into a fun 5.10 splitter. Rock quality deteriorates as the pitch progresses, but soldier on until you reach the money pitch of the entire route.
P9: yes.
P10: this could be combined with the Womb Fight, but then you'd miss out on the coolest belay perch and killer photos of your partner following the pitch. Start this pitch at the ramp just at the end of the Womb Fight, and gallivant up and right while chortling with glee.
P11: walk up the trail (Class 2), and mantel the chain-link fence from a sit-start at V4.
Overall, I'd say the route is worth doing once just for the Womb Fight. In another eight years, I'll probably forget everything I've written here and do it again. May 8, 2022