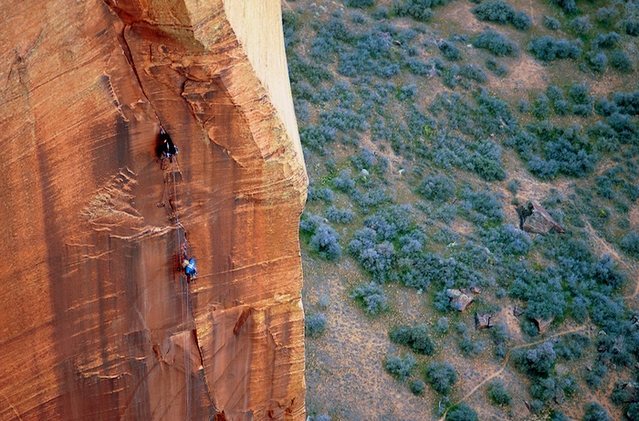
This is a great clean aid line to the left of the
Moonlight Buttress route. A beautiful, straight-up line with lots of good nutting and tricky clean aid. The original first two pitches are loose and not recommended. Pitches 1 and 2 follow
Moonlight Buttress. Leave bags below the anchors of pitch 1 where the 5.10 variation goes.
P1 (5.8) Start way left and scramble up 3rd class ledges and toss rope around bushes. Belayer needs to go up a few ledges (about 20 feet) so that 60 meter rope will reach anchors.
P2 (5.10 or C1) Traverse right and throw overhang with small gear. Follow crack to anchors below large, closed-book corner. Don't haul on pitch 2, just drag haul line up P2 and P3 then easy haul from anchors on top of P3.
P3 (5.10 or C1)
Moonlight goes right,
Lunar goes left up through large, flared chimney with a good crack in back. Good free climbing, much easier than aiding.
P4 (5.9 C1) Can be done in two sections; not a bad idea due to rope drag. From ledge ascend obvious crack (5.9) to mantle, traverse right ~15-20 feet to bolt and beginning of C1 and the Halfmoon Traverse. If done in two sections can easily belay from nice ledge above mantle and haul all of pitch as one.
P5 (C2) Begins the real meat of the route. Some fixed pieces to a Steep, thin crack. Hanging belay.
P6 (C2) Pitch is called "Leapfrogging Aliens" and that's what you do. Steep, thin crack. Hanging belay.
P7 (C2+) Same thing - steep, thin crack, this time broken by the Amoeba, a large mass of rock mysteriously clinging to rock face. The top of the pitch has dicey, sandy, mandatory 5.7 move to anchors.
P8 (5.8 C1) From belay ledge carefully free climb (5.8) up sandy rock steps to crack. Possible to place small gear in horizontal crack. Easy C1 up crack takes you to huge ledge.
P9 Two options: The original finish goes up right from multi-bolt anchor and has loose sections with mandatory free climbing. The Jarrett Finish (recommended) starts from the left side of the large ledge from the two bolt anchor.
P9 Jarrett Variation (C1) Loose C1 at start to bomber, steep, and exposed C1 for bulk of route. Finishes at two bolt anchor at lip. Can back up bolts with extra lead line tied to tree. Bring bags and follower(s) up to two-bolt station first. Then, make easy work bringing pigs and people over lip.
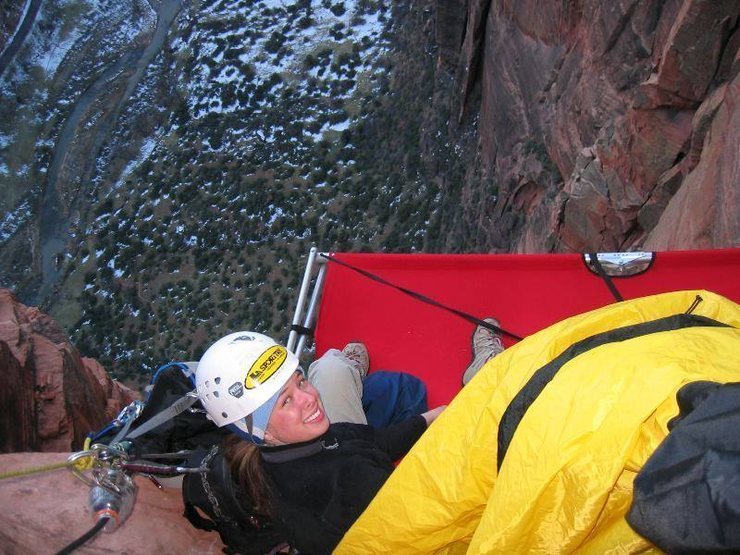
Bivy Huge ledge on top of Pitch 3 with 1 distanced pin, three equalized bolts, and one distanced bolt. Good for two portaledges.
Good ledge on top of pitch 4 with three equalized bolts and additional bolt for portaledge. Best suited for one portaledge.
Pitch 7 is okay bivy with three or four bolts and one pin. Easy to set up two ledges.
Huge, monstrous ledge on top of pitch 8; two bolts on left side of ledge and multiple anchors on right (2 or 3 pins and 3 or 4 bolts). Great for multiple ledges.
Ledge on top of pitch 3 could be slept on without portaledge, although uncomfortably. Pitch 8 would be a great sleeper ledge without portaledge.
TopoOffset aliens and nuts work great. Multiple sets of aliens, as many as five per certain sizes. Up to #4 Camalot with 1 each #3, 3-1/2, & 4. 2 sets ball nuts. Didn't need hooks. 60 meter ropes recommended.
Hike up and right from tree to canyon rim and you can easily spot the paved trail that takes you to the Grotto Picnic area.


 Avg: 3.7 from 79
votes
Avg: 3.7 from 79
votes
 Access Issue: Seasonal Raptor Closures

 Continue with onX Maps
 Continue with Facebook


Flagstaff, AZ
We took two sets of HB off-set nuts which, with a little back cleaning, turned out to be enough. Off-set Aliens were also helpful.
We climbed the original finish and thought that it was pretty cool. The last few moves are dicey as the rock is a little soft and the pin scars are pretty boxed out.
Once I get them developed and scanned, I will add a few photos. Apr 1, 2005
Glenwood Springs, CO
Lander, WY
denver, co
After that pitch I thought pitch the next 2 pitch's were no harder than C1+/C2-...no big deal really. A talon hook was key for 2 bat hook moves one around the amoeba, and one near the top of that pitch- both are marked on the topo from Bigwall.com.
We took a double set of HB brassies and used mostly the bigger ones...we were quite surprised at how little we actually needed the offsets..however they were key in a couple of spots. We did not have any of the large offsets's and it didn't matter. Offset aliens were nice a couple of places.
A very fun route!
josh Feb 26, 2006
broomdigiddy
Glenwood Springs, CO
Grand Junction, Co
St George UT
Fort Collins, CO
We took 3 sets of micro thru large DMM offsets up with us along with a set of tricams and lots of small cams. Didn't need the ballnuts. Did take 2 hooks with us and used them both a couple of times. A handful of screamers were nice to have in a few places.
Great route!! Enjoy! Nov 5, 2008
La Sal, UT
Direct start was super cool...
Third Pitch is awkward as hell to aid (Talon useful)...
The Half Moon Traverse (pitch 4) seemed harder than the topo indicated (we counted less bolts than shown on the topo)
Old "crux" pitch was NTB...tricams and a hook were key..Nice spread for a ledge here.
"Alien Leapfrog" pitch seemed longer than 120'.
The "Amoeba pitch" goes well with thin brass offsets and a bathook hole (when you are stumped feel around..Hard to see)...The free climbing was NTB...decent stance here.
Pitch 8 went quickly...
Jarret Finish is steep and fun....Many, many gold aliens, Final bolt is gone..hooks and horizontal...Good bolts @ lip.
We used:
2-3 sets Brass HB
2-3 Sets Aluminum DMM Offsets
pink, red, brown tricam
2 sets offset aliens (yellow green was the MVP)
hooks (Talon and filed Cliffhanger)
1 #3 splitter 2cam
2 set large aliens
2-3 set small aliens
1-2 #2 & #3 camalots
#4 Camalot optional (could easily do with out it)
We brought a lot of shit,took our time, ate, drank, and slept well...Great Vacation..
Route gets a good amount of sun (esp the upper half) Dec 3, 2008
broomdigiddy
Minturn, CO
Littleton, CO
Moab, UT
1st pitch: Easy 5.10 variation
Pitch 2-3: There was a slow party on the shared 2nd pitch, so I climbed straight up from the top of the first pitch. I believe this is an established variation, but it didn't look like many people have climbed it. The variation felt 5.10+, very sandy in some spots. The great thing about this variation, is that it bypasses the original 3rd pitch.
4th pitch: The half moon traverse; Easy C1/C2. Bivied at the farewell ledge. (Wonderful Exposure)
5th Pitch: pins to a few pods that are completely worn out. Bypassed by stick clipping a pecker! Very thin! Brass offsets, hb offsets are key! C2+/C3-
6th pitch: I believe this was the pitch where I leapfrogged my C3 #0, 1 and 2. Offsets weren't as useful because it was more splitter than flare. C1+
7th Pitch: IDK how the amoeba is still attached to the wall!! There are a few good size death blocks on top of the amoeba that moved every time I tried to aid/free past them. Sketch!
The remainder of the pitch after the amoeba is very thin, flared, worn out and sandy. I had to make a couple funky aid/free moves 30 feet up from the amoeba; this was the crux for me, mentally and physically (I used ball nuts, hooks, tricams and other stuff to figure out this spot (C3-?)
The MP beta says there are mandatory free moves to the anchor, this is not true. I placed a yellow Totem cam that had one lobe bearly engaged, and standing in the top step on the tips of my toes (I'm 5'9"), I bearly slid in a bomber offset cam.
8th pitch: Sandy, but easy free climbing for 30 feet (5.7). C1+ for the remainder.
Huge ledge at the top.
Pitch 9: I did the original finish; the mandatory (5.8) free moves felt committing, mostly because it was dark and sandy with only mediocre pro. The last 30 feet is worn out. I was lucky to have offset cams and totems. The very last moves are clipping a pin and doing an easy mantle. (5.8 C2)
I used : Metolius Offset cams (1 set), brassies (2 sets), dmm offsets (2 sets), C3's (3 sets), Totems (1 set), link cams (1 set), ball nuts, tricams and hooks. Dec 27, 2014
SLC
I feel like my rack was pretty spot on for this climb, I wouldn't change much.
-2 sets offset mastercams. The yellow/blue was the MVP on this route. I did use the two smaller sizes more than a few times. Didn't really need doubles of the two largest.
-1 set DMM offset alloy and micro brass. Used a few times in spots where the cams wouldn't fit.
-1 Full set of stoppers.
-doubles of C3 sizes with 3 Greens.
-doubles .4-2 with 4X .5 and .75 (could have done with 3).
-single 3 and 4 C4. Didn't need the 4 and could have done without the 3 if willing to freeclimb 4 feet...
-2 hooks, Used both.
-16 alpine draws
Bringing a large selection of brands helped a lot.
Fun route, easy to do in a day if you are a competent aid climber. Get after it! Mar 26, 2015
Flagstaff, AZ
SLC
Fucken Zion
Bozeman, MT
Springdale
Johnny Ringo said, "IDK how the amoeba is still attached to the wall!! There are a few good size death blocks on top of the amoeba that moved every time I tried to aid/free past them. Sketch!"
Considering when I climbed past the amoeba (Spring 2018) I don't recall anything moving I assume those "death blocks" are no longer present. However, I will say I agree with JR and I too don't know how the amoeba is still attached! Leading past the amoeba was the crux for me. If I recall right I hooked a drilled hole and then had to free climb out of it. The free climbing wasn't difficult, maybe 5.7 or 5.8 but its hard for me mentally to free out of my ladders. It's possible that the same move could be solved differently but that is how I did it.
Also I did the Jarrett finish. This variation came highly recommended by a friend. I also would recommend it. Super steep+super exposed+good gear=super rad! I personally didn't like the hauling anchor at the summit lip. I backed it up to the summit tree. A bit of a pain but worth the peace of mind.
Otherwise a superb aid route. I feel that it is just difficult enough to be interesting but not so difficult that it's terrifying. Not to mention the Moonlight formation is iconic and way better position than the Moonlight buttress route. Def would recommend aiding Lunar Ecstasy way better than Moonlight Buttress. And way less traffic. Enjoy. Feb 7, 2019
Fucken Zion
Center of jah universe
BeaUTAHfull
Salt Lake City, UT
I certainly did not notice any death blocks around, so no worries on that front.
Thank you to whoever re-bolted the whole route with glue-ins. They are very confidence inspiring! If there was a missing bolt on the Jarret finish, it must have been replaced. However, the anchor bolts/hauling bolts at the end of this pitch need to be replaced. The one on the left is pretty worn out (the hole is deteriorating). That being said, there are two glue ins right under it that can be used in conjunction.
Great route with a spectacular position. Incredible views of the canyon! Oct 26, 2020
College Station, TX
P5 -> 4 is obvious, double rope rappel. From there (the farewell ledge) you have two options. (We did #2 not knowing any better)
1. Send the first person down with minimal weight, they can redirect the rappel off the last bolt of the half moon traverse to push the rope a bit further left. That way when they rappel alllll the way down, it will put them right on the edge of the top of the P3 chimney when your feet touch, and you can do the 10ft scramble back up to the P3 anchors. Fix the ends to the anchor and the others will rappel right down to you. No redirect probably works too but it might be a little harder to catch the edge with your feet. The critical part is that you do NOT go into the chimney. From there you would do a double(?) rope rappel to the P1 anchors. At the top of P1 look down you’ll see another set of anchors well below you. A double rope rappel gets you there. And finally, a single rope rappel gets you the last 30 ft to the ground.
So now option #2, which only happens if you goof like we did. You can rappel straight down from the farewell ledge and make it to the base of the P3 chimney with 2 60m ropes. From there you will rappel down and trend climbers left through a small tree/bush aiming for a vegetated ledge. 2 60m ropes will make it but there is not much margin. When you touch down, look climbers left and down about 25 feet (through some bushes) you’ll find two bolts you can use to rappel the remaining 30 ft. to the ground. The only misgiving about this method is the 25 ft transfer before the last rappel. It’s a little sketchy/thorny/steep but you’re not going to fall off the mountain. Also be careful the rope likes to get stuck in several places when pulling, especially in the trees. Good luck! Sep 30, 2021
Utah
Flagstaff, AZ
Park City, UT