
 Continue with onX Maps
 Continue with Facebook


Micro cam nesting


|
I've done a few different ways recently of doubling up on micro gear, looking for discussion of pros/cons of each and to hear what others prefer (obviously situation specific). 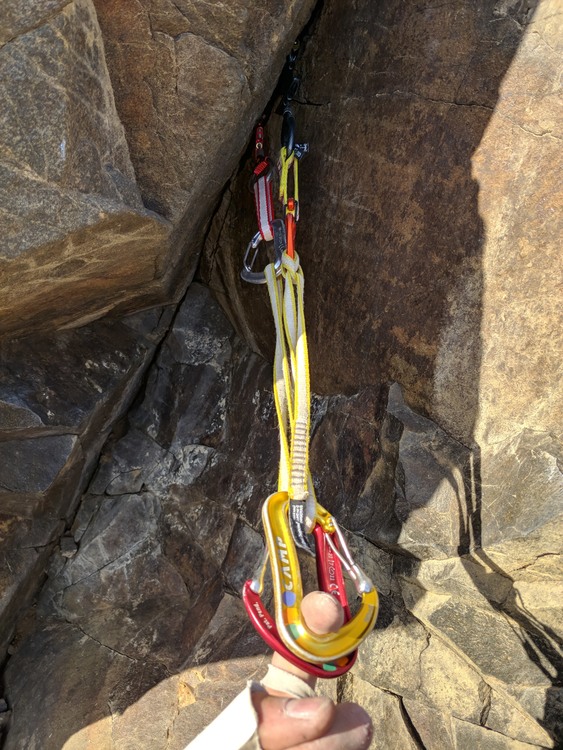 Clip top cam to bottom cam sling, basically one backs up the other. Was fast to set up, and to clip them both to the rope I would have put a draw on the upper one but then the 2 rope connection points were at the same height and the wiregates could fight each other (risk of unclipping). Only 1 rope connection here tho and if that unclips I'd be in trouble. Not at a good stance so did this one-handed. 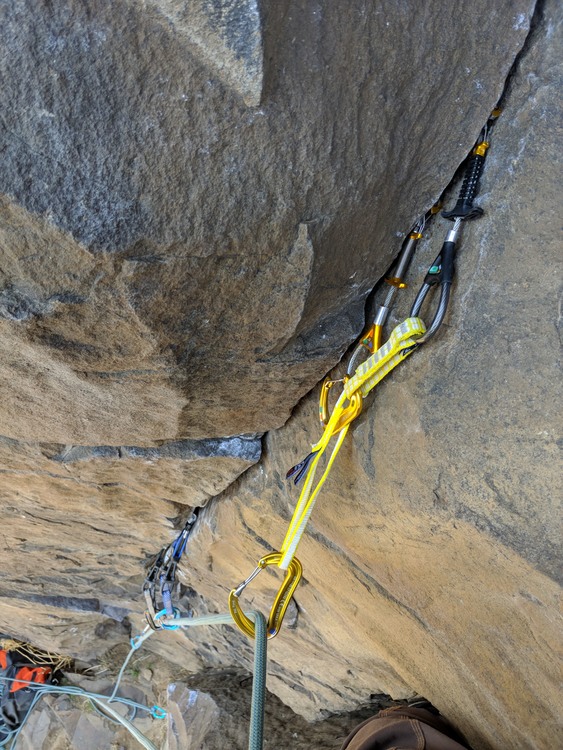 Clip both separately to rope? Super simple, any downsides? Other methods? What about joining 3 or more tiny pieces? Here's a single-pitch belay anchor I made on top of a sketchy pillar. Black totem doesn't feel like micro gear but it still is. What could I have done differently to better share the load here without adding a ton of extension risk? Granted the forces are low unless I jump backwards and I tried to keep it tight while belaying. 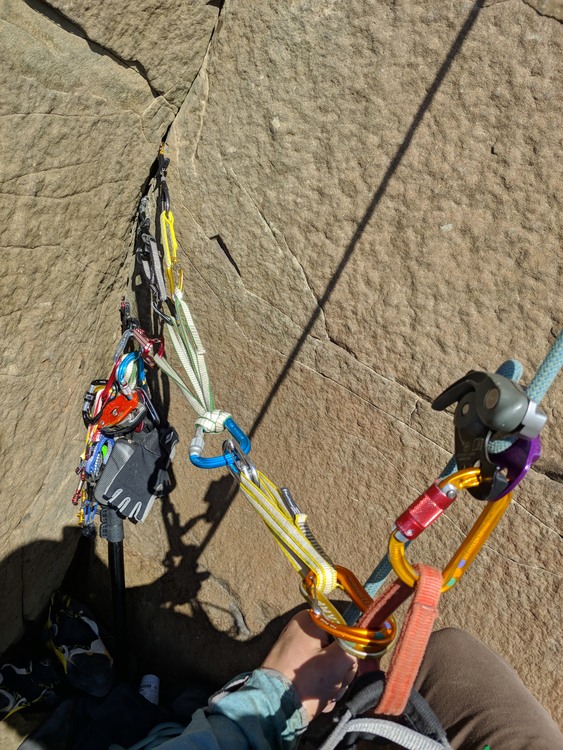 |
|
|
Yesterday, I built an anchor with three tiny cams with marginal placements. Individually, they probably wouldn't hold any kind of a fall. But all together, as an anchor, they probably wouldn't have held a fall, either. Perfect! |
|
|
 |

|
Interesting question. I'm a proponent of the "rest, nest, and fire" but I'm not sure there's consensus on exactly which type of nesting is best. Maybe some UK grit climbers can chime in, they're probably the most qualified. A bit of a cop-out answer, but I think the best would be to use half-rope technique. If the pieces are close to each other and with a good belay, each piece should take about half the force. With the stretch of the ropes, I bet you'd get pretty decent equalization, and no extension if one fails. With a single rope, I'd think that keeping it simple and easy to do on lead while limiting extension is more important than trying to equalize (which isn't really achievable, especially on lead). If the pieces are close, I'd just clip them each separately to the rope. If there's space between them, use a draw or sling to extend the top piece so they clip the rope close to each other, limiting extension to reduce peak forces on the lower piece. |
|
|
My comment above is based on the assumption we are talking about nesting on lead. Are we talking about lead pro or belay anchors here? For gadget's picture above, it would be a big improvement to attach to the anchor using the rope. That's a very static setup and uses 2 extra slings and 4 extra carabiners. Clove that blue biner or use one extra locker to clove into it. Either would go a long way towards protecting the small gear from high peak forces, moreso than tying them together in a fancier way. |
|
|
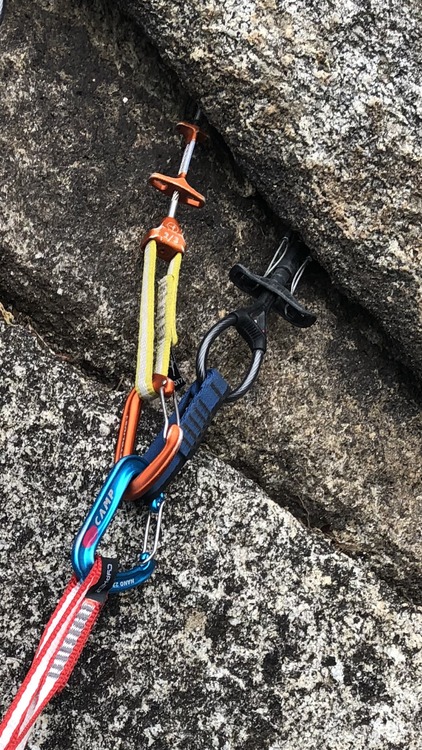
I think clipping them separately on lead if they are close to each other (minimize extension as you said) seems like the easiest as long as you have some confidence in the pieces holding separately, and it also gives you 2 attachment points on the rope. I think the trickiest situation is when you have a few marginal placements on lead and really, really want them to work together. Quick sliding x with limiter knots? Agreed on tying in with the rope, definitely do that for multipitch, this was a single pitch belay stance but I guess I could have fished out the other end of the rope and tied in. We then swapped places and I climbed so the sling tether was easier to get in and out of. It was just a single alpine draw, the extra carabiners were from the green double length sling I used for the anchor. |
|
|
K Go wrote: I think having two different half ropes clipped into two separate pieces that are close together in a straight up crack is a good way to lower peak force In a fall. They will both share the load a bit in a fall(albeit not perfectly), and if the upper fails it will be the smoothest transition to the lower piece- no extension, no extra new slack in the rope as a piece pops. Correct me if I’m wrong here:) |
|
|
K Go wrote: There's nothing quick about a sliding x with limiter knots on lead. Maybe you have a no-hands rest on this route, but you'll eventually encounter a route where it's impossible to tie a sliding x at a cruxy stance. Unless you're in deep on a head-point project and it's pre-rigged before you leave the ground. But in a dynamic load, a sliding X still doesn't equalize as well as we wish it did. If the crack is uniform enough, you can move the placements up/down to level their clip in points, but of course you don't want to sacrifice the perfect placement either.
I hear ya that it seems silly, but I'd argue that it's less faff than trying to tie up a sliding x with limiters on lead, and will almost certainly better achieve the strength you're looking for. Sure, it won't improve a non-existent rope drag problem, but there's nothing inherently wrong with using half ropes on straight up cracks. Of course half ropes don't always make sense for various other reasons either, so like always, it depends. |
|
|
You're both right, half ropes can still be beneficial even running straight. These routes are mostly good gear just a couple thin pieces off the deck. I haven't experienced half rope management on lead but single pitch could be a great place to practice. 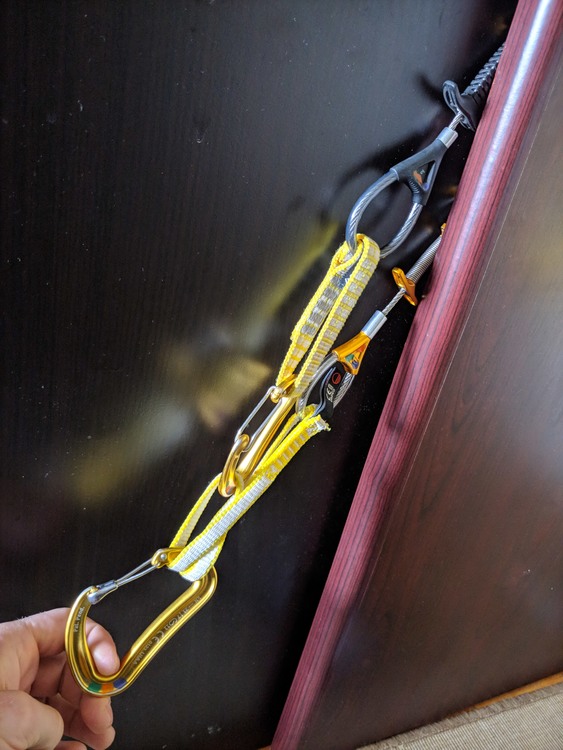 |
|
|
Sliding X on micro cams is best avoided. You’re better off just using draws of the correct length so they’re clipped next to each other or nearly so. Even if they’re an inch apart and the top one blows, the bottom one is only catching a couple of Kn, very safe. |
|
|
Why do you suppose it’s called a “nest of courage” and not “nest of marginal cam placements equalized together to hold a fall”? |
|
|
There's an old paper that looks at successive gear failure (titled "sequential failure" or something like that; I'm sure google can find it). The punchline is that when the top piece fails, it generally reduces the force on the subsequent piece. Consecutive failures make it more likely that something will ultimately hold. This is consistent with the experiential evidence: nests/life boats work (in general). You might rip a piece or two, but something will hold. The most effective strategy is to: 1. Place the best gear possible. 2. Clip as normal, or using the ad hoc load distribution strategies upthread. A sliding x is not worth the effort. The series failure is a better option than extension. 3. Commit to the moves and don't fall. In other words, the classic "nest, rest, fire" strategy mentioned above persists for a reason. |
|
|
Derek DeBruin wrote: This? https://mra.org/wp-content/uploads/2016/05/Beverly_Sequential_Falls2.pdf TL;DR: If you place small or otherwise questionable gear, the most important thing is the difference between how far you fall initially and how far you fall after the first piece fails before the 2nd gets loaded. My interpretation is that clipping pieces separately but a foot apart is hoping the top one alone stops you but if it just slows you down a bit then blows, then the 2nd one has to do the rest of the work of the initial fall plus the additional force of the new fall distance. Using a sliding X allows them to work together to arrest the initial fall, and if the top one still fails you are falling an extra foot or so which is similar to just placing 2 pieces a foot apart except you have a better chance of them holding together in the first place. If it is possible to equalize with a short runner (or using the extendable sling like in my last pic), I think there is still some benefit, but also adds risk of the extending sling opening a carabiner gate or something weird. If it's too much of a faffe just put the pieces as close together as possible and clip separately. Who likes science? I do, huge nerd. Ok here goes. Very interesting, they looked at the stiffness of the rope system including stretch, knot tightening, etc. and used that to both measure and create models for the force applied to anchors in lead falls. They look at both zippering up from the bottom and "un-zippering" when gear fails top down. They found that the rope system stiffens significantly after an initial fall primarily due to knot tightening (the knot stays tight) so subsequent catches are even harder. Interestingly, they found that the rope dynamics played a much smaller role as the dynamic unloading of the rope during an anchor failure seemed to reset the rope length a bit before the 2nd piece catches, but it does stretch some from the first fall of the day. This table shows a single catch followed by 3 more tests simulating a failing top piece (2 impacts per drop), notice how much the top anchor force goes up after the initial fall. 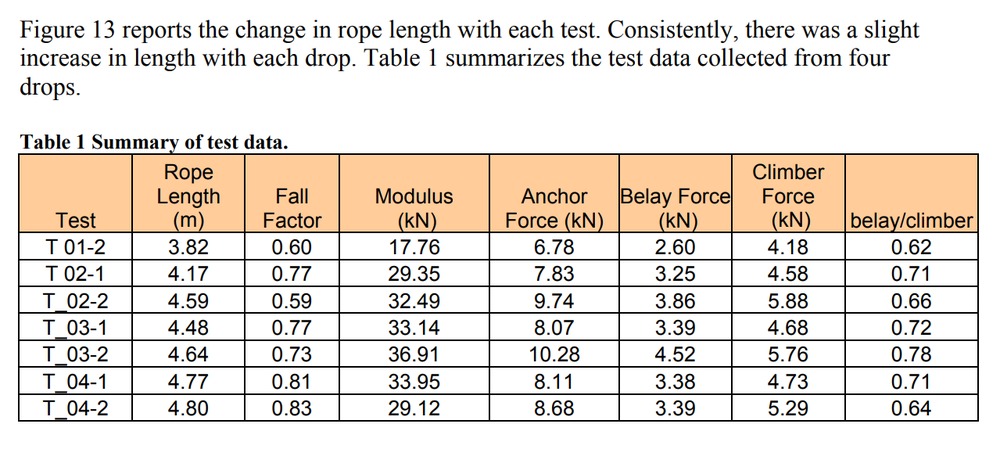 "If anchors are placed at equal spacing and have equal strength, then the addition of an equivalent fall height as a result of residual velocity insures that the fall factor on the second impact with be higher than the first. This means that if the first anchor fails, the rest of the anchors will fail. If the top point fails due to fall from a height equal to the anchor spacing, then sequential failure is almost certain for equally spaced, equal strength anchors." Basically the top anchor does work on you to slow you down, but if it fails it won't reduce your speed to zero and if you then fall the same distance you just did but now with an initial velocity you will hit subsequent pieces with more force and they will all blow if they are the same strength. Things were a bit more complicated for non-equally spaced anchors. They made a model for predicting whether the 2nd piece would fail after the first failed, using 1.7m from climber to top piece, 0.92m between top and middle piece, and varying distance from mid piece to belayer. Anchors were set to fail at 7.8kN. Here's a graph, where any data bar that is zero height means the anchor doesn't fail. Distance to belayer is the Initial Fall Factor.  They made accurate measurements of system stiffness and showed that knots play an important role. The figure 8 follow through absorbs the equivalent of 1.5m (5ft) of fall force for the first impact but almost none for the 2nd impact. They recommend lowering after a fall on a dubious piece of gear (even if it holds), untying and switching ends of the rope before retying in to regain this shock-absorbing benefit of both an unstretch rope end and a freshly tied knot. Also good for a mental break and to re-evaluate your climb approach. |
|
|
Interesting study above. |
|
|
Thanks for your example! |
|
|
Nesting is ok, sliding X connecting them is a waste of time. Just clip the rope to each in series, done. |
|
|
K Go wrote: And I'm also not super stoked on placing tiny gear (0.3 and down if I have to climb above it a body length or more) but there are a surprising number of 5.8-5.10's at Frenchman Coulee with some pretty thin gear, either a few moves off the deck or throughout the route. As per above images, you seem to have a black totem, so I assume you also have a blue one. I have shifted somewhat what I consider to be small gear after taking 2 falls (piece roughly at the feet both times, once on on slightly slabby face and other the cam was placed in a mini-roof/lip, so the fall what in thin air) on the black totem. It held perfectly, didn't bulged at all both times. I now consider the blue to be just as good as .4, .5 etc.. and the black to be almost as confidence-inspiring a placement. |
|
|
K Go wrote: Great topic Gadget, thanks for bringing it up! For what it’s worth in the Gunks it seems like there is no shortage of thin gear available on juggy moderates. It’s easy to get lulled into just placing a thin piece and then moving on up based on the ease of the actual climb. Recently though I’ve been trying to incorporate sliding x’s for thin gear where no hands rests permit. It really just comes down to the amount of time it takes on lead. Nest, rest, and fire seems the most ideal. Great photos and whatnot though to get the ideas flowing. |
|
|
I do have the black and blue totem (all of them up to red) and they are super confidence inspiring in the right rock types, i.e. non crumbly choss. I trust the totems more than similar sized Z4s generally, especially if it's weird, flaring, wavy, etc. So far my only trad falls were a 0.5 Z4 and #1 WC Friend in granite (both held) and then another 3 times on #1 WC Friends in the creek (all held). I've been thinking about staging some falls on gear with a backup belay but haven't done it yet. Thanks for the nudge! And by a safe setup for practice falls, you mean not like this dude. He takes repeated intentional whips on a single piece that would definitely be a decker if it blows. At least put in a nest or clip that bolt right below, jeez dude. He mentions backing up or using a TR setup but just yolos it. |
|
|
@gadget: I think you may be overestimating the actual utility of a sliding x. It's ability to evenly distribute the load is not actually that great, so there's a strong chance you won't achieve the desired loading regime, especially as you climb past it and it's left to its own devices. Practically speaking, if the climbing is at all difficult it might actually be the thing that pumps you out enough that you fall when you otherwise wouldn't have, which defeats the whole point. That's why you see the recommendations to just build a nest, clip them in the easiest way possible, and make moves. I can think of real world examples for 3 routes off the top of my head where this strategy was effective in arresting the fall, in spite of a piece failing. Note that in many of these situations, the gear doesn't break (and certainly doesn't actually see the loads in the cited paper) but fails due to placement and/or rock failure if it's soft/chossy enough. Little gear is easier to rip, even if it doesn't break. |
|
|
Friends don’t let friends sliding X. End of. Think of it this way: two pieces clipped separately a foot apart, top one fails, load falls to lower piece, which is bad, but also contributes a foot of rope to the system. Better than a poke in the eye, right? With a sliding X, the amount of rope stays the same and that shock load is handled by a static sling. That’s a recipe for broken rocks and broken cams. |


