|
|
Bruno Schull
·
Dec 9, 2021
·
Unknown Hometown
· Joined Dec 2009
· Points: 0
Hey folks, I imagine the title may give some people the shivers--don't worry, I'm not going to run out and buy a drill and start bolting...yet. - I recently helped bolt a dry tooling route with a friend of mine who is a certified mountain guide, and a setter of many rock and dry tooling routes in the area. If we were being more formal, I guess you could say he is my "bolting" mentor. His tips and tricks were really useful. It was fun, it was hard, and it was spicy (fully weighting ice tools hammered into placements to reach up high with the drill to get in the next bolt). It definitely gave me a better appreciation for the work and craft that goes into routes, and it makes me excited to look for more new lines.
- I'm from the US, but I live in Switzerland. My guide friend is Swiss. So all this is Euro-style. The rock is limestone. If anybody could help with my inexperienced questions, I would really appreciate it. Of course, I can ask my friend, but I have a little bit of "hero worship complex" and am somewhat embarrassed to throw all these questions his way.
- We used 10 mm stainless steel bolts where you drill a hold, place the bolt and hanger, and tighten up the nut with a 17 mm wrench. What do you call bolts like this in English?
- How important is it to have the hanger sit completely flush with the rock? Sometimes the fit seemed perfect. Sometimes there were small divots and edges that held the hanger a little away from the rock, but it all seemed fine when we tightened them down. A few times, I sort of flattened the rock a bit with the hammer, before placing the bolts. Is this normal?
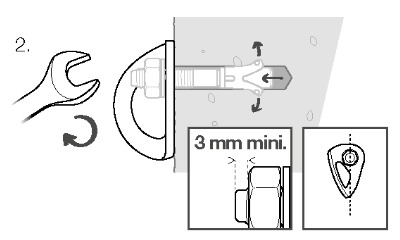
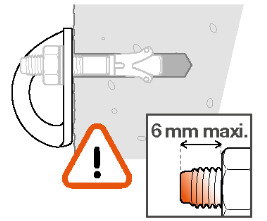
- What are the guidelines for how much of the threaded portion of the bolt should protrude from the nut when everything is snugged down? I tried to strike a balance between getting the bolts as deep as possible, but leaving enough threads sticking out. When the nuts were snugged down, about 2-4 mm of bolt were typically protruding. Is that OK?
- Once (just once) as I snugged a nut, it got tighter and tighter, and then suddenly it seemed to get looser. I was afriad I might have overtighetned it, although I wasn't applying that much force. I stopped turning it, but my friend said I should try a little more, and then it started to get tight again. What happened? Did the cone just slip for a moment? Did a small feature inside the hole break? How common is this? And should I be concerned? I do understand that slighly looser is better than over-tightened. Do folks use a torque wrench to gauge this when starting out?
- Once you have a bolt placed, and the nut snugged down, is the general idea that you don't touch it anymore? What if you noticed that you screwed up, and the hanger is upside down, or something like that. This didn't happen, but I'm trying to immagine a situation where you had to unscrew a previously tightened bolt. Is it OK to tighten, un-tighten, and then re-tighten a bolt, or does that damage the cone and sleeve, or enlarge the hole, and so on?
- Let's say you screw up somehow, maybe holding the drill wrong, and the hole just seems too big. Again, this didn't happen, but I could see it happening. Are there oversize bits and bolts available, for example, 10.5 mm, or 11 mm, to correct mistakes?
- Last, this is more a style question, but our approach was to place a bolt, clip in with a Petzl Connect lanyard (the one with two arms), move up, find a placement for a tool, hammer the tool into a crack or hole, clip to the tool with the other arm of the lanyard, move onto that placement, and repeat until it was time to place the next bolt, and so on. We put in about 10 stainlesss steel bolts, and a nice anchor with a chain, a rap ring, and a old locking carabinner. It goes at around D9, but we will probably add a foot placement or two, just to make it less tenuous and insecure, and more fun, which would bring the grade down to abut D8. Anyway, my main question is about hammering in the tools to get solid placements to move upward. On the one hand, it really helped to feel secure while moving/drilling/clipping. It also had the benefit of establishing/enlarging the future tool placements. On the other hand, it felt like cheating! But, I guess it's all aid, right? We're talking about crag bolted dry tooling! Thoughts?
Thanks.
|
|
|
Jake Jones
·
Dec 9, 2021
·
Richmond, VA
· Joined Jun 2021
· Points: 165
Bruno Schull
wrote:
Hey folks, I imagine the title may give some people the shivers--don't worry, I'm not going to run out and buy a drill and start bolting...yet. - I recently helped bolt a dry tooling route with a friend of mine who is a certified mountain guide, and a setter of many rock and dry tooling routes in the area. If we were being more formal, I guess you could say he is my "bolting" mentor. His tips and tricks were really useful. It was fun, it was hard, and it was spicy (fully weighting ice tools hammered into placements to reach up high with the drill to get in the next bolt). It definitely gave me a better appreciation for the work and craft that goes into routes, and it makes me excited to look for more new lines.
- I'm from the US, but I live in Switzerland. My guide friend is Swiss. So all this is Euro-style. The rock is limestone. If anybody could help with my inexperienced questions, I would really appreciate it. Of course, I can ask my friend, but I have a little bit of "hero worship complex" and am somewhat embarrassed to throw all these questions his way.
- We used 10 mm stainless steel bolts where you drill a hold, place the bolt and hanger, and tighten up the nut with a 17 mm wrench. What do you call bolts like this in English?
Expansion bolts. There are a variety of manufacturers, but only a few that manufacture with the specific intent of climbing use. - How important is it to have the hanger sit completely flush with the rock?
Very. It's paramount. Holes that are drilled in any other angle/orientation than perpendicular are wrong. Also, the hole should be drilled with the resting position of the hanger in mind as well. All the pieces of the system make up a complete fixed protection entity. They're all important. - Sometimes the fit seemed perfect. Sometimes there were small divots and edges that held the hanger a little away from the rock, but it all seemed fine when we tightened them down. A few times, I sort of flattened the rock a bit with the hammer, before placing the bolts. Is this normal?
Yeah, somewhat. Ideally you would find a spot that in which a hole could be drilled as close to perpendicular as possible (I've even gone so far as to take a small 3" speed square with me to make sure the bit is at a 90 degree angle with the rock. If no other position is available and you have to hammer down a few small nubbins, it's no biggie in my opinion, though I certainly wouldn't quarrel with anyone who did deem it a big deal. - What are the guidelines for how much of the threaded portion of the bolt should protrude from the nut when everything is snugged down? I tried to strike a balance between getting the bolts as deep as possible, but leaving enough threads sticking out. When the nuts were snugged down, about 2-4 mm of bolt were typically protruding. Is that OK?
Pay special attention to the manufacturer's installation instructions. They specify how deep to make the hole, how to prep the hole, and what diameter to make the hole. Purchase from manufacturers that provide this information and you'll generally be in good shape. - Once (just once) as I snugged a nut, it got tighter and tighter, and then suddenly it seemed to get looser. I was afriad I might have overtighetned it, although I wasn't applying that much force. I stopped turning it, but my friend said I should try a little more, and then it started to get tight again. What happened? Did the cone just slip for a moment? Did a small feature inside the hole break? How common is this? And should I be concerned? I do understand that slighly looser is better than over-tightened. Do folks use a torque wrench to gauge this when starting out?
I've never NOT used a torque wrench to tighten to specification. I know a few developers that don't, but they've put in waaaaayyyy more bolts than I have. If you're a beginner, taking a torque wrench with you is cumbersome, sure, but it will give you a good idea of the tension that's needed for a particular bolt. As far as your other questions, it's hard to tell without having witnessed it, but what you propose that might have happened is plausible. - Once you have a bolt placed, and the nut snugged down, is the general idea that you don't touch it anymore? What if you noticed that you screwed up, and the hanger is upside down, or something like that. This didn't happen, but I'm trying to immagine a situation where you had to unscrew a previously tightened bolt. Is it OK to tighten, un-tighten, and then re-tighten a bolt, or does that damage the cone and sleeve, or enlarge the hole, and so on?
Most expansion bolts are no fun to get out. There are tons of threads on this site that go over the various tools that are used to do so. This underlines the importance of paying close attention to what you're doing. It's possible to fix a bolt, but the idea is to not screw up when installing brand new "permanent" fixed gear. One way to do this is to get a chunk of rock and practice with your preferred brand/type of bolt. - Let's say you screw up somehow, maybe holding the drill wrong, and the hole just seems too big. Again, this didn't happen, but I could see it happening. Are there oversize bits and bolts available, for example, 10.5 mm, or 11 mm, to correct mistakes?
A hole that's too small or too big is problematic. A hole that's too big simply won't work and should be filled and patched and the developer should be chastised. The whole idea is only alter what's absolutely necessary to develop the route. Simple, avoidable screwups fly in the face of that tenet. Again, practice makes perfect. A hole that's too small has a greater risk of being too large, at least of the beginning of the hole because the bit will bounce around if you're just going slightly bigger. Neither is ideal. Pay special attention to the stated diameter of bit and/or hole that the manufacturer presents with the product. - Last, this is more a style question, but our approach was to place a bolt, clip in with a Petzl Connect lanyard (the one with two arms), move up, find a placement for a tool, hammer the tool into a crack or hole, clip to the tool with the other arm of the lanyard, move onto that placement, and repeat until it was time to place the next bolt, and so on. We put in about 10 stainlesss steel bolts, and a nice anchor with a chain, a rap ring, and a old locking carabinner. It goes at around D9, but we will probably add a foot placement or two, just to make it less tenuous and insecure, and more fun, which would bring the grade down to abut D8. Anyway, my main question is about hammering in the tools to get solid placements to move upward. On the one hand, it really helped to feel secure while moving/drilling/clipping. It also had the benefit of establishing/enlarging the future tool placements. On the other hand, it felt like cheating! But, I guess it's all aid, right? We're talking about crag bolted dry tooling! Thoughts?
I know drytooling has a somewhat cultish following that is small compared to other disciplines. It's a very contentious topic in some circles, and it's not accepted as a common practice everywhere. Because of these things and because I don't climb or develop where you are, it's tough to answer that question, but that's one that you definitely should swallow some pride/fear on and ask your local mentor that you developed with. Thanks.
This isn't comprehensive, and there are a lot of people out there that make my amount of development look like a squirt of piss, but these are solid answers IMO and should help some.
|
|
|
Bruno Schull
·
Dec 9, 2021
·
Unknown Hometown
· Joined Dec 2009
· Points: 0
@ Jake--thanks for your detailed answers. That's really useful information. God, with all the other stuff hanging on the harness, a torque wrench wouldn't add much! I'll definitely add one to the list of thing to (possibly) buy. I also like the idea of the sped sqaure. I have a small machinist square that would be perfect. Anyway, thanks again. I really appreciate it. Bruno
|
|
|
Andy Bennett
·
Dec 9, 2021
·
Tucson, AZ
· Joined Mar 2006
· Points: 676
Finding a mentor is strongly advised
|
|
|
ClimbBaja
·
Dec 9, 2021
·
Unknown Hometown
· Joined Nov 2009
· Points: 0
|
|
|
bernard wolfe
·
Dec 9, 2021
·
birmingham, al
· Joined Jan 2007
· Points: 265
An unscientific answer to the number of threads that should be revealed on the outside of the nut after tightening: four, minimum
|
|
|
Austin Donisan
·
Dec 9, 2021
·
San Mateo, CA
· Joined May 2014
· Points: 660
bernard wolfe
wrote:
An unscientific answer to the number of threads that should be revealed on the outside of the nut after tightening: four, minimum Please don't do that, it can cause a quickdraw to unclip itself. More like 4 maximum. For example see the instructions for Petzl's wedge bolts. 6mm = 4 full threads, so they suggest even less than that.
|
|
|
Princess Puppy Lovr
·
Dec 9, 2021
·
Rent-n, WA
· Joined Jun 2018
· Points: 1,756
Jake Jones
wrote:
I've never NOT used a torque wrench to tighten to specification. I know a few developers that don't, but they've put in waaaaayyyy more bolts than I have. If you're a beginner, taking a torque wrench with you is cumbersome, sure, but it will give you a good idea of the tension that's needed for a particular bolt. As far as your other questions, it's hard to tell without having witnessed it, but what you propose that might have happened is plausible. In addition the torque wrench has other advantages, - often it is longer (often you will destroy your knuckles less)
- you could use it as a square (mark it with a sharpie on its head) since the head of it is often the size of a bolt hanger you can figureout square orientation
- The torque wrench is less flimsy your less likely to drop it without noticing
|
|
|
Adam Wood
·
Dec 9, 2021
·
seattle
· Joined Jun 2017
· Points: 1,428
Much has been written on bolting best practices so check out old threads. Lots of factors to consider and they all shift a bit depending on the type of rock, rock quality and types of features being protected. Practicing proper and safe installation off the wall is a great start. I have not placed Petzl wedges but I use blue lock tite on my wedge bolts. Also, take care to hammer the stud and nut flush (don't leave protruding threads before tightening.) Inspect your bolt before placing it to ensure the cone is intact. Hangers do best when seated flat, the placement should be solid stone that is attached entirely to the wall. Check the stone with a hammer and listen for changes in the sound (hallow or flat sounds are bad) some people flatten placements with a hammer to seat the hanger properly. It is also important to think about how the quick draw will hang in a fall. Edges or protrusions can cross load the spine of a carabiner and break it. If rock protrudes below the bolt this can lead to gate flutter or quick draws opening. Bringing a hanger with a quick draw attached to hold against the wall is helpful. Then you get to consider clipping stances (measure from the elbows), protecting ledge falls, being aware of how the rope runs (for drag, and fall safety) anchor height etc…
|
|
|
Fishy Boi
·
Dec 10, 2021
·
Unknown Hometown
· Joined Sep 2021
· Points: 0
Hello, I believe there was a hilti FAQ where they said a maximum of 6 degree off perpendicular. For a 10mm bolt that works out to the thickness of roughly 2 credit cards, at the edge of the nut. To get the angle correct you can make a drill guide the size and shape of a hanger with wood. You will always be perpendicular that way. They also said something about re torqing a maximum of 3 times to spec over the life of an expansion bolt. The best way to have the correct torque is to get a digital torque adapter which works on any socket wrench. You can set warnings at any torque level and the range is usually greater than mechanical torque wrenches. You can buy decent ones online. Overdrill your holes deep enough so that you can hammer in your bolts if you make a mistake.
|
|
|
Bruno Schull
·
Dec 15, 2021
·
Unknown Hometown
· Joined Dec 2009
· Points: 0
Thanks for all the replies--this has been very helpful, and surprisingly supportive :) I do have a solid mentor, and I'm taking cautious steps, but there are cultural differences and language differences, and there's such a wealth of knowledge in this forum, I though I'd ask for more information. Information is always good! I will probably get a Makita 18 V hammer drill (I already have a bunch of Makita 18 V tools so I can save on batteries) and I will definitely get a torque wrench of some kind. I'm also considering buying a hammer (we used the Kong Spealeagle and it seemed to do the trick) and I'll probably get one of those Petzl double connect adjustable lanyards, to move around easily. Anyway, baby steps. My friend and I are going to go back to the route we set and improve it a bit, and then I might try something different. I'm going to rap in an have a look first, because making something appropriate and lasting is more important than doing it ground up, for me. I'll report back.
|

 Continue with onX Maps
 Continue with Facebook