
 Continue with onX Maps
 Continue with Facebook


Bolt removal tools - resources, tips, how-to videos


|
|
Jayson Nissen wrote: Ken- You are neglecting friction. The whole point of the doodad is to provide a mechanical advantage while decreasing the friction. With a big heavy impact wrench and a variety of spacers, sure you could pull it with the spinner tool, but then you have to bring a big heavy impact wrench and a bunch of different sized spacers whereas the doodad is a single tool that will do it for you, weighs less than an impact wrench, and doesn't need batteries. |

|
Bump. |
|
|
Why would the doodad have lower friction than an impact wrench? |
|
|
Jayson Nissen wrote: Why would the doodad have lower friction than an impact wrench? With the impact wrench you are trying to overcome the friction between the nut and the bolt that you are trying to remove. With the doodad you are using a ball screw which contains bearings which have the sole purpose of reducing that friction. |
|
|
Are you using a 5/16 - 18 or 5/16 - 24 die? |
|
|
I just put in an order that will hopefully come with the 1/2 20 threading. The contact sent me this link which looks like a direct order item for future ref. |
|
|
mattm wrote: I just put in an order that will hopefully come with the 1/2 20 threading. The contact sent me this link which looks like a direct order item for future ref. I ordered 20 that I will assemble and sell through the BCC. I requested a change to the outside end of the ball screw on this order- M10 threads on the small portion that typically has a 10mm diameter and a circlip cut. The circlip isn't strong enough to stop the ball nut if someone absentmindedly keeps turning the handle, but a nut and washer would do the trick. Send them this updated drawing: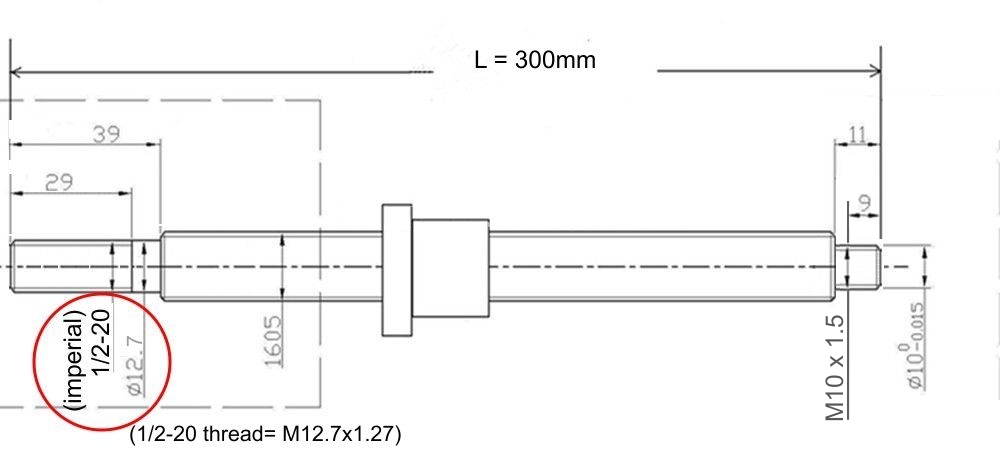 edit: also see this post about a design idea for the spacer tube - mountainproject.com/forum/t… |

|
I have 10 of the initial design I have yet to build up - been traveling. I'll build them in July when I am back home. But they seem far longer than needed. And I dont see a need for the 'nut'... I like the 'bike wrench' idea and will probably just make a batch of these on a waterjet. I hate custom tools, but well I guess the doodad is a custom tool and will get a custom wrench. |
|
|
Before you fire up the water jet and make something from scratch - this is what I plan to use. I've ordered one to make sure it will work, but it hasn't arrived yet. I plan to use a 3/4" oak or hickory dowel with copper pipe stops at the ends for a ~8" handle. 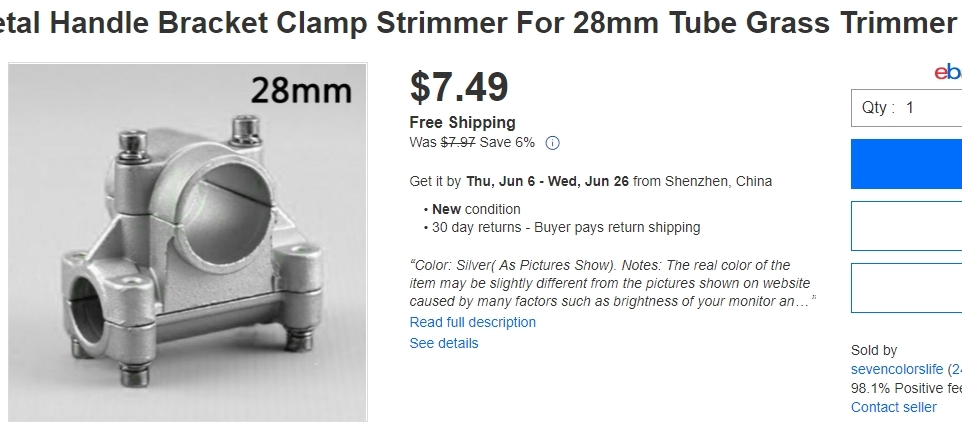 edit- regarding the length - For studs alone the whole tool could be much shorter. For ~4" long 5-piece bolts and the necessary 4" long draw stud you will run out of travel if the tool is much shorter. |
|
|
I like the new M10 threads on the end. Seems like you could use this nut to spin as well. Not fast with a drill, but if I recall Geir had some success with the Hurly Jr just snow spinning a bit, pull a bit, repeat. Curious how this new handle will work out. Tho price-wise I think I can make the wrenches on the waterjet quite cheap. I saw the very purdy one from cleatis in Salt Lake last fall. Def a nice tool. I'm just looking to make these 10 cheap enough and work well enough to be useful. |
|
|
Nylon 1" thick spacers are pretty tough. We used them as spacers when we were using the Greenlee punch driver method. UHMW plastic is pretty slippery, but also good in compression. It's certainly easier to machine than aluminum. I'll check to see if Colorado Plastic Products in Louisville has a 1.5" x 1.5" x 0.25" square tubing.  |
|
|
Good to know this history. My main reason for the round is so I can simplify the ends with just needing bushings on either side. But maybe there is something else out there to put the ends on the square tube. Basically looking to make this as simple as the Hurley jr. |
|
|
Found an even better bracket for the ball screw - short MTB stem is built for a 1 1/8"/28mm fork. Just add a dowel for the handle. I'm looking around for local used parts before ordering a bunch of these from Shenzhen. Looks lightweight and strong enough.  |
|
|
Confirmed: most threadless bike stems are a perfect fit for the 28mm ball nut housing. Add a wooden/aluminum handle and you are set.  |
|
|
Gregger Man wrote: Confirmed: most threadless bike stems are a perfect fit for the 28mm ball nut housing. Add a wooden/aluminum handle and you are set. How much torque before it slips? I may have one or two of these lying around in 120mm length! Win |
|
|
mattm wrote: A bolt head sticking out of one of the six holes in the ball screw would stop the slipping, but I think it will grip sufficiently. Think of the punishment that a MTB fork and handlebars takes - the ball screw is the same size as the bike fork. Body weight on the handle would translate into enough force to break a new bolt, so this should work well for our purposes. |
|
|
Finally got around to putting one of these together! Still need to add the cable clip-in loop, but the main tool is assembled, and I'm pretty happy with how it came together! 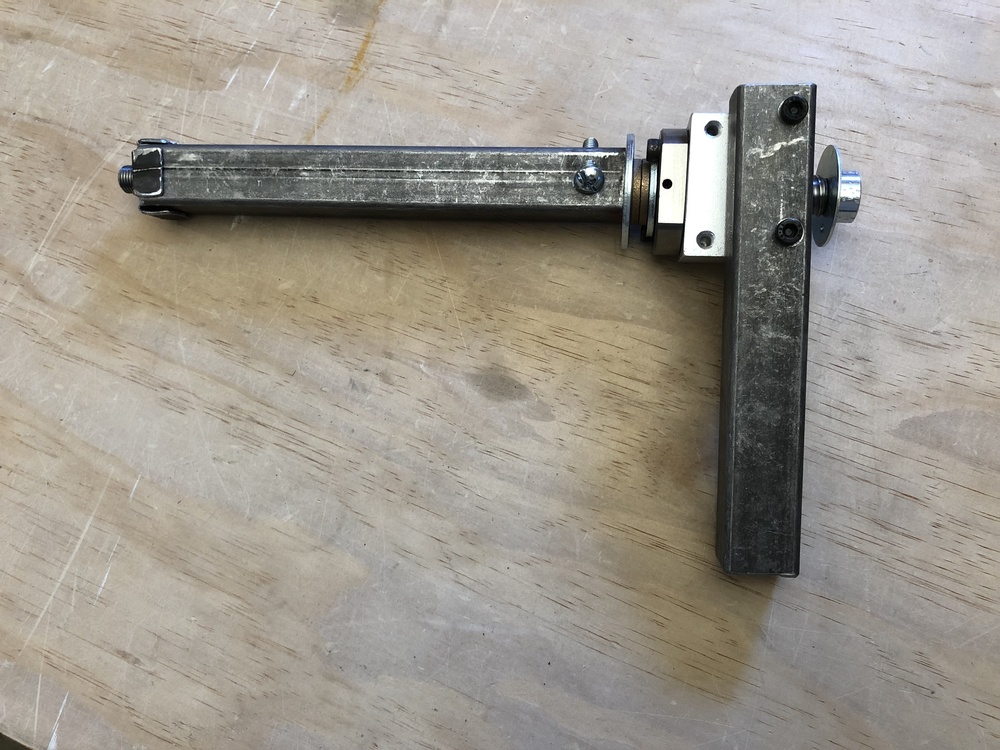 I was a little intimidated by the metal working (I'm more of a wood-worker), but it wasn't that bad. A few comments:
|
|
|
A few questions about spinner tools. I got the threaded inserts from Northwestern Tool. I assume I want to trim the coupler nut back to the black line I drew (at the combined length of the sds chuck and the thread inserts)? Is that right? 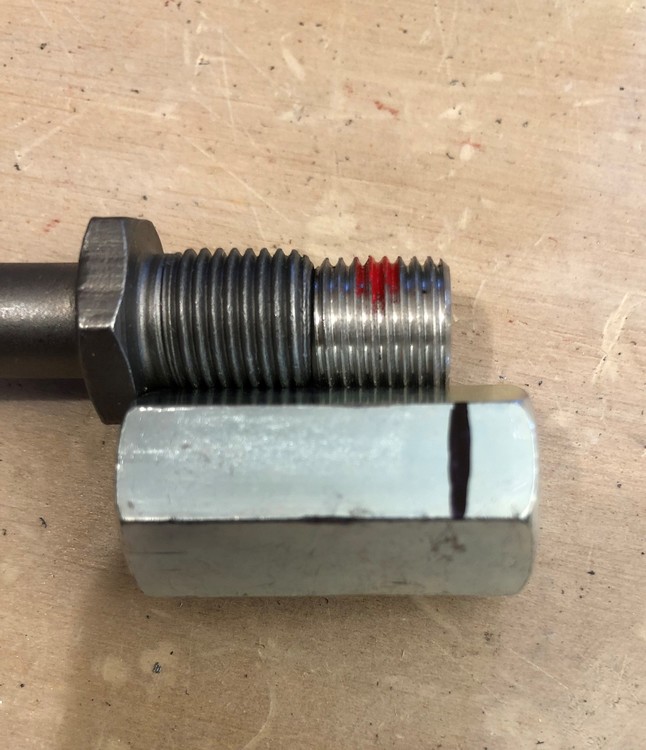 Also, is that red material that comes on the threads red loctite? Is that enough, or should I add more? I've never used red before and don't know how much it takes for a "permanent" bond. |
|
|
Rich Farnham wrote: A few questions about spinner tools. I got the threaded inserts from Northwestern Tool. I assume I want to trim the coupler nut back to the black line I drew (at the combined length of the sds chuck and the thread inserts)? Is that right? If the coupler nut you bought is all one diameter/thread that matches the SDS chuck adapter thread, and the silver threads (top right piece) match that but have 3/8-16 on the inside, then I would add red locktite to the outside of he thread insert and screw it into the coupler nut just far enough that it doesn’t stick out. I wouldn’t bother trimming it. I also wouldn’t fix it to the chuck adapter. I’ve found it helpful to have a “strike bolt” that screws into the coupler so I can put it on the wedge bolt, hit the strike bolt with the hammer to unseat the clip, the swap the chuck adapter on and spin. I have better luck with that than using the drill’s hammer mode |
|
|
I would add more Loctite to make sure the insert doesn't come loose. I had one back out on me and it wasn't good(I always carry a spare spinner tool in case this happens). Also. there is a bit of a debate on how deep the insert threads should be which screw onto the stud. Sometimes I just screw the threads all the way down on the bare stud and hope there are enough threads on the stud to bottom it out. Other times I put a nut on the stud first and use that in opposition with the coupler nut to lock it all up for spinning. |


