
 Continue with onX Maps
 Continue with Facebook


Home-made tensile load testing rigs
|
|
I don't have access to a nearby uni with a universal testing machine anymore, and at times I have questions most easily answered by just testing the thing/idea. Anyone made their own testing rig? What did it look like? I can't weld and live in an apartment, so woodwork is all I do. Been thinking about getting a cheap pair of 10kN crane scales and a hand winch (the type used on boat trailers would be nicest, though some 4WD recovery winches could work - but they tend to be less compact), and mounting it in a simple but robust wood frame to pull stuff apart, up to ~10kN. Never designed anything in wood, but with a compression strength of 40MPa (Pinus Radiata) seems easy enough. 10kN isn't much but it meets the strong enough for me"criteria, 20-30kN would enable a great many more experiments but then I get into more pricey winches and scales / load cells. Could 2:1 the 10kN gear I suppose. (I know...I'll get kx^2/2 energy flying at my face if I arrange things poorly.) |
|
|
I have one. I use a hydraulic jack stand as the main source. A hand winch is not going to come anywhere near close enough to producing the level of force you need. The winch might be rated for 5000 lbs or whatever, but that's just the breaking strength of the winch, not what you can actually produce while turning it. You would be lucky if you could produce more than 1000 lbs while actually turning the winch. The only real option is hydraulics. A winch system is not going to cut it. I think a wood frame is going to be really questionable. It would be hard to make a frame strong enough out of wood and even if you did it's going to bend under load which is going to consume some of the hydraulic ram's travel distance. The wood might be okay if loaded in compression, but if you load it in tension or shear it's going to break. The best you might be able to get away with is a hybrid frame made partly from wood where it's loaded in compression and steel where it's loaded in shear. You might be able to get away without any welding. If so, the local steel mill should be able to cut the steel to your specifications for little or no cost. |
|
|
I´ve got several for textile testing as my powered hydaulic ones for bolt testing don´t usually have enough travel. As 20kN says forget trailer winches. The way to go is using a hand cable puller (the ratchet sort) which are dirt cheap, get the 4 ton model, you won´t in fact pull 4 tons but at least it won´t break, you´ll be lucky to get 1 ton so I´ve got an extension handle and can get 20kN easily enough. My long one (20ft) is wood because the steel girder was too heavy for convenience, it´s just a 4" x 12" beam, it bends a little but won´t break. You don´t need any steel-work, just drill some holes and thread several turns of rope or whatever through as end points. If your using a strain guage make sure it´s in free-air under load, any bending or rubbing screws up the accuracy. USE A SAFETY LEASH THAT`S INDEPENDENT FROM EVERYTHING ELSE!!! I´ve put a 10kg strain guage into a blockwork wall before I learnt it goes on the fixed end not the pulling end. Hydraulics are good as you don´t need a load-cell, just a manometer (pressure guage) but the travel is very limited, for hard goods it´s fine but textiles it´s useless. A cheap workaround which I built for someone doing demo´s breaking old gear is to use a cheap 10 ton pull cylinder one end with a pressure guage instead of a strain guage but do the pulling with a hauler the other end. Depending on the travel you want Hi-Lift´s are a good option, I made one for busting slings using one and a cheap pull cylinder. |

|
Jim Titt wrote: That's very clever. Basically, the area of the piston minus the area of the rod times the hydraulic gauge reading = load. The cylinder doesn't need much stroke. You could use a transducer instead of a gauge to electronically record what's going on. Not sure if that could be cheaper than a strain gauge |
|
|
would something like this work? https://www.harborfreight.com/6-ton-a-frame-bench-shop-press-1666.html |
|
|
wivanoff wrote: Depends on how much money you want to spend and how much accuracy, using a transducer is a hassle as you need the other end of the electronics and a way to calibrate the whole thing. A digital 1000bar guage will set you back $119 on Amazon! |
|
|
Jim Titt wrote: I typed "strain gauge" was thinking "load cell". What's a load cell cost? About $850? rockexotica.com/enforcer-lo… As you said, a cylinder and pressure gauge would be much cheaper |
|
|
Just out of curiosity, once you've built a DIY pull tester, does it have many maintenance costs or use costs? In other words, is it just the start-up cost to put it together and then you don't have to spend another cent or are there cost that come out of using it (ie electricity, replacing parts, etc.)? |
|
|
I built one for testing the Merlin cams I make. The entire thing cost me about $800. I'm using a pneumatic cylinder with a 6" bore and 9" stroke. You can use a pressure up to 250 psi but my compressor only goes to about 150 psi, which will give me about 19 kN compression or a little less in tension. The pressure regulators with gauges give you the pressure and therefore the force. I also calibrated it with a load cell in the beginning. The upper crossbeam is adjustable in height on 6" centers so with the cylinder's 9" stroke you can test just anything up to the 6' height of the tester. Cylinder speed is controlled via flow control valves attached directly to the cylinder. The only downside is that I'm using manually adjusted pressure regulators so have to set a pressure, start it, see how it does, and then bump up the pressure for the next test. Not a problem if you are just testing everything to a specific load but if you are testing to failure it's a little tedious. I could get around this by installing a electrically controlled pressure transducer that would allow me to dynamically adjust pressure from a safe distance. Then entire thing is made from aluminum. The structural members are mostly all "U" channel. Aluminum can be drilled and cut using standard tools normally used for wood so isn't that difficult to work with. 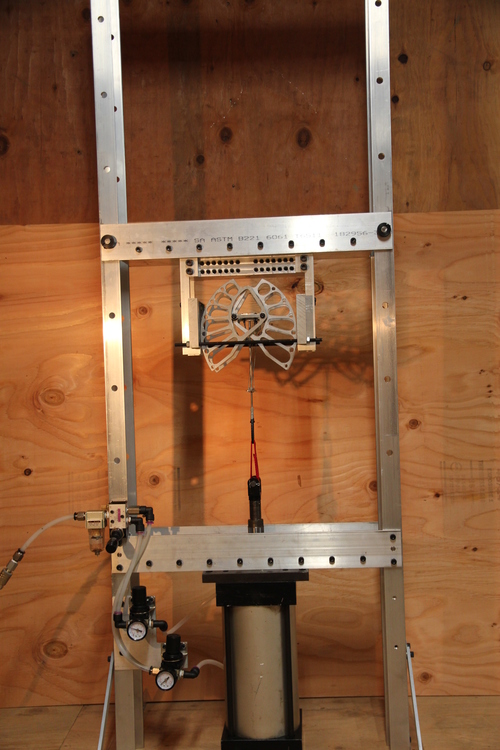 |
|
|
wivanoff wrote: For the sizes we use around $500 for a cell and USB converter (you supply a laptop/computer). |
|
|
eli poss wrote: Things break occasionally, otherwise they cost nothing. The electricity for my hydraulic ones is negligable, I wouldn´t even bother to measure it! |
|
|
Ryan Swanson wrote: You can reckon on the sling/rope or whatever becoming twice as long before it fails. Stuff with knots in is far worse. Dyneema is better. It´s really variable though, you really want about 3ft of travel for general use though. |
|
|
Jim Titt wrote: If you have basic electronics / programming experience, you can bring this cost down. I'm in the process of building a dual-channel wireless logging dynamometer good to 24kN, and I've budgeted $200 for all the materials. You're paying the industrial market tax on commercial units. All you need is a load cell amplifier module, an S-type load cell (super cheap on eBay), and something to log/display the data - can be as simple as an Arduino or Raspberry Pi. All-in-one modules that do this and dump the readings over USB are available off the shelf for $30. All you need is a screwdriver. |
|
|
Ryan Swanson wrote: Adding to what Jim said - it might be more than you think, depending on what you want to break. If you only have a few feet of travel, shackles & pins and whatever else you use to setup the test can eat away quote a bit of that room. Being able to adjust the static spacing to make the most of the travel you have would be a very good feature to include in a homemade device. I sent off some splice samples to be destructively tested, and screwed up the eye size in their spec. The company needed to improvise to mount them, and it was enough difference that they didn't have enough travel left to pull them to destruction. (Fortunately they were able to hit the target I was looking for.) |
|
|
My ghetto test rig uses a forklift, an anchor plate secured with 2 -1/2" bolts in shear, and a Dillon dynamometer. I can straight pull about 22kn, more if I add a two to one setup. Travel is a non issue 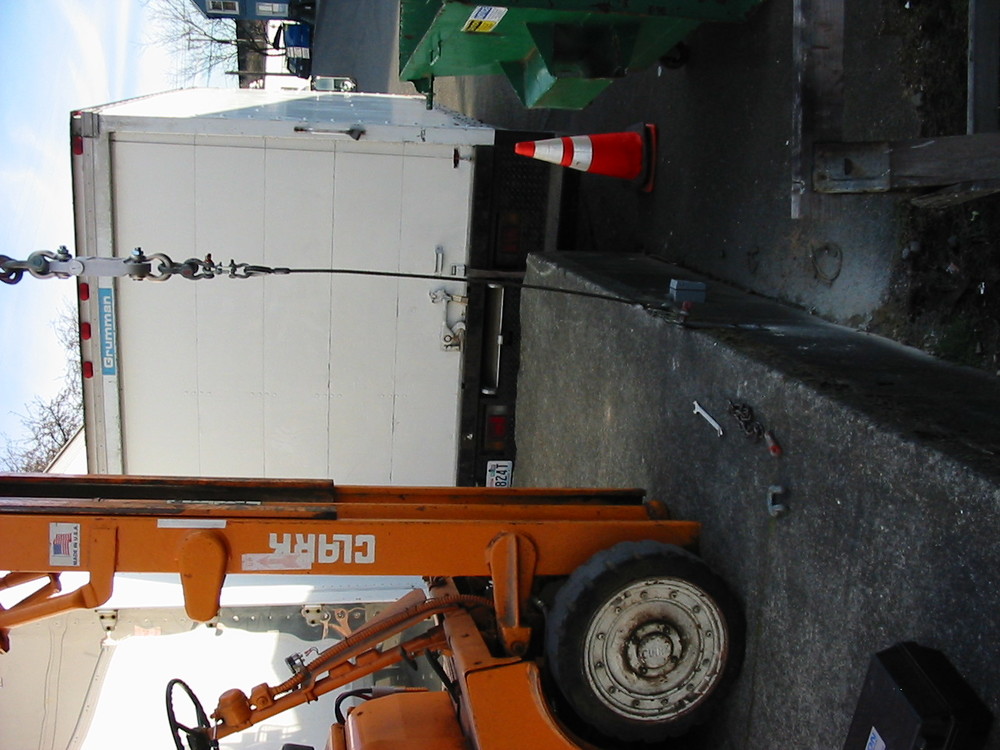 |

|
Dante L wrote: That is awesome. Nicely done! |
|
|
eli poss wrote: Not really, no. If you're talking a huge industrial tester for professional applications, probably. But for home use, DIY, no. |
|
|
Ryan Swanson wrote: Depends on how long of a sample you want to test, but I'd go with at least 20". |
|
|
20 kN wrote: +1 20" is abot the min for slings |


