Mountain Project Logo
To save paper & ink, use the [Hide] controls next to photos and comments so you only print what you need.

7-Lewis

California > Sierra Eastside > June Lake Area > Silver Lake

Description

Slab just left from the low part of sector 8 Moynier and below the high part of sector Moynier.
Faces ENE.

Top-Roping: To access the top of this sector, lead one of the three bolt-protected routes - (or could scramble up around its left side).

In addition to the two-bolt anchors at the top of several of the routes, there is a standing dead tree at the top of the route "Central - Right Overlap" which as of 2018 has a static rope attached to it, also a static rope attached to a tree above the route "Obelix" -- which could be used to help protect and/or aid reaching anchors for some routes from the top.

There is also a two-bolt facultative anchor above the route "Obelix", which could be used to help protect reaching anchors for some routes from the top. Or in making the transition to a higher pitch on sector Moynier.
. . (Bolts + hangers are 304 Stainless steel 3/8 inch. Installed 2017).
. . (3-link chain + quick-links are Plated steel. Installed 2018).

Also there are two or three live trees on the wide ledge at its top which could be used as "natural" top anchors (bring a static rope say 50 ft).

In case anchor hardware is damaged or missing or otherwise inadequate, recommend to carry a few feet of 8mm climbing accessory cord and at least one quick-link.

warning: This cliff (especially its left side) is fairly tall for Top-Roping. So if the belayer is at near the bottom of the climbing route, the elongation/stretching of the rope could be large -- so the climber could take a rather long fall (even though on close belay from above), and could hit a ledge or protruding rock, and get seriously hurt. Ideas for dealing with this dynamic-rope-stretch problem: (a) Have the belayer near the top instead of the bottom; (b) Use a special static or "semi-static" rope which will not stretch so much (but such a rope is not safe for first Leading to reach top); (c) Pull the rope extra tight when the climber is just three feet from the bottom, to take some of the stretch out, and keep it extra tight while climber continues up.
________________________________

Name: Marty Lewis grew up in Agoura Hills (by Thousand Oaks), later settled in Bishop. Pioneered the publication of guidebooks for non-mountain climbing routes on the southern Eastside. Author of multiple rock-climbing guidebooks, then contributor of the further serious labor of revising them for many years ongoing.

. . (previous name of this sector: The June Lake Loop has long been recognized as a little visit to Switzerland. "Melchsee-Frutt" is a family crag under the Bonistock peak, overlooking a lake. Pronounce "Melchsee", using the German language of central Switzerland - roughly as ... melkh-zay).

warning: The rock in this sector has not been climbed much yet, and some of the rock is still breakable and loose -- so the belayer and other people should stand far away from underneath the climber.

Getting There

hiking approach: Follow the instructions on the Silver Lake area description page to reach the bottom of sector 7.

- - > See where on this overview Photo
. . . . or this overview Photo

- - > See Access scrambles + trails, and Anchor locations on this Photo

Close-ups
- - > See route lines on this topo Photo

- - > See on this Photo
. . . . or this Photo of Left side | or this Photo of Right side

Time + effort estimate: From north end of parking lot to the base of this sector is about +125 vertical feet over 0.15 mile distance (+40m over 0.23km), so typical range of hiking times 7-13 minutes.

GPS tracks for hiking/scrambling approaches -- view (or download) on
- - > this Map of the Silver Lake crag

Routes from Left to Right

5.7 5a 15 V+ 13 MVS 4b
 2
Trail Slab - Left Corner
TR
5.3 3+ 10 III 9 VD 3a
 1
TS Short Squeeze
TR
5.2 3 8 II 8 D 2c
 4
Salamander
Sport, TR
5.7 5a 15 V+ 13 MVS 4b
 5
Trail Slab - Middle Prongs
Sport, TR
5.2 3 8 II 8 D 2c
 1
Trail Slab - Face Right
TR
5.3 3+ 10 III 9 VD 3a
 2
Trail Slab - Right Gully
TR
5.4 4a 12 IV 10 VD 3c
 1
Trail Slab - Right Corner
Sport, TR
5.9+ 5c 17 VI 17 E1 5a
 1
Shelves - Wander Left
TR
5.8+ 5b 16 VI- 15 HVS 4c
 2
Shelves - Wander Right
TR
5.5 4b 13 IV+ 11 MS 4a
 4
Central - Left Ridge
Sport, TR
5.5 4b 13 IV+ 11 MS 4a
 2
Central - Left Corner
TR
5.9 5c 17 VI 17 HVS 5a
 2
Central - Left Overlap
TR
5.7+ 5a 15 V+ 13 MVS 4b
 3
Central - Right Overlap
TR
5.4 4a 12 IV 10 VD 3c
 5
Obelix
Sport, TR
5.9 5c 17 VI 17 HVS 5a
 1
Blazar
TR
5.6 4c 14 V 12 S 4b
 1
IceCube
TR
5.6 4c 14 V 12 S 4b
 4
Far Right Face
TR
5.4 4a 12 IV 10 VD 3c
 2
Right Squeeze
TR
5.3 3+ 10 III 9 VD 3a
 2
Right Edge
Sport, TR
Route Name Location Star Rating Difficulty Date
Trail Slab - Left Corner
 2
5.7 5a 15 V+ 13 MVS 4b TR
TS Short Squeeze
 1
5.3 3+ 10 III 9 VD 3a TR
Salamander
 4
5.2 3 8 II 8 D 2c Sport, TR
Trail Slab - Middle Prongs
 5
5.7 5a 15 V+ 13 MVS 4b Sport, TR
Trail Slab - Face Right
 1
5.2 3 8 II 8 D 2c TR
Trail Slab - Right Gully
 2
5.3 3+ 10 III 9 VD 3a TR
Trail Slab - Right Corner
 1
5.4 4a 12 IV 10 VD 3c Sport, TR
Shelves - Wander Left
 1
5.9+ 5c 17 VI 17 E1 5a TR
Shelves - Wander Right
 2
5.8+ 5b 16 VI- 15 HVS 4c TR
Central - Left Ridge
 4
5.5 4b 13 IV+ 11 MS 4a Sport, TR
Central - Left Corner
 2
5.5 4b 13 IV+ 11 MS 4a TR
Central - Left Overlap
 2
5.9 5c 17 VI 17 HVS 5a TR
Central - Right Overlap
 3
5.7+ 5a 15 V+ 13 MVS 4b TR
Obelix
 5
5.4 4a 12 IV 10 VD 3c Sport, TR
Blazar
 1
5.9 5c 17 VI 17 HVS 5a TR
IceCube
 1
5.6 4c 14 V 12 S 4b TR
Far Right Face
 4
5.6 4c 14 V 12 S 4b TR
Right Squeeze
 2
5.4 4a 12 IV 10 VD 3c TR
Right Edge
 2
5.3 3+ 10 III 9 VD 3a Sport, TR

Photos [Hide ALL Photos]

Lewis sector 7: Trail Slab + Shelves from E
<br>
B. Left Corner
<br>
D. Salamander
<br>
F. Face Right
<br>
G. Right Gully
<br>
H. Right Corner
<br>
K. Wander Left
<br>
. v Variation
<br>
L. Wander Right
<br>
X purple = two-bolt anchor
<br>
x small = directional or facultative bolt, or marker of sport lead route
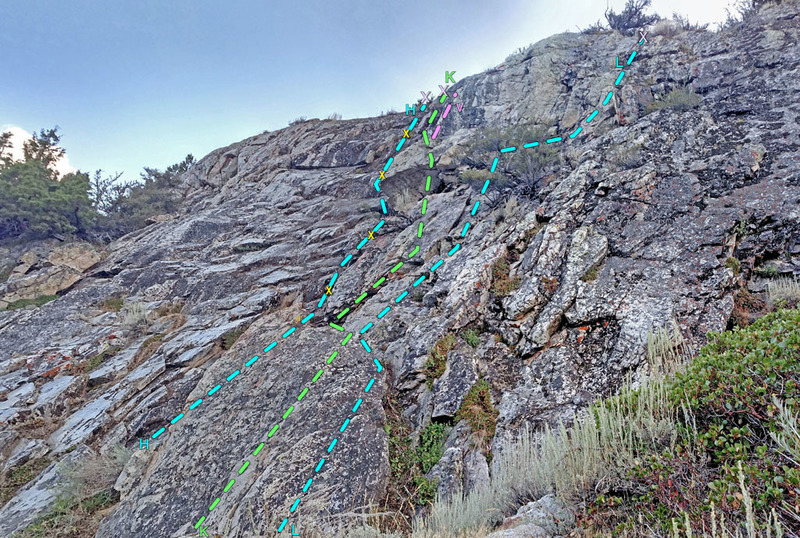
[Hide Photo] Lewis sector 7: Trail Slab + Shelves from E B. Left Corner D. Salamander F. Face Right G. Right Gully H. Right Corner K. Wander Left . v Variation L. Wander Right X purple = two-bolt ancho…
Lewis Cntr R
<br>
L. Shelves - Wander R
<br>
N. Central - L Ridge
<br>
P. L Gully
<br>
Q. L Overlap
<br>
R. R Overlap
<br>
S. Obelix
<br>
T. Blazar
<br>
U. IceCube
<br>
W. Far R Face
<br>
Y. R Squeeze
<br>
Z. R Edge
<br>
purple X = 2-bolt anchor
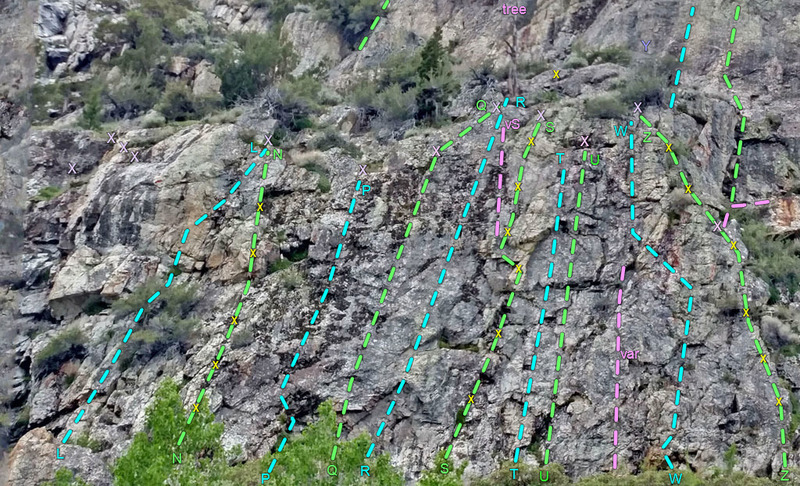
[Hide Photo] Lewis Cntr R L. Shelves - Wander R N. Central - L Ridge P. L Gully Q. L Overlap R. R Overlap S. Obelix T. Blazar U. IceCube W. Far R Face Y. R Squeeze Z. R Edge purple X = 2-bolt anchor
Lewis sector 7: Trail Slab + Shelves from NE
<br>
H. Right Corner
<br>
K. Wander Left
<br>
. v Variation
<br>
L. Wander Right
[Hide Photo] Lewis sector 7: Trail Slab + Shelves from NE H. Right Corner K. Wander Left . v Variation L. Wander Right
Lewis sector 7 : Trail Slab
<br>
B. Left Corner
<br>
. v3 variation
<br>
C. Short Squeeze
<br>
D. Salamander
<br>
F. Face Right
<br>
H. Right Corner
<br>
X purple = two-bolt anchor
<br>
x purple = directional bolt
<br>
x yellow = bolted route
[Hide Photo] Lewis sector 7 : Trail Slab B. Left Corner . v3 variation C. Short Squeeze D. Salamander F. Face Right H. Right Corner X purple = two-bolt anchor x purple = directional bolt x yellow = bol…
Lewis sector 7 below Moynier sector 8
<br>
5 = Erb sector 5
<br>
6 = Franosch sector 6
<br>
7 = Lewis sector 7
<br>
8 = Moynier sector 8
<br>
Silverhorn mini-peak
[Hide Photo] Lewis sector 7 below Moynier sector 8 5 = Erb sector 5 6 = Franosch sector 6 7 = Lewis sector 7 8 = Moynier sector 8 Silverhorn mini-peak
Lewis sector 7: right part from E
<br>
. . .
<br>
. (known routes are not on this photo).
<br>
. . .
[Hide Photo] Lewis sector 7: right part from E . . . . (known routes are not on this photo). . . .
Lewis sector 7: Right side close from E
<br>
G. Central - Right Overlap
<br>
H. Obelix
[Hide Photo] Lewis sector 7: Right side close from E G. Central - Right Overlap H. Obelix
Lewis sector 7: Right side from NE
[Hide Photo] Lewis sector 7: Right side from NE
Lewis sector 7: Left side from SE
<br>
. . .
<br>
. (known routes are not on this photo).
<br>
. . .
[Hide Photo] Lewis sector 7: Left side from SE . . . . (known routes are not on this photo). . . .