
 Continue with onX Maps
 Sign in with Facebook


River Wall Rock Climbing
Routes in River Wall


|
Adventure Kayak Trundle S 5.12a 7a+ 25 VIII+ 25 E5 6a |
|
|
Beach Front T 5.9 5c 17 VI 17 HVS 5a |
|
|
Bottom Side Down S,TR 5.10c/d 6b+ 21 VII+ 21 E3 5b |
|
|
Clear Water Revival S 5.9 5c 17 VI 17 HVS 5a |
|
|
Evil S 5.13b 8a 29 IX+ 30 E7 6c |
|
|
Float Trip S 5.12a 7a+ 25 VIII+ 25 E5 6a |
|
|
Flood Control S 5.10c 6b 20 VII 20 E2 5b |
|
|
Goin' Fishin' S 5.11+ 7a 24 VIII 24 E4 6a |
|
|
Grilled Trout S,TR 5.10c 6b 20 VII 20 E2 5b |
|
|
Human Rites S 5.11 6c+ 23 VIII- 23 E4 5c |
|
|
Muddy Waters S 5.10a 6a 18 VI+ 18 E1 5a |
|
|
Old Man River S 5.10c 6b 20 VII 20 E2 5b |
|
|
Original Route T 5.9 5c 17 VI 17 HVS 5a |
|
|
Overflow S 5.11b 6c 23 VIII- 23 E3 5c |
|
|
Put In, The S 5.8- 5b 16 VI- 14 VS 4c |
|
|
Right To Laugh S 5.9+ 5c 17 VI 17 E1 5a |
|
|
Right to Life S 5.12a 7a+ 25 VIII+ 25 E5 6a |
|
|
River Dance S 5.12b 7b 26 VIII+ 26 E5 6b |
|
|
River Grill S 5.10d 6b+ 21 VII+ 21 E3 5b |
|
|
River Jam S 5.11+ 7a 24 VIII 24 E4 6a |
|
|
River Mild, The S,TR 5.10c 6b 20 VII 20 E2 5b |
|
|
River Walk T,S 5.10+ 6b+ 21 VII+ 20 E3 5b |
|
|
River Wild, The S 5.12c 7b+ 27 IX- 27 E6 6b |
|
|
Slacker S 5.12c/d 7c 28 IX 28 E6 6b |
|
|
Splash S 5.11c/d 7a 24 VIII 25 E4 6a |
|
|
Take Me to the River S,TR 5.11a 6c 22 VII+ 22 E3 5c |
|
|
Up A Creek T 5.11c 6c+ 24 VIII- 24 E4 6a |
|
|
Viagra Falls S 5.12b/c 7b+ 27 IX- 27 E6 6b |
|
|
Water Sports S 5.9+ 5c 17 VI 17 E1 5a |
|
|
Water Sports Direct Start S 5.11- 6c 22 VIII- 22 E3 5c PG13 |
|
|
White Water S 5.12a 7a+ 25 VIII+ 25 E5 6a |
| Elevation: | 6,351 ft | 1,936 m |
| GPS: |
39.7373, -105.3189 Google Map · Climbing Area Map |
|
| Page Views: | 63,310 total · 209/month | |
| Shared By: | Ramin Jamshidi on Dec 31, 2000 · Updates | |
| Admins: | Leo Paik, John McNamee, Frances Fierst, Monty, Monomaniac, Tyler KC |
 Access Issue: Seasonal Raptor Closures
Details
Access Issue: Seasonal Raptor Closures
Details
Raptor Closures Effective February 1-July 31
Visit: jeffco.us/open-space/news/2…
Tunnel 1 closure
For more details visit: jeffco.us/open-space/alerts…

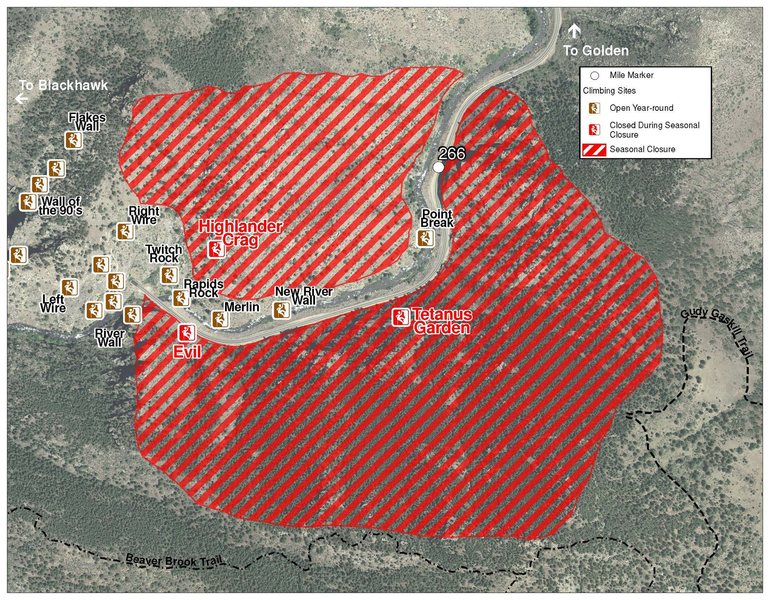
The two areas Jefferson County Open Space intends to close in Clear Creek Canyon, shown on the attached maps, encompass the active eagle nests. If the Clear Creek eagles continue to nest in the active nests, these areas will remain closed from February 1 through July 31. If the eagles choose different nesting sites, the closures will be adjusted accordingly to protect those eagles during their breeding season.
Currently, rock climbing areas that fall inside of the seasonal raptor closures include:
Blonde Formation
Bumbling Stock
Evil Area
Ghost Crag
Highlander
Skinny Legs
Stumbling Block
Tetanus Garden
Fault Caves
Description

A unique climbing area perched above Clear Creek. The setting is beautiful and there is essentially no approach; you just have to put up with the quarry trucks roaring through the tunnel. Tricky slab routes on the lower part of the wall, and more varied, powerful climbs on the upper half. There are a number of truly enjoyable climbs here. Most climbs are accessed via a large ledge split in two by a giant boulder (see picture). This ledge caps the lower series of climbs and forms the base of the upper set. There are two means of accessing this central area: The Put In (5.7) heads up from road level just a few yards away from the start of the bridge railing. From these anchors, you can climb Overflow or traverse right along the ledge (5.2) past a few bolts to reach the left side of the main ledge. Walk along the wall down to the river, where you can climb Bottom Side Down (5.10d) straight up to the left side of the main ledge. The right side of the belay ledge can be accessed by squeezing behind the boulder (take your pack off first!). River Wall requires a 60m rope and some forethought in rope management. A note on leading the lower climbs: rap down on one rope and carry a second to lead out on. Each of the lower climbs has a 2-bolt belay station just above the water where the belayer will have to mind the rope as much as the climber. (Dry treated rope will do no good if it's floating down the river.) Alternatively, on your way down you can hang draws and clip in one end of your rap line. At the bottom, pulling the rap line down through the draws should keep your rope from flying down into the drink.
This crag is generally in the shade.
Getting There
River Wall is right across the river from High Wire. Get on US 6 from Golden, going west. The wall is on the east side of the bridge immediately east of Tunnel 2 (4.9 miles from Tunnel 1). It's best to park on the north side of the highway, about 1/4 mile east Tunnel 2. From the cars, walk west toward the bridge & tunnel, but stay south-east of the bridge (that is, don't cross over the bridge as though going to High Wire). The wall is right there on the south-east corner of the bridge.
L->R:

Wall left:
A. Evil, 13, 1p, bolts.
Lower Wall:
B1. The Put In, 8, 1p, 60', bolts.
B2. Original Route, 9 PG-13, 1p, 60', gear & old bolts.
C. Muddy Waters, 9+, 1p, 80', bolts.
D. Old Man River, 10, 1p, bolts, 85'.
E1. Up A Creek, 11, 1p, bolts.
E2. Float Trip, 12-, 1p, bolts.
F. Bottom Side Down, 10+, 1p, 85', bolts.
G. The River Mild, 10, 1p, 85', bolts.
GH. Grilled Trout, 10+, 1p, bolts, linkup.
H. Grilled Trout, 10+, 1p, 85', bolts.
I. Take Me To The River, 11-, 1p, 85', bolts.
J. Flood Control, 10, 1p, 85', bolts.
K? Kor Route, 1p, 85', gear.
L? Family Unit, 9, 1p, bolts & gear.
M. Riffle, 2, traverse along ledge between lower & upper walls.
Upper Wall:
L. Overflow, 11, 1p, 40', bolts.
M. The River Wild, 12+, 1p, 70' (*), bolts.
N. Viagra Falls, 12, 1p, 70' (*), bolts.
O. White Water, 12-, 1p, 70' (*), bolts.
P. Splash, 11, 1p, 70' (*), bolts.
Q. Adventure Kayak Trundle, 12-, 1p, 100', bolts.
S. River Dance, 12, 1p, 80', bolts.
T. River Jam, 12-, 1p, 100', bolts.
U. Slacker, 12-, 1p, bolts.
V. Human Rites, 11, 1p, 60', bolts.
W. Right to Life, 12-, 1p, bolts.
X. Right To Laugh, 9+, 1p, bolts. Location?
Y1. Water Sports, 9+, 1p, 120', bolts.
Y2. Clear Water Revival, 9, 1p, 115', bolts.
Y3. River Walk, 10+, 3p, 225', bolts & gear.
Z1. Beach Front, 9, 1p, 100', bolts & gear.
Z2. Goin' Fishin', 11+, 1p, 100', bolts.
Nelsonator I, location?
Nelsonator II, location?
Nelsonator III, location?
(*) = a 60m rope is preferred for descent due to the overhanging nature of the route & the falling away of the terrain below the anchors.
Classic Climbing Routes at River Wall
Weather Averages
|
High
|
Low
|
|
Precip
|
Days w Precip
|
| J | F | M | A | M | J | J | A | S | O | N | D |
| J | F | M | A | M | J | J | A | S | O | N | D |
Photos


![The River Wall.<br>
<br>
[[L->R]]http://www.mountainproject.com/v/river-wall/105744714 for the crag.](https://mountainproject.com/assets/photos/climb/1300884_smallMed_1557850374.jpg?cache=1757172199)


All Photos Within River Wall
Most Popular · Newest · RandomMore About River Wall
Printer-FriendlyWhat's New
Guidebooks (16)


3 Comments