Continue with onX Maps
 Continue with Facebook


climb tech wave bolt on overhangs?


|
jonathan knight wrote:Sounds like more of an issue of the adhesive kicking too fast due to warm temps. We've enjoyed using these plastic mallets , but we keep a Wave bolt installation tool and a steel hammer handy.That plastic mallet seems much better. That I could be convinced of. I don't think it had to do with the glue, the rubber mallet was just bouncing off without doing anything. I started hammering immediately and in under a minute the bolt stopped progressing. Total bummer. |
|
|
Great point 20kN. Bit of a tangent, but I wonder how the amount of stress factors into the potential for SCC. |
|
|
This is a pretty cool video on wavebolts for anyone that might be interested: |
|
|
Rubber or plastic hammers are not the tool you want for installing interference style glue-ins. While Jim Titt's solution of welding a stainless face to a steel hammer is a good one and I've considered it, there's really no need for anything fancy hammer wise. I just carry my regular hammer and one or two 1x1x6" pieces of hardwood (ironwood or elm if you have it) in my bolt bag. I've installed hundreds of Wave bolts this way; the 8mm version that can be freakin' hard to pound in, and that Climbtech doesn't seem to be making anymore. It's ridiculous I know, but I don't like the skimpy look of 6mm material and have switched over to Jim's 8mm twisted leg bolt. Here's a pic of a 8mm bolt-product and the 6mm Wave to compare. 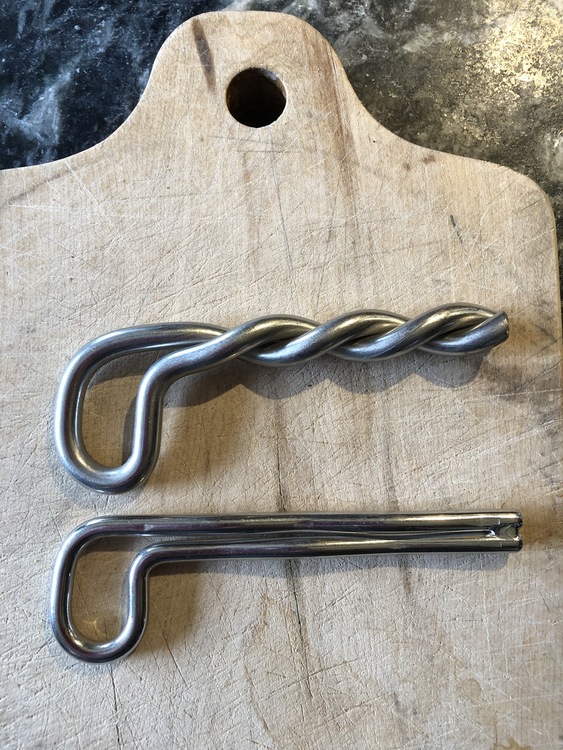 |
|
|
Garry, a rubber dead blow hammer works wonderfully. The 8mm twist bolts are great, no hammering is necessary for the ones I've been using in sandstone with a 5/8'' bit. I prefer to wiggle the drill some in softer stones when placing waves, otherwise you're introducing a lot of sand and dust into the hole as you pound it in and the bolt grinds against the side of the hole, it also increases corrosion resistance by having some glue in between the bolt and the rock. For overhangs and roof placements the hole gets wallowed less. |
|
|
Anonymous wrote: I'm not worried about pullout strength after cure, I was thinking of the fact that I have to clip into the bolt to even be close enough to the wall to even think about drilling the next hole. Even then its steep enough that its hard... Haha J achey, Greg, thx for the info, that's what I was looking to find out! you have two options in that case. 1) If you're developing ground up, then you should use ClimbTech's Removable Bolts (RB's) and hide the holes in pockets or patch them after you leave them. This can be expensive, though, as you'll need a full route's worth of these little tools (or more than a couple, at least). 2) Leave the old bolts in place so you can ascend and place the new bolts, then come back and chop the old ones. This is less than awesome, as it means you can't re-use the hole, but its the only practical way if you're installing glue-ins.Enough CT Removable bolts to do the job can be prohibitively expensive, imo. Titen HD are working awesome and they just unscrew when you are done. Then you can use the hole for a glue in, regular bolt or patch it etc: 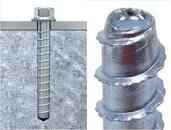 Cheap, extremely strong, easy to place, easy to remove...hopefully others can post their experiences with them if my lack of long term experience with them is missing something. Not an option for a permanent anchor though because they untighten so easily in a climbing application over time and you very much do not want to over torque them. Seem to be working great for a temporary "positioning" anchor. |
|
|
If you're going to use screw in bolts as directionals then patch them might as well use 1/4'' or 3/8''. If you're reusing the hole the 1/2'' ones are good. I don't see how a set of legacy that you reuse would be prohibitively expensive, as compared to rbs, they don't make them anymore however, but yeah more expensive than the screws. I agree that they wouldn't be good in a permanent application, though people will likely try after seeing the slackline testing videos. |
|
|
DrRockso wrote: Garry, a rubber dead blow hammer works wonderfully. The 8mm twist bolts are great, no hammering is necessary for the ones I've been using in sandstone with a 5/8'' bit. I prefer to wiggle the drill some in softer stones when placing waves, otherwise you're introducing a lot of sand and dust into the hole as you pound it in and the bolt grinds against the side of the hole, it also increases corrosion resistance by having some glue in between the bolt and the rock. For overhangs and roof placements the hole gets wallowed less. Ya Doc, those 8mm Waves really needed pounding! You make a good case for reaming the holes. I wondered about where the kinks scraped the walls but was too enamored by the thought that Waves could take a fall even without the glue.
|
|
|
An option that hasn't been discussed, and is the way that I bolt all of my routes, which practically all have been steeper than what you're describing, is to place cams for directionals on the way down, drill on the way up, then glue going back down, and collect your cams on the way out. Maybe the rock youre dealing with doesnt have enough features to do this successfully, but where im at, you can find a Totem placement 98% of the time. For reference, for a 100ft route, ill carry a double rack from .1-2 and a single 3 and 4, all Totems, Z4's, and Dragon cams, and a few small UL Master cams. This has got me down a lot of routes cleanly. |
|
|
Anonymous wrote: 2) Leave the old bolts in place so you can ascend and place the new bolts, then come back and chop the old ones. This is less than awesome, as it means you can't re-use the hole, but its the only practical way if you're installing glue-ins. I don't know what you mean by "chop". There's no chopping necessary. I've posted this several times before... You can use hardware store 3/8" x 3" expansion bolts (maybe shorter for granite) for your temporary anchor and intermediates to hold yourself close to the wall. Overdrill the holes all the way to the chuck. Place your glue-ins. When the glue is cured, go back up and remove the nuts, washers and hangers from your temp bolts. Pound them flush to the wall, then countersink them using an old drill bit backwards or other punch-like item such as a screwdriver, steel rod, etc.The temp bolts will just disappear, assuming you didn't badly scar the rock putting them in. The holes are small and hard to see even when right on top of them. I've actually asked people to look for them and they can't find them. |
|
|
Garry R wrote:If you're not using them until the glue cures, just drill a larger hole and skip the reaming. Yes, Jim's bolts and Titan Climbing bolts only need a light tap to keep them in place. Much better designs for 99% of the people who use them. |
|
|
I've gotta put in a provisional plug for the Wave installation tool. OK, it would be nice if it wasn't needed, but it really helps and is worth the investment if you plan to place a lot of Wave Bolts. One of the issues with driving Waves is that the bolt has no flat surface for striking. The rod stock forming the eye is angled, guaranteeing a somewhat glancing hammer blow. The tool gives you a big flat surface to hit and the Waves (long ago redesigned from the original specs so as to be much easier to drive) go in very easily if using the tool. You'll usually get a bit of glue on the tool as you drive the bolt home, so you have to wipe that, and it will be hard to tell if the eye is perfectly plumb, so you'll likely need to straighten the bolt once the tool is off. I use a small block of wood to avoid a direct blow from my non-stainless hammer. OK, agreed, somewhat of a pain in the ass, and an extra tool to carry and drop, but whatever, you get used to it and the system works. Another tip for Waves is - make sure you drill the hole a little deeper than you think you need. I've carefully measured (not wanting to waste glue), but then had the bolt bottom out a few millimeters too soon for how I wanted it to sit. My suspicion is that the "wave" in the rod stock straightens upon driving and the bolt gets a little longer. Also, DON'T use Waves as directionals while they are setting. Surely any force on them will flex the bolt within the glue, at least at the surface, but more importantly any sideways force will definitely pull the eye out of plumb. And that's just plain ugly! |
|
|
I have a Wave Bolt install tool that I'd sell someone for a reasonable price if interested. I'm not a fan, and personally recommend a hard rubber mallet. PM me if interested. |
|
|
A hard rubber mallet will not work in hard rock without reaming. |
|
|
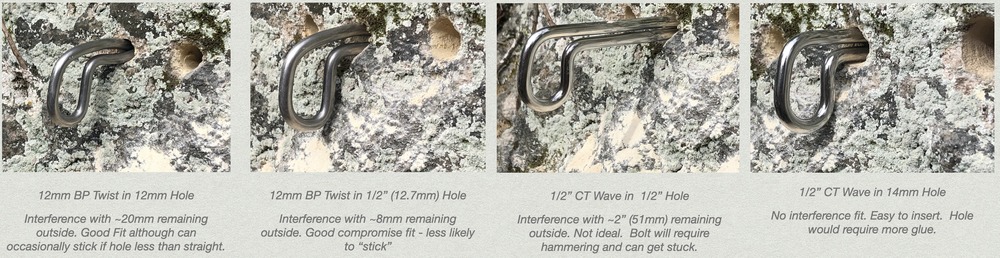
I've done some testing of 12mm Twists, and 1/2" Waves in various holes sizes to see how they each fit. Results below. I never had a lot of 12mm bits so I was perfectly happy using 1/2" with the BP twists. The Waves were always a PITA to get in a 1/2" hole and in the past I just went up to 9/16th". Recently, 14mm SDS bits have become a lot easier to locate on eBay or online for $10ish so 14mm seems like a good way to go for those using Waves. EDIT - I updated the picture after Jim pointed out I have "USA" BP twists. 12mm but the flare near the end is slightly wider for 1/2" US holes. See his comments below. 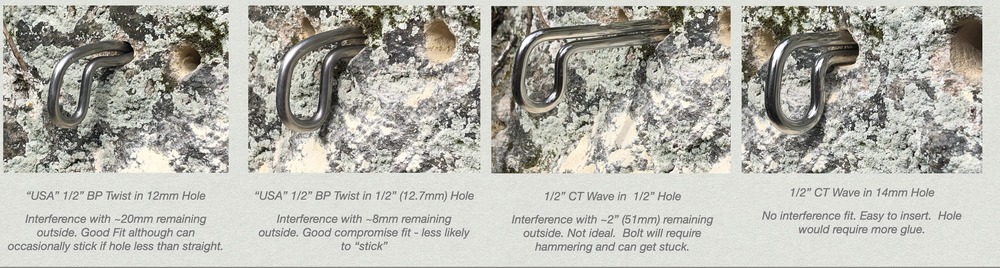 |
|
|
mattm wrote: I've done some testing of 12mm Twists, and 1/2" Waves in various holes sizes to see how they each fit. Results below. I never had a lot of 12mm bits so I was perfectly happy using 1/2" with the BP twists. The Waves were always a PITA to get in a 1/2" hole and in the past I just went up to 9/16th". Recently, 14mm SDS bits have become a lot easier to locate on eBay or online for $10ish so 14mm seems like a good way to go for those using Waves. Well a slight correction, the Bolt Products twisted leg bolts are 1/2" and have their own product number, the 12mm version is different. We make the 1/2" specially to fit a 1/2" hole for the USA. The slight bend on the top leg at the eye is the difference |
|
|
Jim Titt wrote: So I have 1/2" US BP pictured? I'll update the slide and info ASAP. I vaguely recall a 12mm vs 1/2" re-tool way back in the pre Team Tough days but wasn't sure that had continued. The fact it went most of the way in 12mm hole also had me wondering. |
|
|
mattm wrote: I've done some testing of 12mm Twists, and 1/2" Waves in various holes sizes to see how they each fit. Results below. I never had a lot of 12mm bits so I was perfectly happy using 1/2" with the BP twists. The Waves were always a PITA to get in a 1/2" hole and in the past I just went up to 9/16th". Recently, 14mm SDS bits have become a lot easier to locate on eBay or online for $10ish so 14mm seems like a good way to go for those using Waves. Yep, the 14mm bits are just about perfect for wave bolts, and they aren't that expensive anymore either which is great! As noted, the only real downside is that it requires more glue (as long as you don't need to hang on the bolt immediately). |
|
|
mattm wrote: Yup, that's a 1/2". They should go in nearly all the way loose, the kink at the end is just to hold them in place (they measure ca. 13.4mm there). |
|
|
After flatening the eye of a Wave bolt early on i have been starting the hole with 9/16 or 14mm to a depth of 1.5 inch. Then finish the hole with 1/2. The bolt still rings as it goes in. Northern TN softish sand stone. I use the instal tool any way. The 9/16 bit can be worn and doesnt have to replaced often using it like this. |