Continue with onX Maps
 Continue with Facebook


What does your Woody look like???


|
Eliot Augusto wrote: You could get a really light colored stain and mix the sand with that. Go light and the sand and put in two coats? The negative of that is that where there isn't sand it will be really slippery for a while.Only the prime will work? |
|
|
Sanllan wrote: Only the prime will work?Any primer I've dealt with has been gray or white. Some shades of tan too. But my experience is limited to house construction. The whole point of primer is to make the next coat last longer and be a more uniform color. I guess I don't get putting primer on if you want to keep the color of wood. |
|
|
O.k. so, instead of using primer i´m thinking of something else but first i´m going to point out two things. |
|
|
I bet that would work just fine. The only problem I foresee when it comes to aesthetics, is making sure the wood panels match to themselves. I have many different angles in my cave, and I'm by no means a professional carpenter, so getting the panels to match with no gaps between them didn't work out very good for me. I used an electronic level and a t bevel before cutting each panel, but still found that minor variations in the plywood (<1 degree), and the fact that my house has settled in its old age, added up to a significant gap when fitting the panels together. I ended up using a whole lot of Alex plus caulk in these gaps, and while you can barely tell there is space between the panels now, it required paint to cover up my mistakes. If you're only doing a simple systems wall, this shouldn't be a problem, but anything more complex, be prepared for the plywood not to match together. |
|
|
Didn't stain or paint mine. There was definitely a problem with the holds spinning, so I just drilled holes for set screws in most of them. Smearing on the ply really does work without any texture added, you just have to have enough oppositional force. |
|
|
Has anyone tried building under an outside deck? I figure the support is already there, just add the walls right? What would one do about water from the top? Would it be worthwhile to insulate it a bit for cold winters? Thanks |
|
|
Tyler Newcomb wrote:Has anyone tried building under an outside deck? I figure the support is already there, just add the walls right? What would one do about water from the top? Would it be worthwhile to insulate it a bit for cold winters? ThanksI built my wall under my deck and it has been great. I finished it a couple years ago, and I'm finally posting up. My wall spans 16 feet with an 8 foot wide 15 degree overhanging section on the left side and an 8 foot wide 30 degree overhang on the right side. The wall is 8 ft vertical (I wish I had an extra 4 feet at least). I framed the wall with pressure treated 2X6's spaced at 24". I mounted the frame to two 4x4 supports for the deck and the whole thing is solid. I recently put a vertical section on the back side using 2x4 framing and it's solid too. 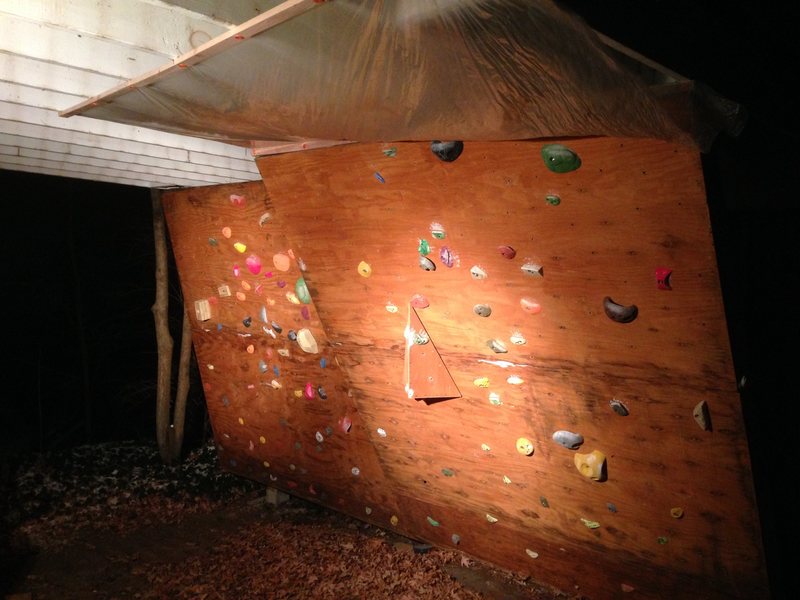 Water has been a slight problem, and I haven't solved the issue completely. If you look in the photo you can see the 30 degree overhanging section on the right has a plastic tarp tacked into the joists above it. It works all right, but I can't climb in a downpour or the day after one due to dripping, although I can climb in light rain without a problem. Before installing the plastic I would climb on the overhanging parts in light rain and the steepness of the wall helped keep out the rain for an hour or so. If anybody else has any ideas on keeping a woody under a deck dry during the rain I'd love to hear them. Edited: to answer your question about the cold... I can climb comfortably on it when it's 30 with no wind. I always have the option of coming back inside in between attempts to warm up the fingers if it gets too cold. I've climbed on it through two winters so far and I just avoid the coldest times like right now (single digits, negative with wind chill). I thought about adding a section on the far left side to block the wind, but I don't have vertical support beams to mount too and I wouldn't want to hang it off a single joist or two. All in all I've been pretty please with this wall for a first woody. |
|
|
Kenny Clark wrote: If anybody else has any ideas on keeping a woody under a deck dry during the rain I'd love to hear them. Edited: to answer your question about the cold... I can climb comfortably on it when it's 30 with no wind. I always have the option of coming back inside in between attempts to warm up the fingers if it gets too cold. I've climbed on it through two winters so far and I just avoid the coldest times like right now (single digits, negative with wind chill). I thought about adding a section on the far left side to block the wind, but I don't have vertical support beams to mount too and I wouldn't want to hang it off a single joist or two. All in all I've been pretty please with this wall for a first woody.Maybe install some plastic/metal roof panels directly onto the bottom of the deck and get creative with the drainage into a good spot: homedepot.com/p/Metal-Sales… Looks like you have an opportunity to add a climbing roof to your wall which would easily add a few more moves to your wall as well. Not sure how to integrate with a waterproof roof but just an idea. |
|
|
As far as cold goes, I was also looking at the idea of building an are in there for gear and using it as a hang out place, since it's my parents house (being a high school student). So insulation would need to be at least decent, keep it 60 degrees w/ a space heater or two |
|
|
Kenny Clark wrote:If anybody else has any ideas on keeping a woody under a deck dry during the rain I'd love to hear them.I don't know exactly how they did it, but in the condo we used to live at, some of the lower decks were sheltered from the decks above. It was some kind of construction that allowed rain and moisture to be drained off underneath the upper deck. Sort of like a roof for the lower deck. They seemed to work really well. A google search or consulting with a builder would probably answer how exactly it was done and would seem to answer the question for your woody as well. |
|
|
Depending on the deck size. Use a tarp and hang it on the under side off the rafter supports. Next to the house hang it higher then the side you want it to drain on only needs to be a 1/4 inch for every ten feet. To keep it tight maybe use straps that you can tighten to make the tarp taut. Simple and cheap. |
|
|
It may be tedious, but for a more permanent solution would it work to put some thin marine grade ply in between each rafter slightly slanted amd then caulk it to seal. Then you could directly attach the climbing roof to the rafters? |
|
|
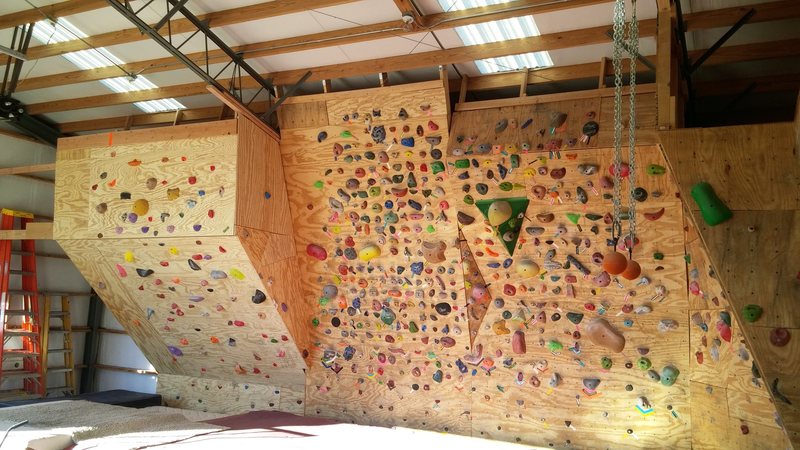
Done! Finally finished the 45 degree section. For reference, the yellow ladder on the left is six feet, the orange one is a ten footer. 500+ sq feet total. |
|
|
Good thing we put what is certainly meant to be a dog bed directly under the woody. Here's a cool thing, though: chalkboard paint! |
|
|
Nice idea about the paint, Garth. |
|
|
Chalkboard paint seems like a great idea. I used deck paint, and it's really difficult to mark routes with tape. It's always peeling off. Chalkboard paint, I suppose you just mark routes with chalk. Does anyone know if there's more natural colored chalkboard paint (i.e. looks like natural rock)? I like the aesthetic of my walls colors, but am sick of route tape falling off. |
|
|
Yea great idea. Again how many coats? Drying time? And do the holds stick to the paint? I'm not worried about texture. ( I remember reading after I painted my wall with a paint and sand mixture--- "if you can smear on plywood you can smear on anything". After that I slapped myself in the head and scrapped off all the sand cause it just cut you up if you popped off a hold). I did tinker with make laminated colored paper. The problem was you need so many different sizes and the holds would some times spin. Can't wait to try this on my new home wall. |
|
|
Garth wrote:Good thing we put what is certainly meant to be a dog bed directly under the woody. Here's a cool thing, though: chalkboard paint!  Garth, love seeing the kids having a blast. Your photo looked pretty darn similar to this one...awesome! |
|
|
Hoff wrote: Garth, love seeing the kids having a blast. Your photo looked pretty darn similar to this one...awesome!Looks great, Hoff! And cheers, all. The chalkboard paint isn't a great texture for feet -- a little slippy -- but it's so easy to mark routes! We leave the good ones and easily erase the rest. We used two coats of pretty generic black chalkboard paint (got it at Lowes). We let it dry extra long and the holds don't seem to stick too bad. Now if I could just get the non-furry varmints off it, and the furry varmints out from underneath it, maybe it'd make a decent training wall... |
|
|
Thanks Garth. |